阿里P8重磅总结:看完别说不会了哦,SpringBoot「完结篇」
“
本文主要介绍 SprinBoot如有需要,可以参考如有帮助,不忘 点赞 ❥
一、 缓存
CachingProvider
CacheManager
Cache
Entry
Expiry
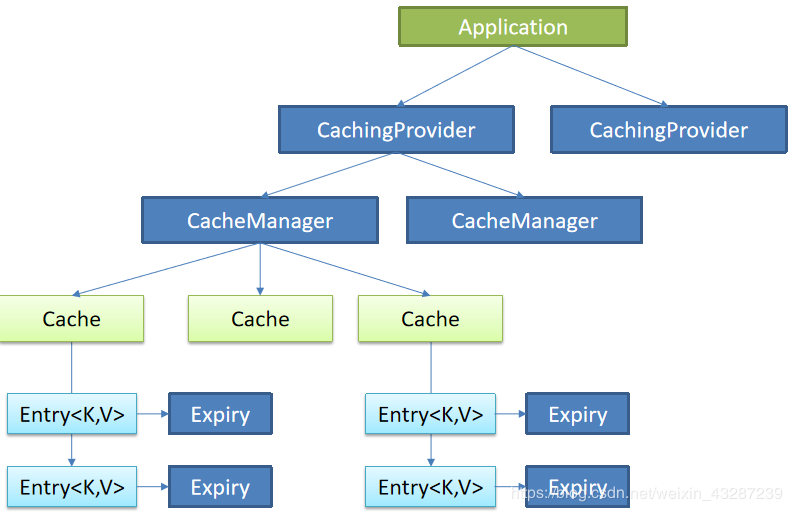
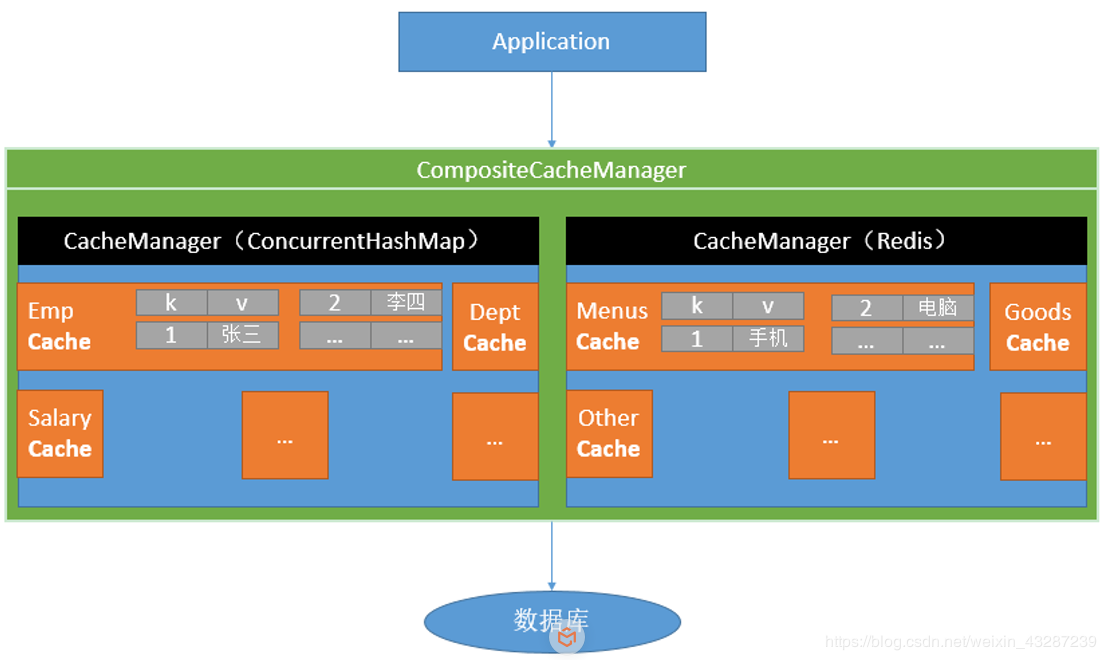
Cache接口为缓存的组件规范定义,包含缓存的各种操作集合
Cache接口下Spring提供了各种xxxCache的实现;如RedisCache,EhCacheCache ,ConcurrentMapCache等
每次调用需要缓存功能的方法时,Spring会检查指定参数的指定的目标方法是否已经被调用过,如果有就直接从缓存中获取方法调用后的结果,如果没有就调用方法并缓存结果后返回给用户。下次调用直接从缓存中获取。
使用Spring缓存抽象时我们需要关注以下两点:


引入spring-boot-starter-cache模块
    org.springframework.boot
    spring-boot-starter-cache

复制代码
利用@EnableCaching开启缓存
@MapperScan("cbuc.life.cache.mapper")
@SpringBootApplication
@EnableCaching
public class Springboot01CacheApplication {
    public static void main(String[] args) {
        SpringApplication.run(Springboot01CacheApplication.class, args);
    }
}
复制代码
注解使用
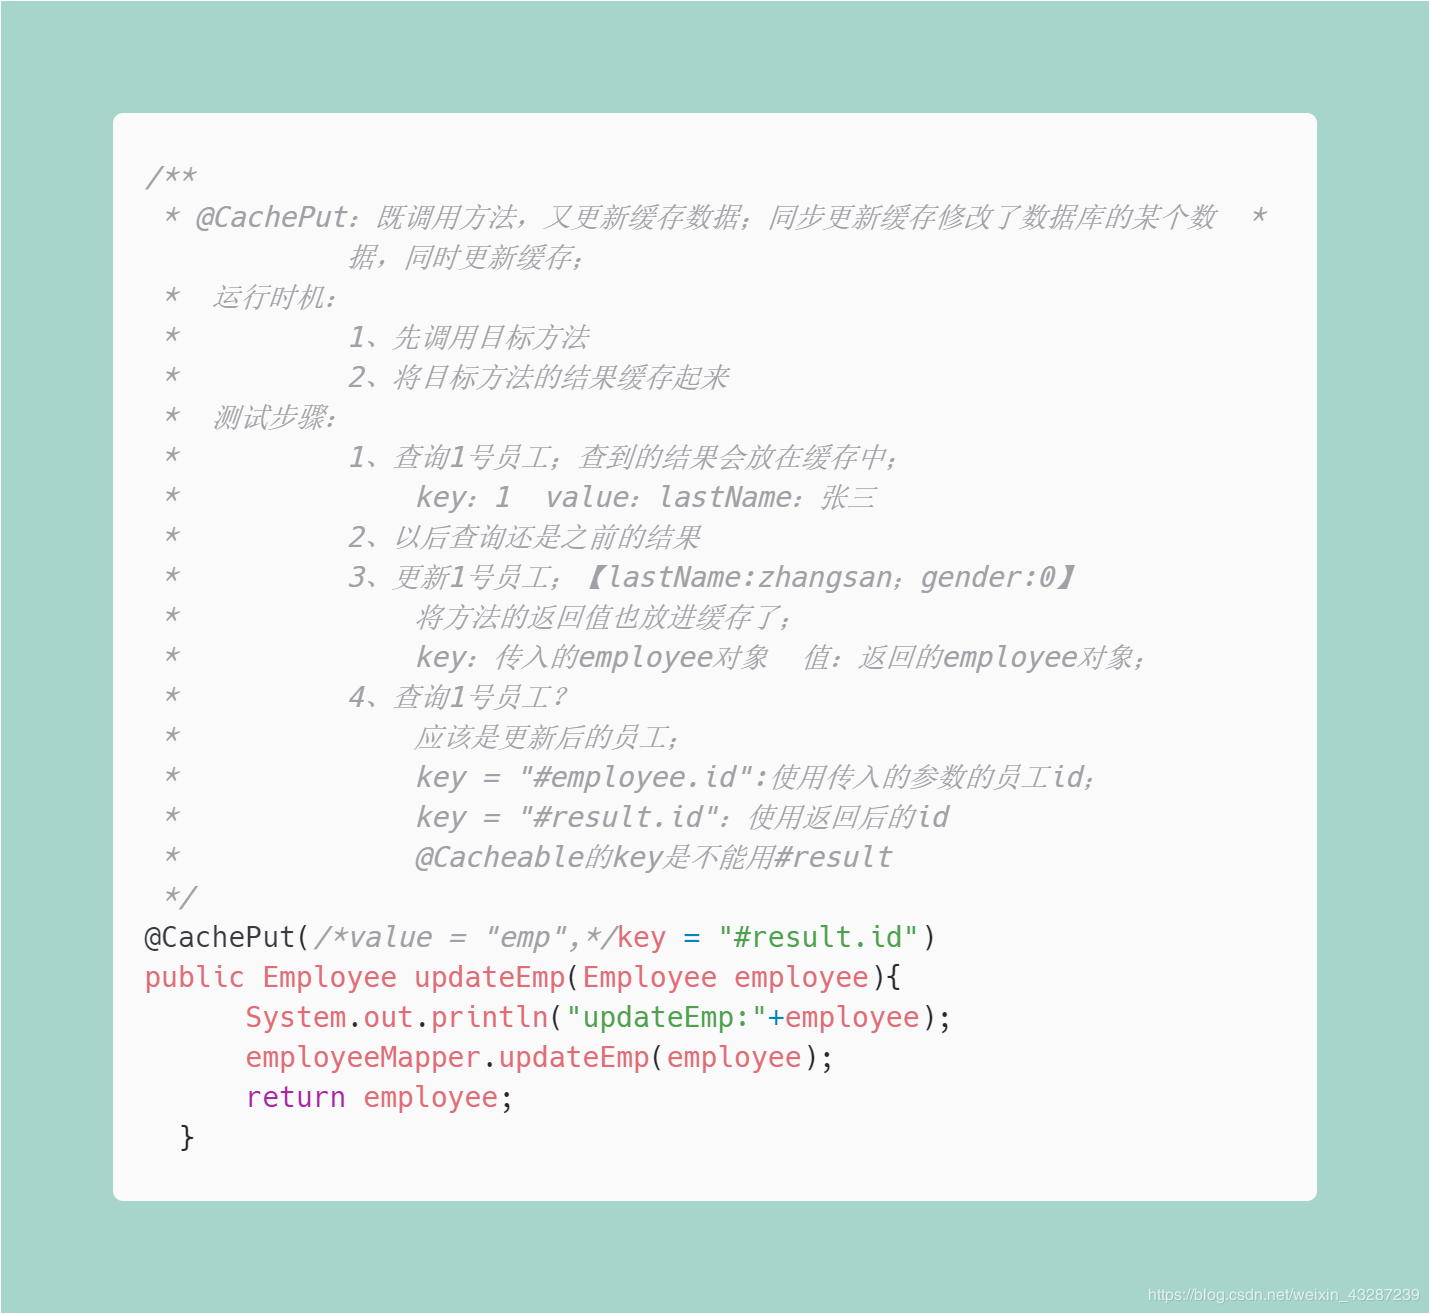
示例1)


    org.springframework.boot
    spring-boot-starter-data-redis

复制代码spring.redis.host=118.24.44.169
复制代码


二、消息
消息代理(message broker)
目的地(destination)
队列(queue):点对点消息通信(point-to-point)
主题(topic):发布(publish)/订阅(subscribe)消息通信
消息发送者发送消息,消息代理将其放入一个队列中,消息接收者从队列中获取消息内容,消息读取后被移出队列
消息只有唯一的发送者和接受者,但并不是说只能有一个接收者
发送者(发布者)发送消息到主题,多个接收者(订阅者)监听(订阅)这个主题,那么就会在消息到达时同时收到消息
基于JVM消息代理的规范。ActiveMQ、HornetMQ是JMS实现
高级消息队列协议,也是一个消息代理的规范,兼容JMS
RabbitMQ是AMQP的实现
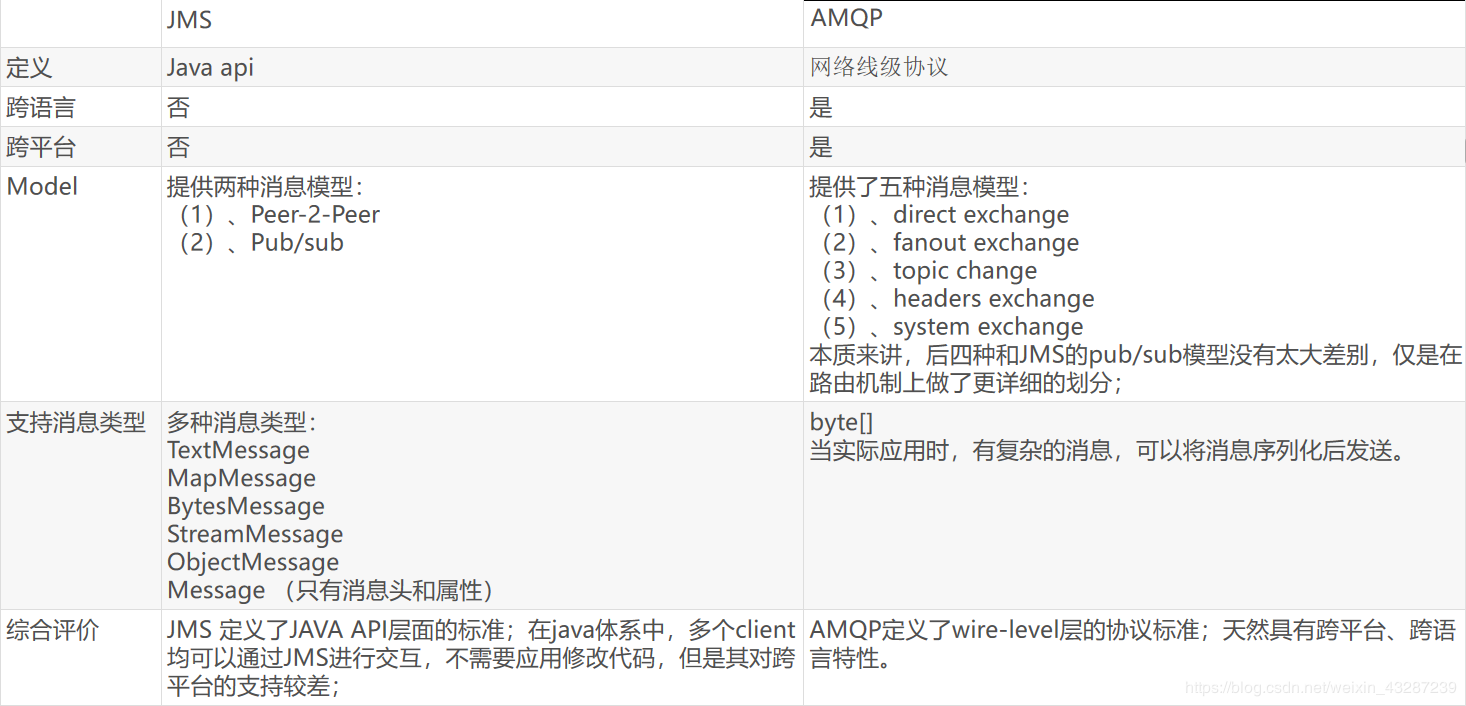
spring-jms提供了对JMS的支持
spring-rabbit提供了对AMQP的支持
需要ConnectionFactory的实现来连接消息代理
提供JmsTemplate、RabbitTemplate来发送消息
@JmsListener(JMS)、@RabbitListener(AMQP)注解在方法上监听消息代理发布的消息
@EnableJms、@EnableRabbit开启支持
JmsAutoConfiguration
RabbitAutoConfiguration
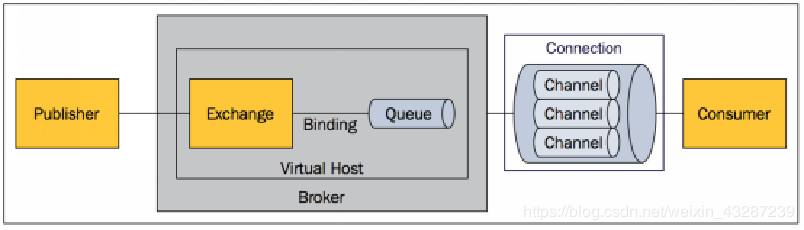
Message:
消息,消息是不具名的,它由消息头和消息体组成。消息体是不透明的,而消息头则由一系列的可选属性组成,这些属性包括routing-key(路由键)、priority(相对于其他消息的优先权)、delivery-mode(指出该消息可能需要持久性存储)等。
Publisher:
消息的生产者,也是一个向交换器发布消息的客户端应用程序。
Consumer:
消息的消费者,表示一个从消息队列中取得消息的客户端应用程序。
Exchange:
交换器,用来接收生产者发送的消息并将这些消息路由给服务器中的队列。
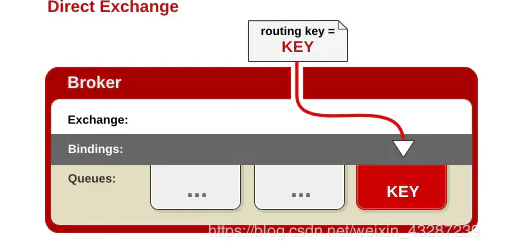
不同类型的Exchange转发消息的策略有所区别 direct(默认)
fanout
topic
headers
Queue:
消息队列,用来保存消息直到发送给消费者。它是消息的容器,也是消息的终点。一个消息可投入一个或多个队列。消息一直在队列里面,等待消费者连接到这个队列将其取走。
Binding:
绑定,用于消息队列和交换器之间的关联。一个绑定就是基于路由键将交换器和消息队列连接起来的路由规则,所以可以将交换器理解成一个由绑定构成的路由表。Exchange 和Queue的绑定可以是多对多的关系。
Connection:
网络连接,比如一个TCP连接。
Channel:
信道,多路复用连接中的一条独立的双向数据流通道。信道是建立在真实的TCP连接内的虚拟连接,AMQP 命令都是通过信道发出去的,不管是发布消息、订阅队列还是接收消息,这些动作都是通过信道完成。因为对于操作系统来说建立和销毁 TCP 都是非常昂贵的开销,所以引入了信道的概念,以复用一条 TCP 连接。
Virtual Host:
虚拟主机,表示一批交换器、消息队列和相关对象。虚拟主机是共享相同的身份认证和加密环境的独立服务器域。每个 vhost 本质上就是一个 mini 版的 RabbitMQ 服务器,拥有自己的队列、交换器、绑定和权限机制。vhost 是 AMQP 概念的基础,必须在连接时指定,RabbitMQ 默认的 vhost 是 / 。
Broker:
表示消息队列服务器实体
AMQP 中的消息路由

Exchange 类型


引入 spring-boot-starter-amqp
    org.springframework.boot
    spring-boot-starter-amqp

复制代码
application.yml配置
spring.rabbitmq.host=118.24.44.169
spring.rabbitmq.username=guest
spring.rabbitmq.password=guest
复制代码
启动类

自定义消息转换器,以Jackson的形式转换
@Configuration
public class MyAMQPConfig {
    @Bean
    public MessageConverter messageConverter(){
        return new Jackson2JsonMessageConverter();
    }
}
复制代码
注入Bean
/**
* 注入我们需要的两个bean
*/
@Autowired
RabbitTemplate rabbitTemplate;
@Autowired
AmqpAdmin amqpAdmin;
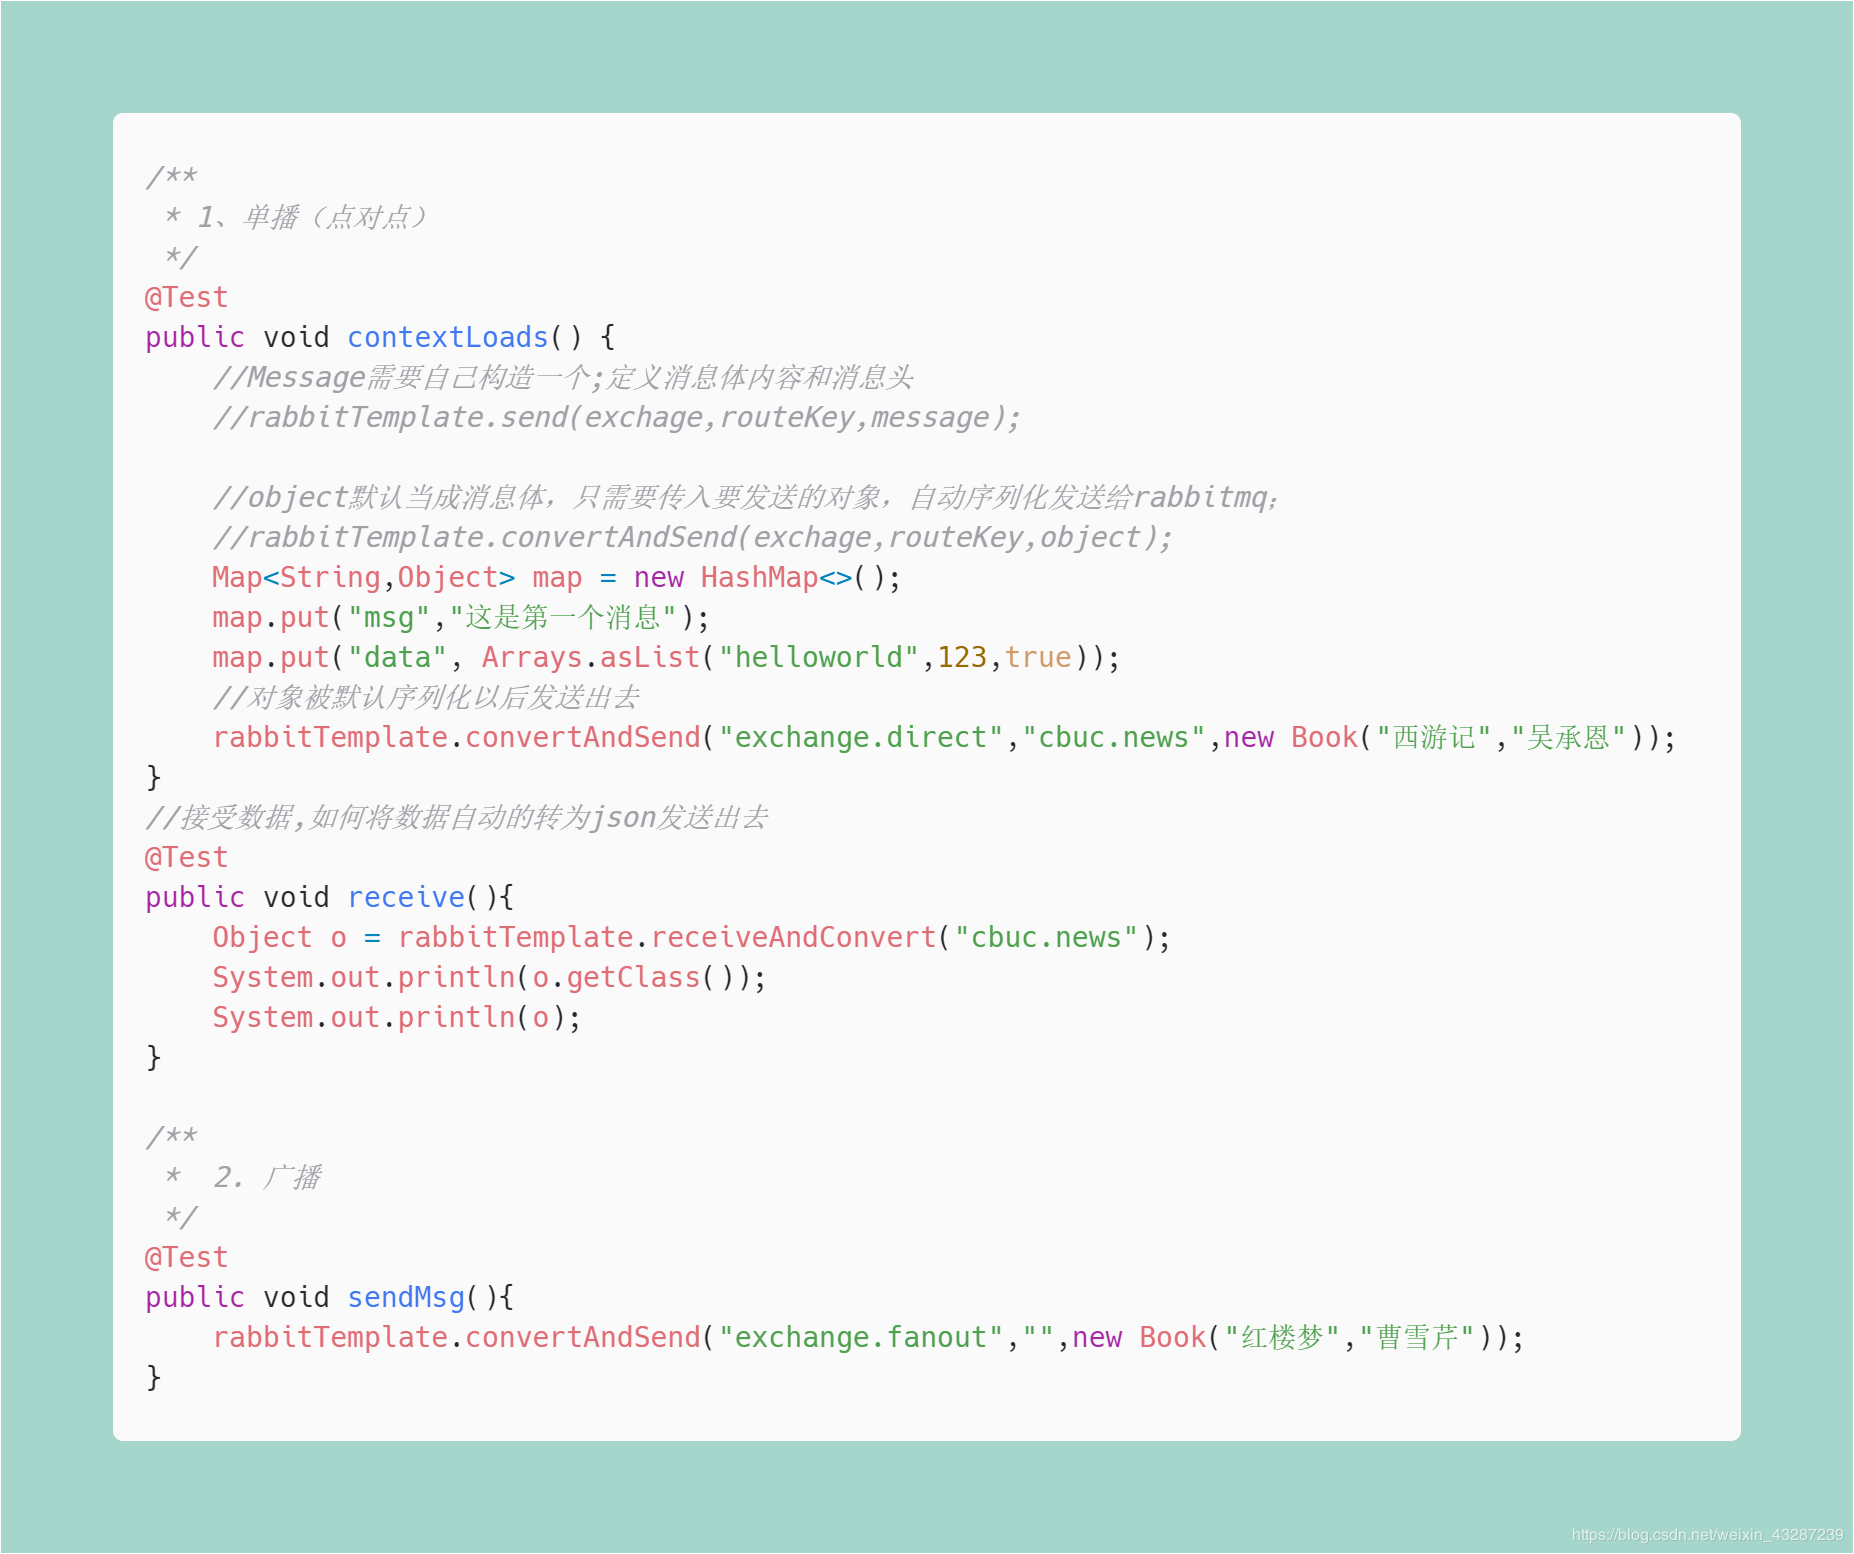
复制代码不同模式发送

三、检索
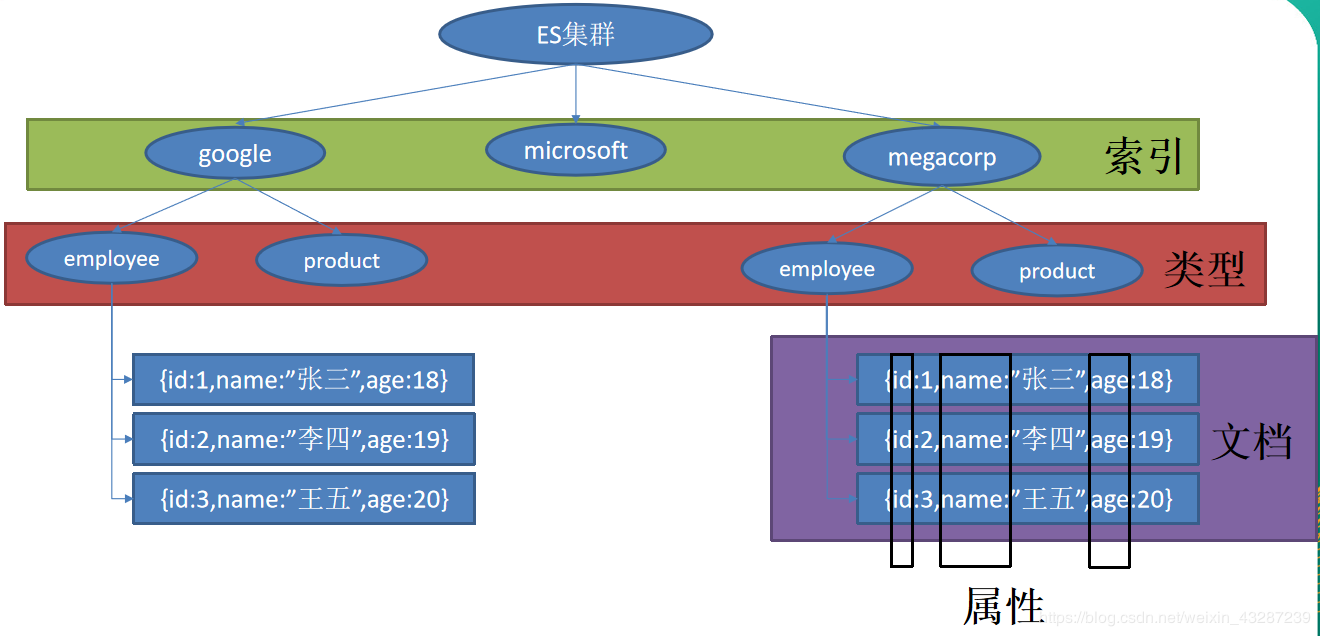
索引 ==== 数据库
类型 ==== 表
文档 ==== 表中的记录
属性 ==== 列
Jest(默认不生效)
    io.searchbox
    jest
    5.3.3

复制代码
SpringData ElasticSearch
    org.springframework.boot
    spring-boot-starter-data-elasticsearch

复制代码
spring.data.elasticsearch.cluster-name=elasticsearch
spring.data.elasticsearch.cluster-nodes=118.24.44.169:9301
复制代码注入Bean:
@Document(indexName = "cbuc",type = "book")
public class Book {
    private Integer id;
    private String bookName;
    private String author;
    //省略 get/set方法
}

public class Article {
    @JestId
    private Integer id;
    private String author;
    private String title;
    private String content;
    //省略 get/set 方法
}
复制代码
编写 ElasticsearchRepository:
public interface BookRepository extends ElasticsearchRepository {
    //参照 https://docs.spring.io/spring-data/elasticsearch/docs/3.0.6.RELEASE/reference/html/
   public List findByBookNameLike(String bookName);
}
复制代码
引入所需要的Bean:
@Autowired
JestClient jestClient;
@Autowired
BookRepository bookRepository;
复制代码Book book = new Book();
book.setId(1);
book.setBookName("西游记");
book.setAuthor("吴承恩");
bookRepository.index(book);
复制代码for (Book book : bookRepository.findByBookNameLike("游")) {
System.out.println(book);
}
复制代码//给Es中索引(保存)一个文档:
Article article = new Article();
article.setId(1);
article.setTitle("测试");
article.setAuthor("cbuc");
article.setContent("测试检索");
//构建一个索引功能
Index index = new Index.Builder(article).index("cbuc").type("news").build();
//执行
jestClient.execute(index);
复制代码//查询表达式
@Test
public void search(){
//查询表达式
String json ="{\n" +
" \"query\" : {\n" +
" \"match\" : {\n" +
" \"content\" : \"hello\"\n" +
" }\n" +
" }\n" +
"}";
//更多操作: https://github.com/searchbox-io/Jest/tree/master/jest
//构建搜索功能
Search search = new Search.Builder(json).addIndex("cbuc").addType("news").build();
//执行
try {
SearchResult result = jestClient.execute(search);
System.out.println(result.getJsonString());
} catch (IOException e) {
e.printStackTrace();
}
}
复制代码四、任务
@EnableAysnc
@Aysnc
@EnableAsync  //开启异步注解功能
@SpringBootApplication
public class Springboot04TaskApplication {
    public static void main(String[] args) {
        SpringApplication.run(Springboot04TaskApplication.class, args);
    }
}
复制代码@Service
public class AsyncService {
//告诉Spring这是一个异步方法
@Async
public void test(){
try {
//当前线程睡眠 3 秒页面也能及时响应
Thread.sleep(3000);
} catch (InterruptedException e) {
e.printStackTrace();
}
System.out.println("处理数据中...");
}
}
复制代码@RestController
public class AsyncController {
@Autowired
AsyncService asyncService;
@GetMapping("/hello")
public String hello(){
asyncService.test();
return "success";
}
}
复制代码@EnableScheduling
@Scheduled
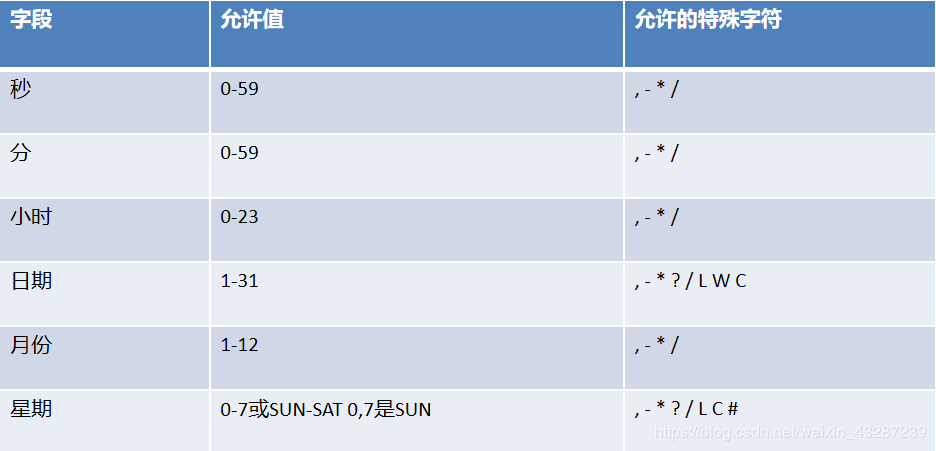
@EnableScheduling //开启基于注解的定时任务
@SpringBootApplication
public class Springboot04TaskApplication {
    public static void main(String[] args) {
        SpringApplication.run(Springboot04TaskApplication.class, args);
    }
}
复制代码
    org.springframework.boot
    spring-boot-starter-mail

复制代码
spring.mail.username=(发送人qq账号)
spring.mail.password=(发送人qq密码)
spring.mail.host=smtp.qq.com
spring.mail.properties.mail.smtp.ssl.enable=true
复制代码
五、分布式系统
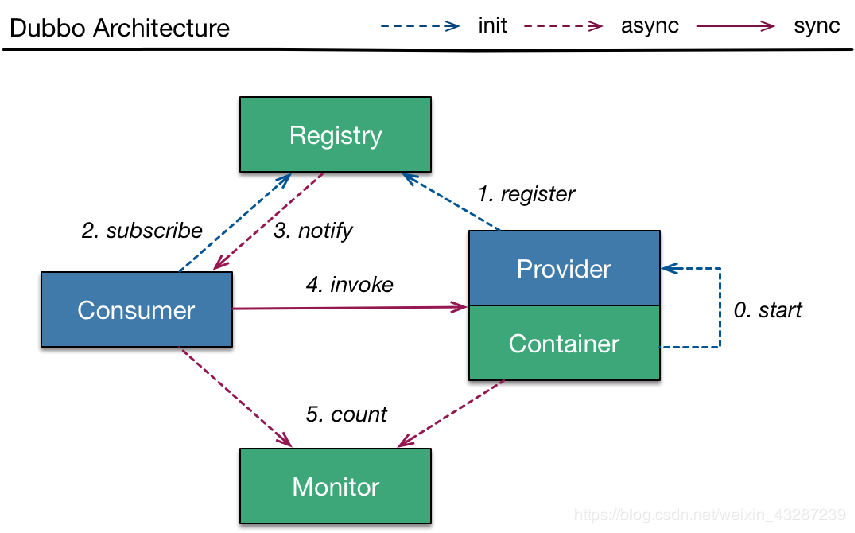
安装zookeeper作为注册中心
编写服务提供者
      com.alibaba.boot
      dubbo-spring-boot-starter
      0.1.0


      com.github.sgroschupf
      zkclient
      0.1

复制代码 dubbo.application.name=provider-ticket
dubbo.registry.address=zookeeper://118.24.44.169:2181
dubbo.scan.base-packages=cbuc.life.ticket.service
复制代码 @Component
@Service //将服务发布出去 注意注解 Service是dubbo包下的
public class TicketServiceImpl implements TicketService {
@Override
public String getTicket() {
return "《我和我的祖国》";
}
}
复制代码编写服务消费者
      com.alibaba.boot
      dubbo-spring-boot-starter
      0.1.0


      com.github.sgroschupf
      zkclient
      0.1

复制代码 @Service
public class UserService{
@Reference // 使用 Reference 引入服务
TicketService ticketService;
public void hello(){
String ticket = ticketService.getTicket();
System.out.println("调用买票服务:"+ticket);
}
}
复制代码服务发现 —— Netflix Eureka
客服端负载均衡 —— Netflix Ribbon
断路器 —— Netflix Hystrix
服务网关 —— Netflix Zuul
分布式配置 —— Spring Cloud Config
引入Eureka注册中心
            org.springframework.cloud
            spring-cloud-starter-eureka-server


            org.springframework.cloud
            spring-cloud-dependencies
            Edgware.SR3
            pom
            import


复制代码
配置application
server:
  port: 8761
eureka:
  instance:
    hostname: eureka-server  # eureka实例的主机名
  client:
    register-with-eureka: false #不把自己注册到eureka上
    fetch-registry: false #不从eureka上来获取服务的注册信息
    service-url:
      defaultZone: http://localhost:8761/eureka/
复制代码
启动类:
@EnableEurekaServer
@SpringBootApplication
public class EurekaServerApplication {
    public static void main(String[] args) {
        SpringApplication.run(EurekaServerApplication.class, args);
    }
}
复制代码
创建provider


创建consumer


原文链接:https://juejin.cn/post/6850037261661110285
最后,小编还整理出面试宝典,有需要的添加小助理vx:mxzFAFAFA来领取!!