面试官系列:你对Spring事件发布和广播监听有了解吗?
1、必须了解的Spring基础概念
1.1 BeanFacotry与ApplicationContext
1.1.1 BeanFactory 源码分析
我们回顾下Spring的小例子:
/**
* spring源码小例子
* @date: 2021/1/3 08:59
*/
@SuppressWarnings("deprecation")
public class BeanFactoryTest {
@Test
public void testSimpleLoad(){
//BeanFactory容器的使用
BeanFactory bf = new XmlBeanFactory(new ClassPathResource("beanFactoryTest.xml"));
MyTestBean bean = (MyTestBean) bf.getBean("myTestBean");
assertEquals("testBean", bean.getTestStr());
}
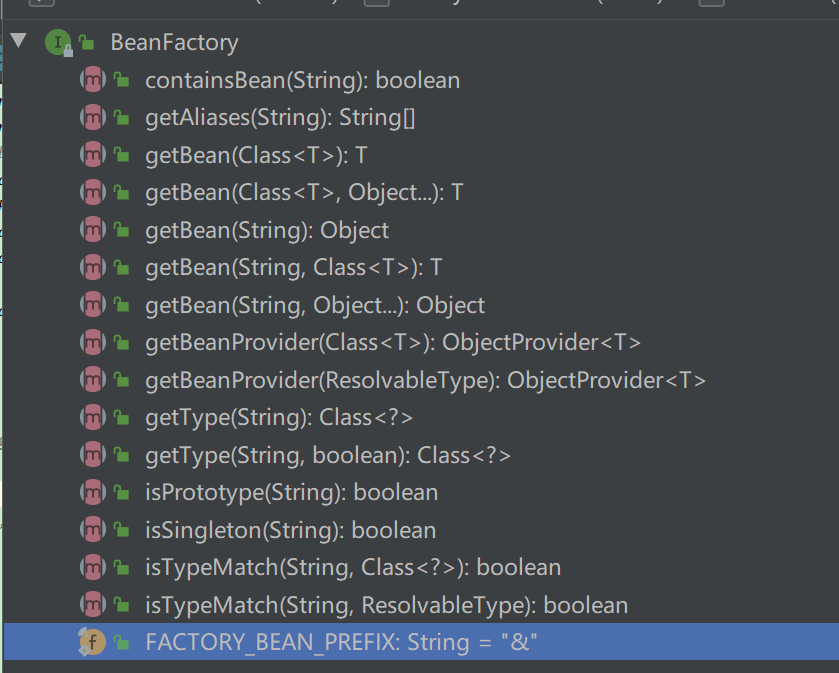
}BeanFactory 接口的定义方法列表:
接口位于类结构树的顶端, 它最主要的方法就是getBean(StringbeanName),该方法从容器中返回特定名称的Bean,BeanFactory 的功能通过其他的接口得到不断扩展。
BeanFactory.getBean() 源码:
	//---------------------------------------------------------------------
	// Implementation of BeanFactory interface
	//---------------------------------------------------------------------

	@Override
	public Object getBean(String name) throws BeansException {
		return doGetBean(name, null, null, false);
	}

	@SuppressWarnings("unchecked")
	protected  T doGetBean(
			String name, @Nullable Class requiredType, @Nullable Object[] args, boolean typeCheckOnly)
			throws BeansException {

		String beanName = transformedBeanName(name);
		Object bean;

		// Eagerly check singleton cache for manually registered singletons.
    //Return the (raw) singleton object registered under the given name.
    // 从单例池获取Bean对象
		Object sharedInstance = getSingleton(beanName);
		if (sharedInstance != null && args == null) {
			if (logger.isTraceEnabled()) {
				if (isSingletonCurrentlyInCreation(beanName)) {
					logger.trace("Returning eagerly cached instance of singleton bean '" + beanName +
							"' that is not fully initialized yet - a consequence of a circular reference");
				}
				else {
					logger.trace("Returning cached instance of singleton bean '" + beanName + "'");
				}
			}
      //获取Bean对象的实例
			bean = getObjectForBeanInstance(sharedInstance, name, beanName, null);
		}
代码分析:
此处,我们通过构造 BeanFactory 的 实例对象 XmlBeanFactory,完成对特定xml文件的Bean信息加载,然后通过 getBean(String beanName); 方法获取特定的对象。
BeanFactory在启动的时候不会去实例化Bean,二是只有从容器中取Bean的时候才会去实例化; BeanFactory具备延迟实例化的优点; 同时,BeanFactory也具备不能及时发现一些存在的Spring的配置问题的缺点;
1.1.2 ApplicationContext 源码分析
同样我们也回顾下例子2,如何使用 ApplicationContext 获取特定的 Bean 对象:
/**
* 自定义标签解析
* @date: 2021/1/6 18:31
*/
public class CustomXSDTagTest {
@Test
public void testSimpleLoad() {
//读取配置文件,ApplicationContext 容器的使用
ApplicationContext bf = new ClassPathXmlApplicationContext("test.xml");
User user = (User) bf.getBean("testbean");
System.out.println(user.getEmail() + " " + user.getUserName() + "" + user.getAge());
}
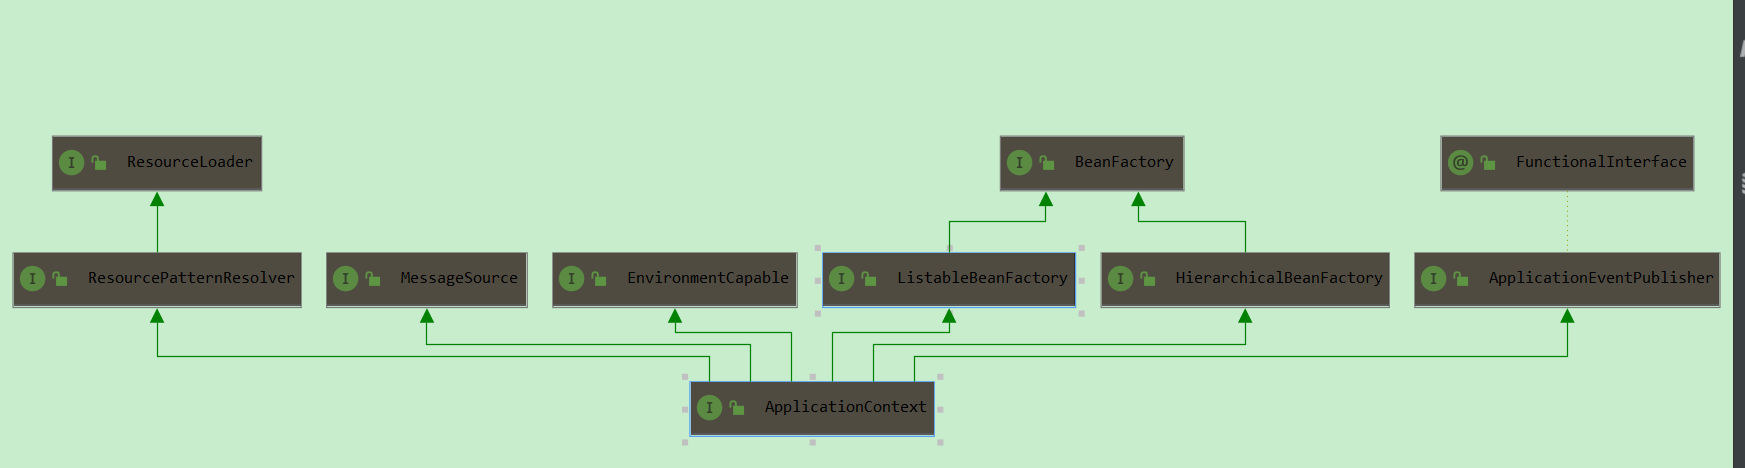
}ApplicationContext 接口的关系架构图:(ApplicationContext 本质是对 BeanFactory 进行了功能拓展)
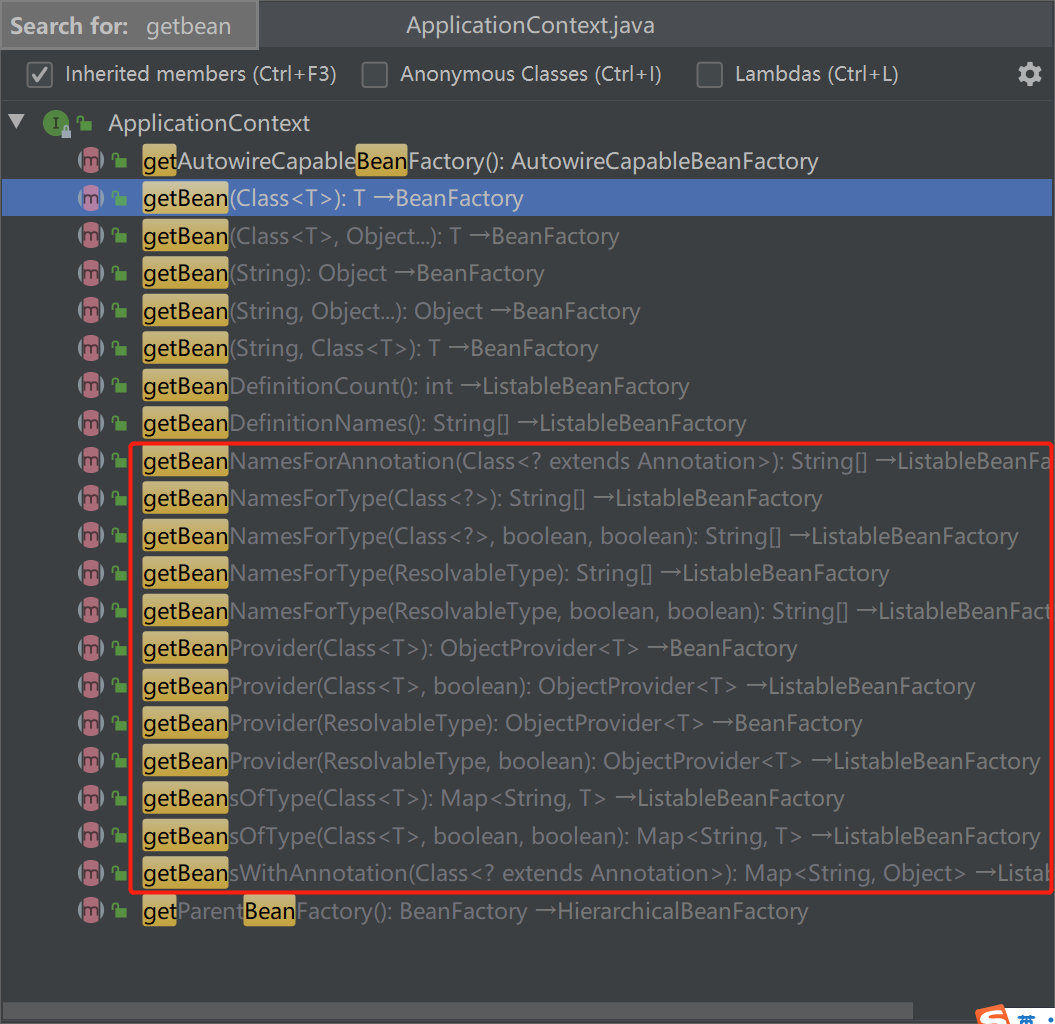
ApplicationContext 接口的定义方法列表:
ApplicationContext的构造器源码:
ApplicationContext跟BeanFactory 相反,它是在容器启动时,一次性创建了所有的Bean。同时,注册Spring监听器的工作也发生在这里:
registerListeners();
public ClassPathXmlApplicationContext(
String[] configLocations, boolean refresh, @Nullable ApplicationContext parent)
throws BeansException {
super(parent);
setConfigLocations(configLocations);
if (refresh) {
//此处的refresh() 方法,会一次性将所有的bean全部装载到Spring容器
refresh();
}
}
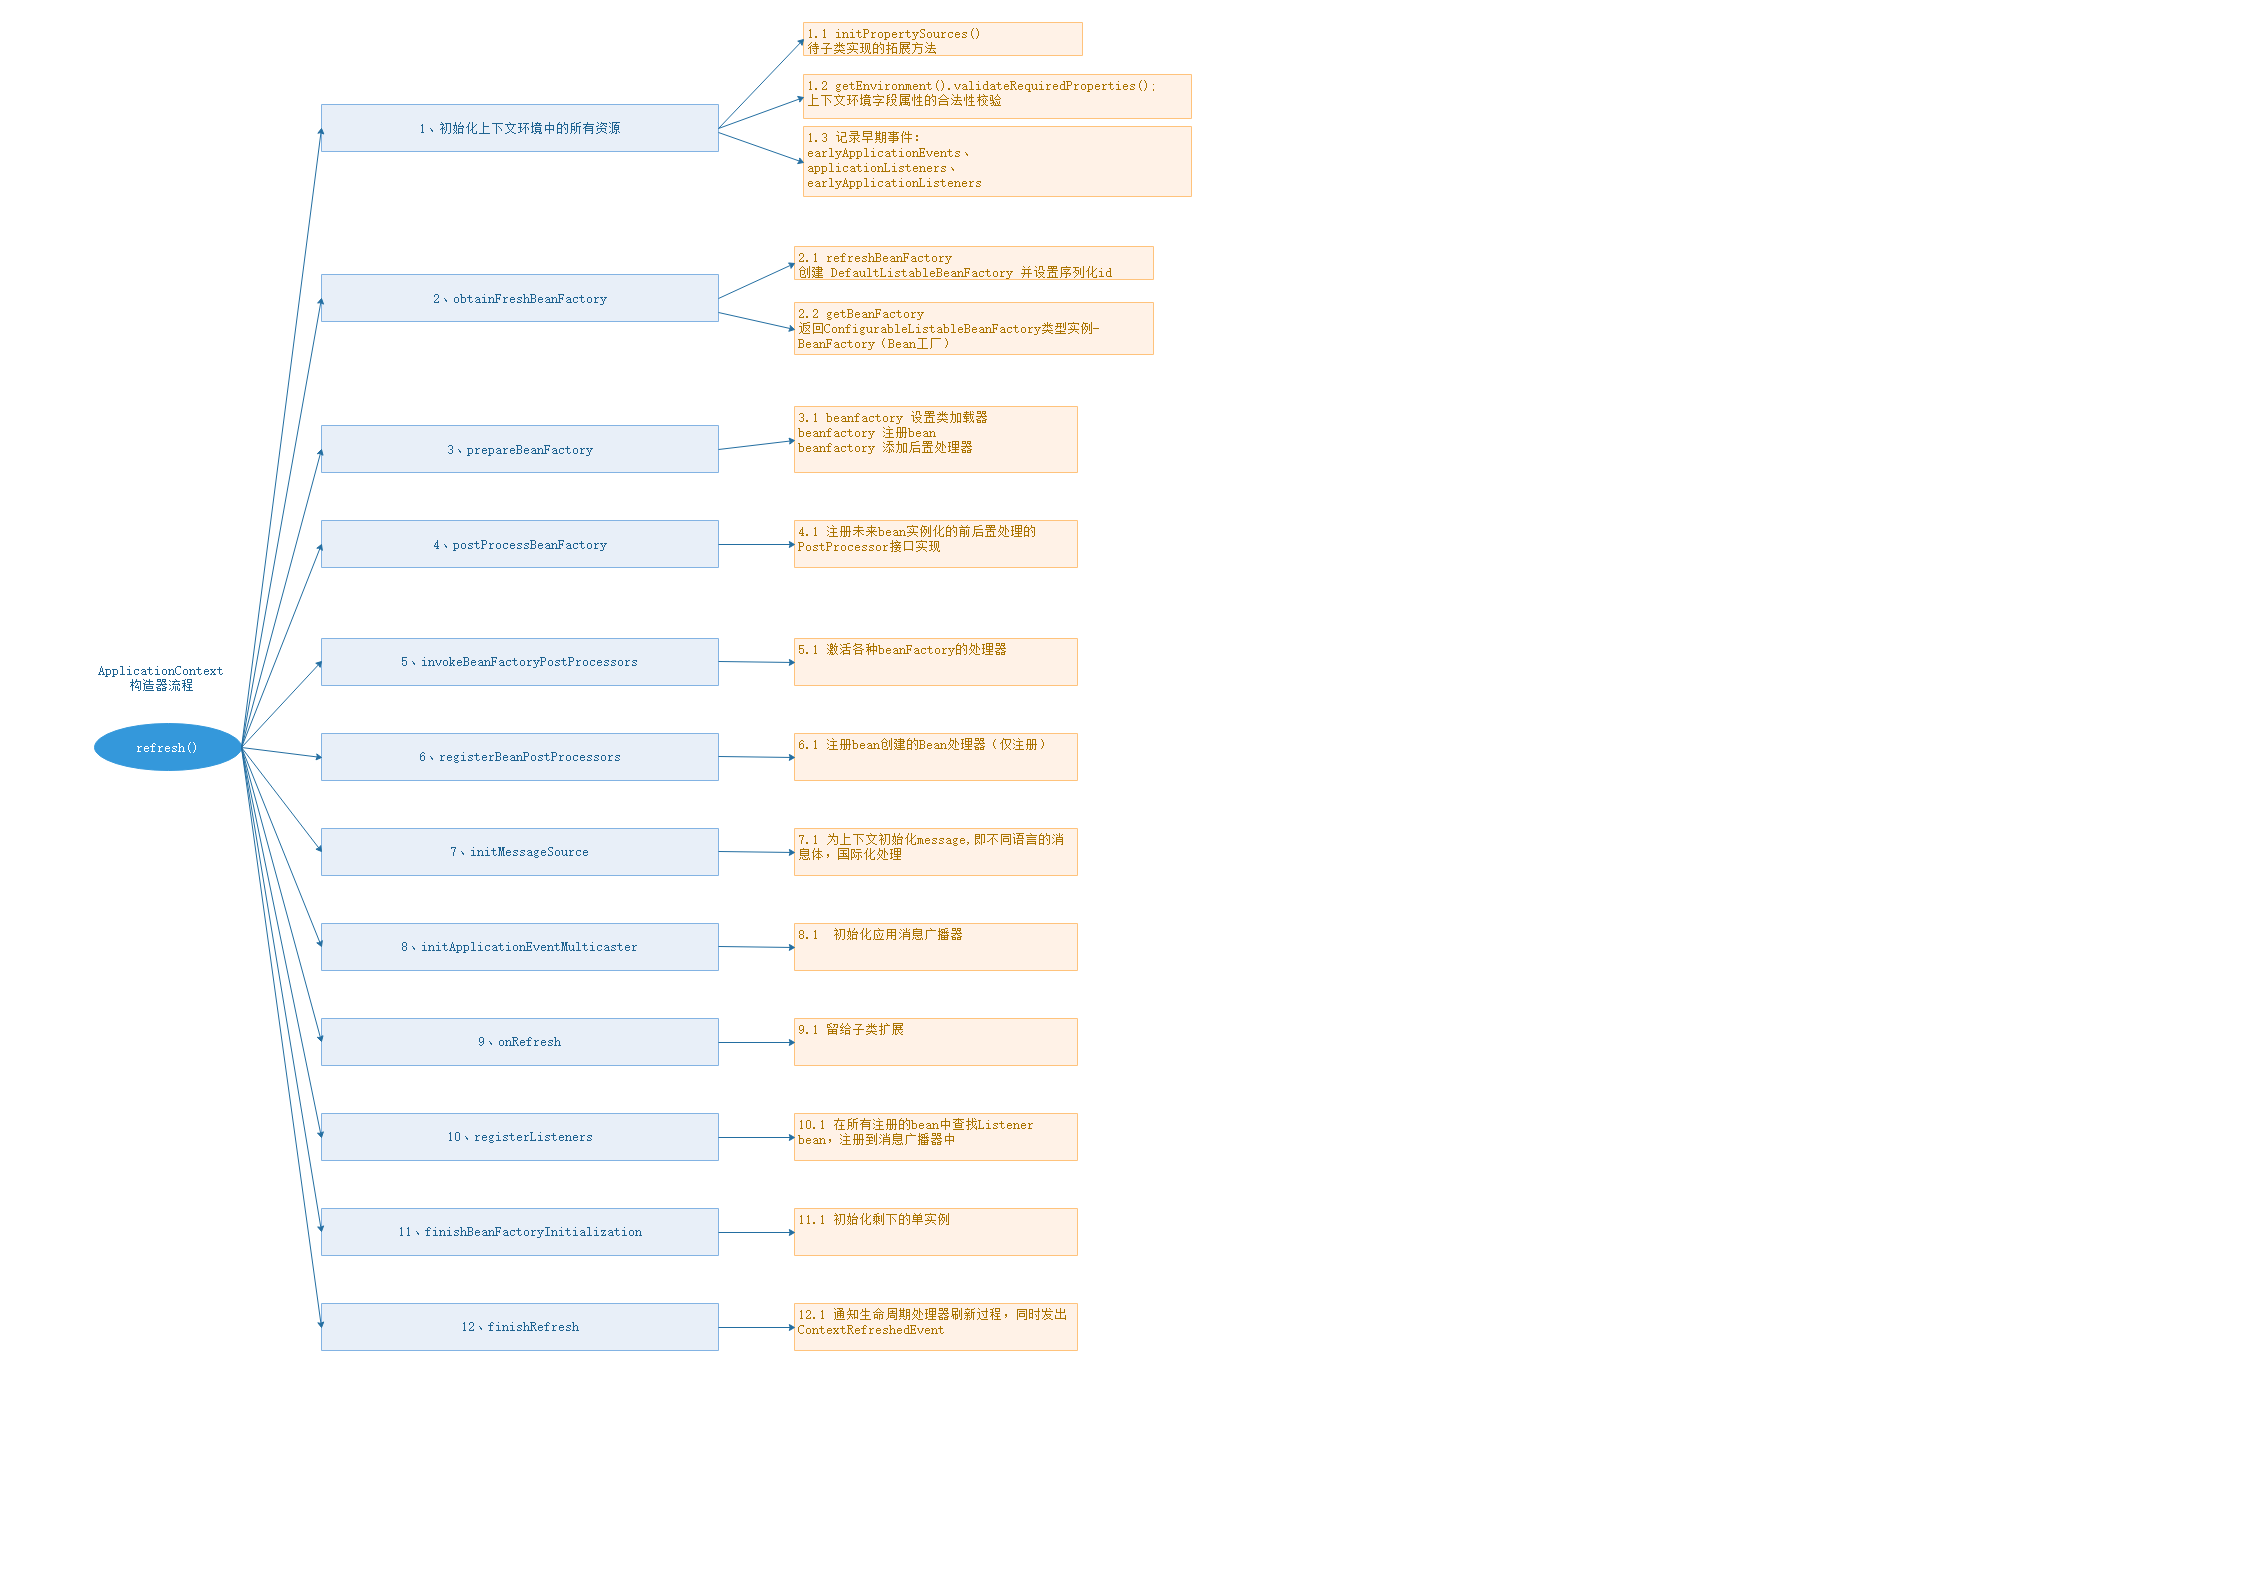
public void refresh() throws BeansException, IllegalStateException {
synchronized (this.startupShutdownMonitor) {
// Prepare this context for refreshing.
prepareRefresh();
// 解析xml配置文件
ConfigurableListableBeanFactory beanFactory = obtainFreshBeanFactory();
// Prepare the bean factory for use in this context.
prepareBeanFactory(beanFactory);
try {
// 注册未来bean实例化的前后置处理的PostProcessor接口实现
postProcessBeanFactory(beanFactory);
//执行所有实现BeanFactoryPostProcessor接口实现,对beanFactory进行处理
invokeBeanFactoryPostProcessors(beanFactory);
// 注册未来bean实例化的前后置处理的PostProcessor接口实现
registerBeanPostProcessors(beanFactory);
// 注册未来bean实例化的前后置处理的PostProcessor接口实现
initMessageSource();
// 实例化spring事件发布监听机制的核心类,SimpleApplicationEventMulticaster
initApplicationEventMulticaster();
// Initialize other special beans in specific context subclasses.
onRefresh();
// 注册事件监听器
registerListeners();
// 实例化非懒加载的bean,完成ioc容器中bean的实例化和反转依赖,并在内部实现动态代理相关的操作
finishBeanFactoryInitialization(beanFactory);
// Last step: publish corresponding event.
finishRefresh();
}
catch (BeansException ex) {
logger.warn("Exception encountered during context initialization - cancelling refresh attempt", ex);
// Destroy already created singletons to avoid dangling resources.
destroyBeans();
// Reset 'active' flag.
cancelRefresh(ex);
// Propagate exception to caller.
throw ex;
}
}
}梳理下源码的流程,见下图:
ApplicationContext.getBean()方法源码:
利用工厂方法获取匹配的Bean对象
	//---------------------------------------------------------------------
	// Implementation of BeanFactory interface
	//---------------------------------------------------------------------

	@Override
	public Object getBean(String name) throws BeansException {
		assertBeanFactoryActive();
		return getBeanFactory().getBean(name);
	}
1.1.3 BeanFacotry与ApplicationContext的区别
BeanFacotry是spring中比较原始的Factory。
如XMLBeanFactory就是一种典型的BeanFactory。原始的BeanFactory无法支持spring的许多插件,如AOP功能、Web应用等。
ApplicationContext接口,它由BeanFactory接口派生而来,因而提供BeanFactory所有的功能。 ApplicationContext以一种更向面向框架的方式工作以及对上下文进行分层和实现继承,ApplicationContext包还提供了以下的功能:MessageSource, 提供国际化的消息访问
资源访问,如URL和文件
事件传播 (我们这章节的重点) 载入多个(有继承关系)上下文 ,使得每一个上下文都专注于一个特定的层次,比如应用的web层
2、Spring事件发布与监听的应用场景
2.1 自定义事件源和事件pojo
事件源
public class TestEvent extends ApplicationEvent {
	/**
	 * Create a new {@code ApplicationEvent}.
	 *
	 * @param source the object on which the event initially occurred or with
	 *               which the event is associated (never {@code null})
	 */
	public TestEvent(TestInfo source) {
		super(source);
	}
}
事件pojo
public class TestInfo {
	private String info;

	public String getInfo() {
		return info;
	}

	public void setInfo(String info) {
		this.info = info;
	}
}
2.2 自定义事件监听器
ApplicationListener 需要设置泛型限定类,也就是上面提到的事件源。
@Component
public class TestEventListener implements ApplicationListener {
	@Override
	public void onApplicationEvent(TestEvent event) {
		TestInfo testInfo = (TestInfo) event.getSource();
		System.out.println("testInfo = " + testInfo);
	}
}
2.3 发布自定义事件
在业务的需要地方进行事件发布
	@Autowired
	private ApplicationEventPublisher applicationEventPublisher;

	private void publishEvent() {
		TestInfo testInfo = new TestInfo();
		testInfo.setInfo("zk-init");
		TestEvent testEvent = new TestEvent(testInfo);
		applicationEventPublisher.publishEvent(testEvent);
	}
2.4 代码分析
ApplicationContext事件机制是观察者设计模式的实现。 通过ApplicationEvent类和ApplicationListener接口,可以实现ApplicationContext事件处理。 如果容器中有一个ApplicationListener Bean,每当ApplicationContext发布ApplicationEvent时,ApplicationListener Bean将自动被触发(同步/异步的方式)。
两个重要成员
ApplicationEvent:容器事件,必须由ApplicationContext发布;
ApplicationListener:监听器,可由容器中的任何监听器Bean担任。
3、源码剖析
源码剖析分为3个组件:
ApplicationEvent 事件
ApplicationListener 监听器,对事件进行监听
ApplicationEventMulticaster 事件广播器,将publish的事件广播给所有的监听器。
3.1 组件一:事件ApplicationEvent 的5种实现
ContextRefreshedEvent :当ApplicationContext初始化或者刷新,将会发布,例如使用ConfigurableApplicationContext接口调用refresh方法,初始化意味着加载所有的bean,同时
ContextStartedEvent:当ApplicationContext启动的时候,将会调用start方法,发布此事件。
ContextStoppedEvent:当容器停止的时候,发布事件。
ContextClosedEvent:当容器关闭的时候,发布事件。
RequestHandledEvent:http请求完成后,发布事件。
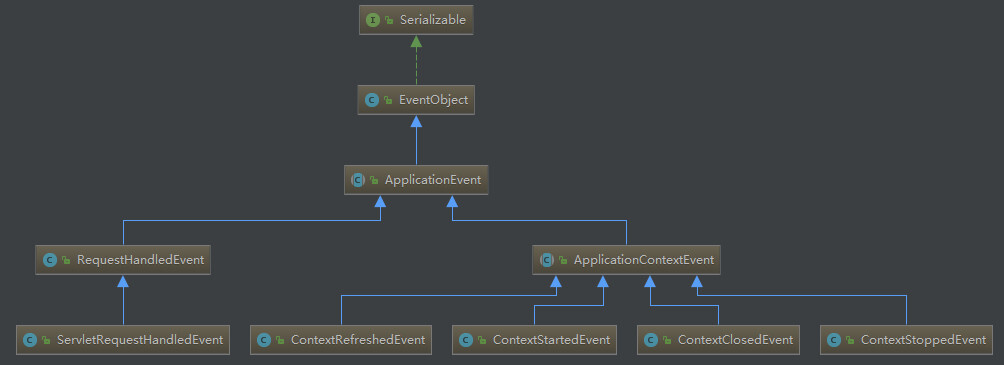
ApplicationEvent 是所有事件的基础抽象类,自定义事件也是继承了它。
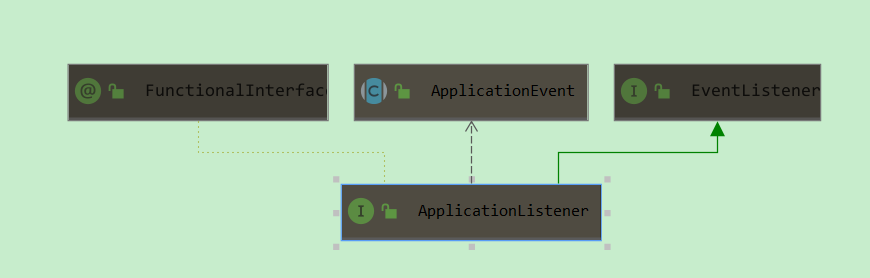
3.2 组件二:监听器 ApplicationListener
ApplicationListener:ApplicationContext容器内部自定义事件监听器接口,继承自java.util.EventListener,ApplicationContext容器在启动时,会自动识别并加载EventListener类型bean的定义,一旦容器事件发布,将会通知注册到容器的监听器。
3.3 组件三:广播器ApplicationEventMulticaster
3.3.1 发布器 ApplicationEventPublisher 和 广播器ApplicationEventMulticaster
ApplicationEventPublisher:是一个封装事件发布接口,作为ApplicationContext父类接口。
ApplicationEventMulticaster:管理ApplicationListener对象,并且发布它们。
ApplicationContext 委托给了 AbstractApplicationEventMulticaster 来实现事件监听器(ApplicationListener)的管理。
3.3.2 发布事件 - ApplicationEventPublisher
源码
使用了 applicationEventPublisher.publishEvent() 的代码段,可以将事件发布出去。
	protected void publishEvent(Object event, @Nullable ResolvableType eventType) {
		Assert.notNull(event, "Event must not be null");

		// Decorate event as an ApplicationEvent if necessary
		ApplicationEvent applicationEvent;
		if (event instanceof ApplicationEvent) {
			applicationEvent = (ApplicationEvent) event;
		}
		else {
			applicationEvent = new PayloadApplicationEvent<>(this, event);
			if (eventType == null) {
				eventType = ((PayloadApplicationEvent) applicationEvent).getResolvableType();
			}
		}

		// Multicast right now if possible - or lazily once the multicaster is initialized
		if (this.earlyApplicationEvents != null) {
			this.earlyApplicationEvents.add(applicationEvent);
		}
		else {
      //获取到广播器,并且将自定义事件告诉广播器。
			getApplicationEventMulticaster().multicastEvent(applicationEvent, eventType);
		}

		// Publish event via parent context as well...
		if (this.parent != null) {
			if (this.parent instanceof AbstractApplicationContext) {
				((AbstractApplicationContext) this.parent).publishEvent(event, eventType);
			}
			else {
				this.parent.publishEvent(event);
			}
		}
	}
源码分析:
getApplicationEventMulticaster().multicastEvent(applicationEvent, eventType);
3.3.3 广播器 - SimpleApplicationEventMulticaster
1、SimpleApplicationEventMulticaster 广播器的类架构图:
ApplicationEventMulticaster 接口实现类是 SimpleApplicationEventMulticaster,它的 multicastEvent() 方法功能是:实现了遍历监听器列表,逐个发布事件到监听器中(观察者模式的应用场景)。
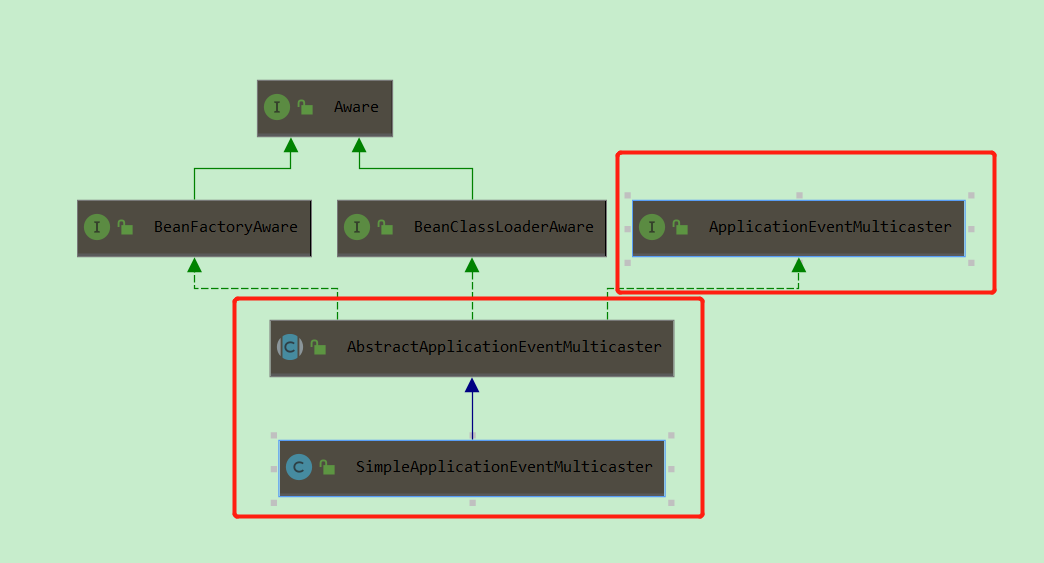
上文提及的代码段:getApplicationEventMulticaster() 方法便是获取到注入的实例 SimpleApplicationEventMulticaster,它即是ApplicationEventMulticaster 的实现类了。
2、SimpleApplicationEventMulticaster 内部维护了一个监听器列表,即是一个 ConcurrentHashMap 进行管理的。
final Map retrieverCache = new ConcurrentHashMap<>(64); 3、SimpleApplicationEventMulticaster 广播事件源码,通过multicastEvent() 方法实现
	@Override
	public void multicastEvent(final ApplicationEvent event, @Nullable ResolvableType eventType) {
		ResolvableType type = (eventType != null ? eventType : resolveDefaultEventType(event));
		Executor executor = getTaskExecutor();
		for (ApplicationListener listener : getApplicationListeners(event, type)) {
			if (executor != null) {
        //调用监听器的 onApplicationEvent 方法,处理事件
				executor.execute(() -> invokeListener(listener, event));
			}
			else {
        //调用监听器的 onApplicationEvent 方法,处理事件
				invokeListener(listener, event);
			}
		}
	}
解析:最终调用 SimpleApplicationEventMulticaster 的 invokeListener() 方法进行实质事件处理。
SimpleApplicationEventMulticaster的 invokeListener() 方法源码,最终调用了 doInvokeListener() 方法
	protected void invokeListener(ApplicationListener listener, ApplicationEvent event) {
		ErrorHandler errorHandler = getErrorHandler();
		if (errorHandler != null) {
			try {
				doInvokeListener(listener, event);
			}
			catch (Throwable err) {
				errorHandler.handleError(err);
			}
		}
		else {
			doInvokeListener(listener, event);
		}
	}

  @SuppressWarnings({"rawtypes", "unchecked"})
	private void doInvokeListener(ApplicationListener listener, ApplicationEvent event) {
		try {
    	//若是匹配上监听器,则会调用该监听器类的 onApplicationEvent 方法
			listener.onApplicationEvent(event);
		}
		catch (ClassCastException ex) {
			String msg = ex.getMessage();
			if (msg == null || matchesClassCastMessage(msg, event.getClass()) ||
					(event instanceof PayloadApplicationEvent &&
							matchesClassCastMessage(msg, ((PayloadApplicationEvent) event).getPayload().getClass()))) {
				// Possibly a lambda-defined listener which we could not resolve the generic event type for
				// -> let's suppress the exception.
				Log loggerToUse = this.lazyLogger;
				if (loggerToUse == null) {
					loggerToUse = LogFactory.getLog(getClass());
					this.lazyLogger = loggerToUse;
				}
				if (loggerToUse.isTraceEnabled()) {
					loggerToUse.trace("Non-matching event type for listener: " + listener, ex);
				}
			}
			else {
				throw ex;
			}
		}
	}
再走读一下源码,我们可以发现 SimpleApplicationEventMulticaster 其实是支持异步事件通知 和同步事件通知。而 SimpleApplicationEventMulticaster 作为默认的事件广播器,用的是同步通知的方式;但是Spring给我们提供了一个解决方案来实现我们需要的异步广播器。
那么要怎么实现异步广播器呢???
1、首先需要一个自定义广播器
@Component("applicationEventMulticaster") 注解则声明了Bean的name为固定的“applicationEventMulticaster”
/**
 *
 *     继承 SimpleApplicationEventMulticaster ,实现异步监听器
 *     如下我们看到在以上的判断是否自定义了多播器的代码中,判断在ioc容器中是否包含如下名字的bean作为判断条件的,所以只要我们自定义一个bean命名为applicationEventMulticaster,并把异步支持的executor植入就行了
 *
 */
@Component("applicationEventMulticaster")
public class AsnyTestEventListener extends SimpleApplicationEventMulticaster {
	public AsnyTestEventListener () {
		setTaskExecutor(Executors.newSingleThreadExecutor());
	}
}
2、源码分析(自定义广播器是如何被注册到Spring容器的)
2.1、我们走读一下 AbstractApplicationContext 的源码,注意到一个静态字符串变量的值为“applicationEventMulticaster”;
2.2、同时定位到 initApplicationEventMulticaster() 方法的作用就是 Initialize the ApplicationEventMulticaster.(初始化事件广播器),如果可以获取到则使用这个“applicationEventMulticaster”Bean,则可以进行注册了(其实就是获取对象引用然后赋值)。
	public abstract class AbstractApplicationContext extends DefaultResourceLoader
		implements ConfigurableApplicationContext {
    /**
     * Name of the ApplicationEventMulticaster bean in the factory.
     * If none is supplied, a default SimpleApplicationEventMulticaster is used.
     * @see org.springframework.context.event.ApplicationEventMulticaster
     * @see org.springframework.context.event.SimpleApplicationEventMulticaster
     */
    public static final String APPLICATION_EVENT_MULTICASTER_BEAN_NAME = "applicationEventMulticaster";

    /**
     * Initialize the ApplicationEventMulticaster.
     * Uses SimpleApplicationEventMulticaster if none defined in the context.
     * @see org.springframework.context.event.SimpleApplicationEventMulticaster
     */
    protected void initApplicationEventMulticaster() {
      ConfigurableListableBeanFactory beanFactory = getBeanFactory();
      //Bean工厂是否可以获取到 applicationEventMulticaster 的Bean
      if (beanFactory.containsLocalBean(APPLICATION_EVENT_MULTICASTER_BEAN_NAME)) {
        this.applicationEventMulticaster =
            beanFactory.getBean(APPLICATION_EVENT_MULTICASTER_BEAN_NAME, ApplicationEventMulticaster.class);
        if (logger.isTraceEnabled()) {
          logger.trace("Using ApplicationEventMulticaster [" + this.applicationEventMulticaster + "]");
        }
      }
      else {
      //获取不到自定义的广播器,那么就使用默认的 SimpleApplicationEventMulticaster
        this.applicationEventMulticaster = new SimpleApplicationEventMulticaster(beanFactory);
        beanFactory.registerSingleton(APPLICATION_EVENT_MULTICASTER_BEAN_NAME, this.applicationEventMulticaster);
        if (logger.isTraceEnabled()) {
          logger.trace("No '" + APPLICATION_EVENT_MULTICASTER_BEAN_NAME + "' bean, using " +
              "[" + this.applicationEventMulticaster.getClass().getSimpleName() + "]");
        }
      }
    }
  }
当在我们自定义的多播器中设置了executor时,SimpleApplicationEventMulticaster 广播器的exeutor就不为空了 ,就会走到第一个异步多播的路径。
4、延伸阅读
《源码系列》
《经典书籍》
《服务端技术栈》
《算法系列》
《设计模式》