ngrok穿越本地服务器,极客大学架构师训练营 第一课总结,John 易筋 ARTS打卡Week 03
每周完成一个 ARTS:
Algorithm: 每周至少做一个 LeetCode 的算法题
Review: 阅读并点评至少一篇英文技术文章
Tips: 学习至少一个技术技巧
Share: 分享一篇有观点和思考的技术文章
zgpeace 立个Flag:坚持ARTS 10年,今天是2020-05-04 ~ 2030-05-04,漏掉一次微信群发红包100大洋。
1. Algorithm: 每周至少做一个 LeetCode 的算法题
Given a Binary Search Tree (BST), convert it to a Greater Tree such that every key of the original BST is changed to the original key plus sum of all keys greater than the original key in BST.
Example 1:
Java
Input: The root of a Binary Search Tree like this:
              5
            /   \
           2     13

Output: The root of a Greater Tree like this:
             18
            /   \
          20     13
解决思路:Tree的解决思路优先递归,也就是深度优先算法,因为递归的思路是先遍历到叶子节点,最终会回到Root节点,直接返回就好。如果用Iteration遍历,也就是广度优先算法,那么就要用栈java中用LinkedList去记录每一层的数据。
这个题目容易理解错误,是每个节点要加上目前最大的值。二分查找数最大值是最右的最层叶子节点。
那么就用一个属性sum来记录最大值。遍历顺序为右 > 中 > 左;最后到右子树 > 根节点 > 左子树。
/**
 * Definition for a binary tree node.
 * public class TreeNode {
 *     int val;
 *     TreeNode left;
 *     TreeNode right;
 *     TreeNode() {}
 *     TreeNode(int val) { this.val = val; }
 *     TreeNode(int val, TreeNode left, TreeNode right) {
 *         this.val = val;
 *         this.left = left;
 *         this.right = right;
 *     }
 * }
 */
class Solution {
    private int sum = 0;

    public TreeNode convertBST(TreeNode root) {
        if (root != null) {
            convertBST(root.right);
            sum += root.val;
            root.val = sum;
            convertBST(root.left);
        }
        return root;
    }
}
笔者为了方便调试,把树按照属性结构打印了出来。思路如下:
package common;

import java.util.ArrayList;
import java.util.LinkedList;
import java.util.List;

public class TreeNode {
    public int val;
    public TreeNode left;
    public TreeNode right;
    public TreeNode() { }
    public TreeNode(int val) {
        this.val = val;
    }

    public TreeNode(int val, TreeNode left, TreeNode right) {
          this.val = val;
          this.left = left;
          this.right = right;
    }

    @Override
    public String toString() {
        if (this == null) {
            return "null";
        }

        String result = "";
        List row = null;
        List> list = new ArrayList>();

        LinkedList rowNode = new LinkedList<>();
        rowNode.add(this);
        while (!rowNode.isEmpty()) {
            int rowSize = rowNode.size();
            row = new ArrayList();

            int rowCount = rowSize;
            int nullCount = 0;
            while (rowSize > 0) {
                TreeNode current = rowNode.pop();
                if (current == null) {
                    row.add("null");
                    nullCount++;
                } else {
                    row.add(Integer.toString(current.val));
                }

                if (current == null || current.left == null) {
                    rowNode.add(null);
                } else {
                    rowNode.add(current.left);
                }
                if (current == null || current.right == null) {
                    rowNode.add(null);
                } else {
                    rowNode.add(current.right);
                }

                rowSize--;
            }

            if (nullCount == rowCount) {
                break;
            }

            list.add(row);
        }

        // print data
        String blank = "    ";
        for (int i = 0; i < list.size(); i ++) {
            for (int j = i; j < list.size(); j++) {
                // print blank
                System.out.print(blank);
            }
            List rowList = list.get(i);
            for (int k = 0; k < rowList.size(); k++) {
                System.out.print(rowList.get(k));
                System.out.print(blank);
            }

            System.out.println();
        }


        //return Arrays.toString(list.toArray());

        return super.toString();
    }
}
调用代码
public static void main(String[] args) {
    //TreeNode left1 = new TreeNode(2);
    //TreeNode right1 = new TreeNode(13);
    //
    //TreeNode root = new TreeNode(5, left1, right1);

    TreeNode left1 = new TreeNode(1);
    TreeNode right1 = new TreeNode(3);

    TreeNode rootLeft = new TreeNode(2, left1, right1);

    TreeNode left2 = new TreeNode(6);
    TreeNode right2 = new TreeNode(15);

    TreeNode rootRight = new TreeNode(13, left2, right2);

    TreeNode root = new TreeNode(5, rootLeft, rootRight);

    root.toString();
  // 当前类的名字
    ConvertBSTToGreaterTree obj = new ConvertBSTToGreaterTree();
    TreeNode result = obj.convertBST(root);
    result.toString();
  }
输出结果为:
            5
        2    13
    1    3    6    15
            39
        44    28
    45    42    34    15
2. Review: 阅读并点评至少一篇英文技术文章
Alexandra Noonan 讲了TA的公司2017年转为微服务,但如今又转回来了单体架构。因为微服务没有处理好的话,业务都没法继续。所以微服务到底是拆分模块,共享service,还得具体问题具体分析,否则就变成了焦油坑。
3. Tips: 学习至少一个技术技巧
博客:
说明
本地服务器一般用 来访问,只能通过本地自己访问。别人可以访问链接么,正常情况下是不可以的,防火墙等等限制。
本文的主角 就是救场的英雄。可以映射到本地机器来访问,可以通过,也可以通过.
用法
详细可以通过官网链接设置,笔者也把步骤罗列一下。笔者为Mac OS.
3.1. 下载安装包, 并解压(可以双击解压,也可用通过如下命令)。
unzip /path/to/ngrok.zip正常情况下,到可执行文件目录,运行 命令就好。为了方便,笔者用 设置环境变量
$ cd $home
$ vim .zshrc
// 添加如下 信息 到环境变量
# ngrok
export NGROK_HOME="/Users/yourpath/software/ngrok"
export PATH=$NGROK_HOME:$PATH

// esc > :wq 保存
// 重新加载 配置文件
source .zshrc
笔者该坏过配置文件,这也没有问题,文件夹打开根目录,显示隐藏文件快捷键为 , 隐藏隐藏文件为再次用同样的命令。用文本工具比如Sublime编辑好,保存,在命令行里重新加载配置文件就好。
ngrok
NAME:
ngrok - tunnel local ports to public URLs and inspect traffic
DESCRIPTION:
ngrok exposes local networked services behinds NATs and firewalls to the
public internet over a secure tunnel. Share local websites, build/test
webhook consumers and self-host personal services.
Detailed help for each command is available with 'ngrok help '.
Open http://localhost:4040 for ngrok's web interface to inspect traffic.
EXAMPLES:
ngrok http 80 # secure public URL for port 80 web server
ngrok http -subdomain=baz 8080 # port 8080 available at baz.ngrok.io
ngrok http foo.dev:80 # tunnel to host:port instead of localhost
ngrok http https://localhost # expose a local https server
ngrok tcp 22 # tunnel arbitrary TCP traffic to port 22
ngrok tls -hostname=foo.com 443 # TLS traffic for foo.com to port 443
ngrok start foo bar baz # start tunnels from the configuration file
VERSION:
2.3.35
AUTHOR:
inconshreveable -
COMMANDS:
authtoken save authtoken to configuration file
credits prints author and licensing information
http start an HTTP tunnel
start start tunnels by name from the configuration file
tcp start a TCP tunnel
tls start a TLS tunnel
update update ngrok to the latest version
version print the version string
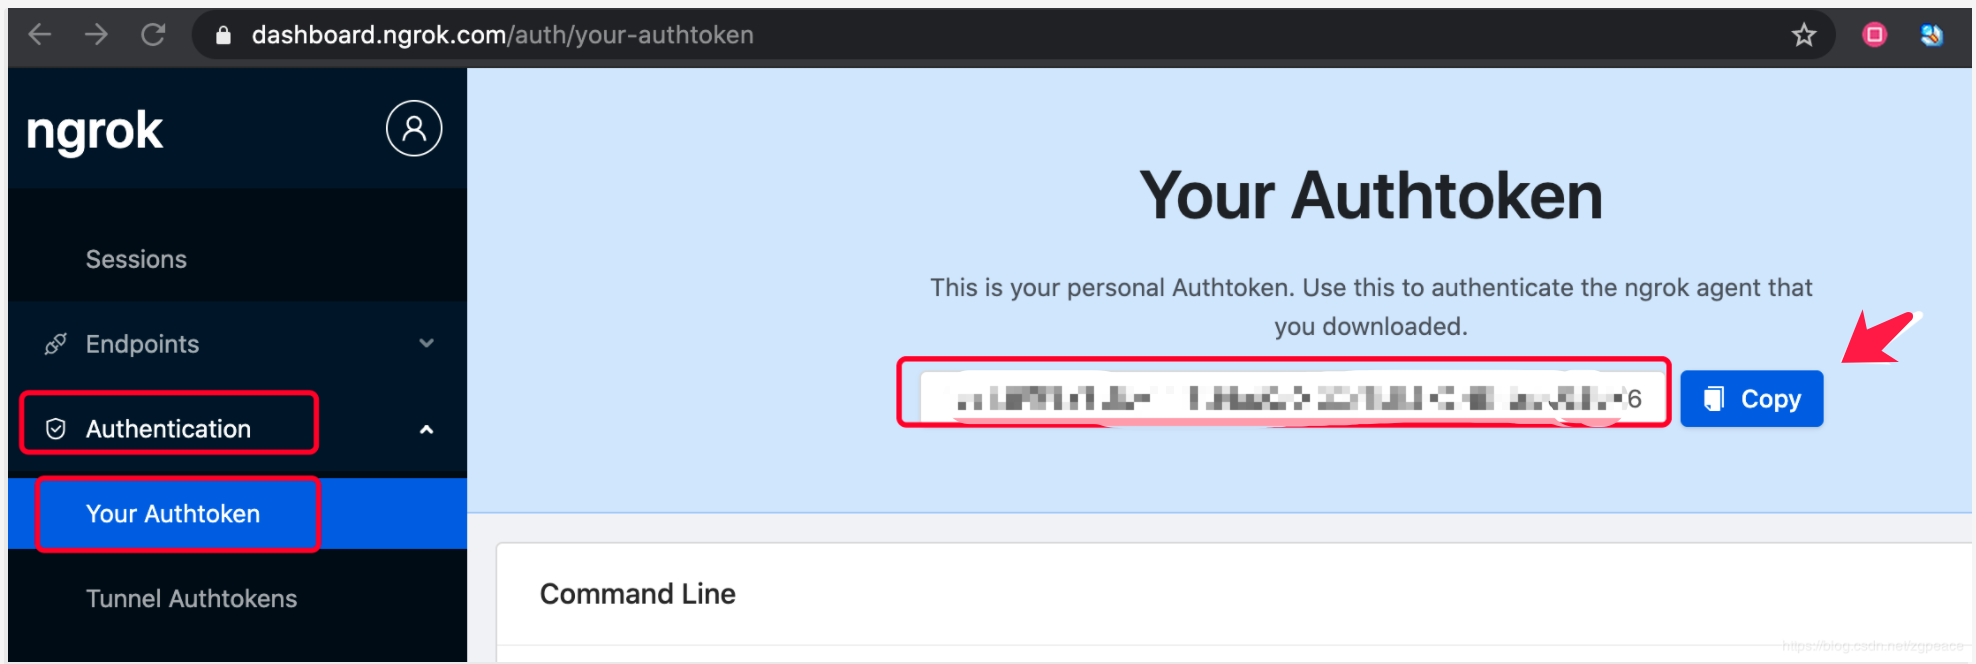
help Shows a list of commands or help for one command 3.2. 绑定`ngrok`的`token`
./ngrok authtoken 1cz..yourtoken.X6token查找位置
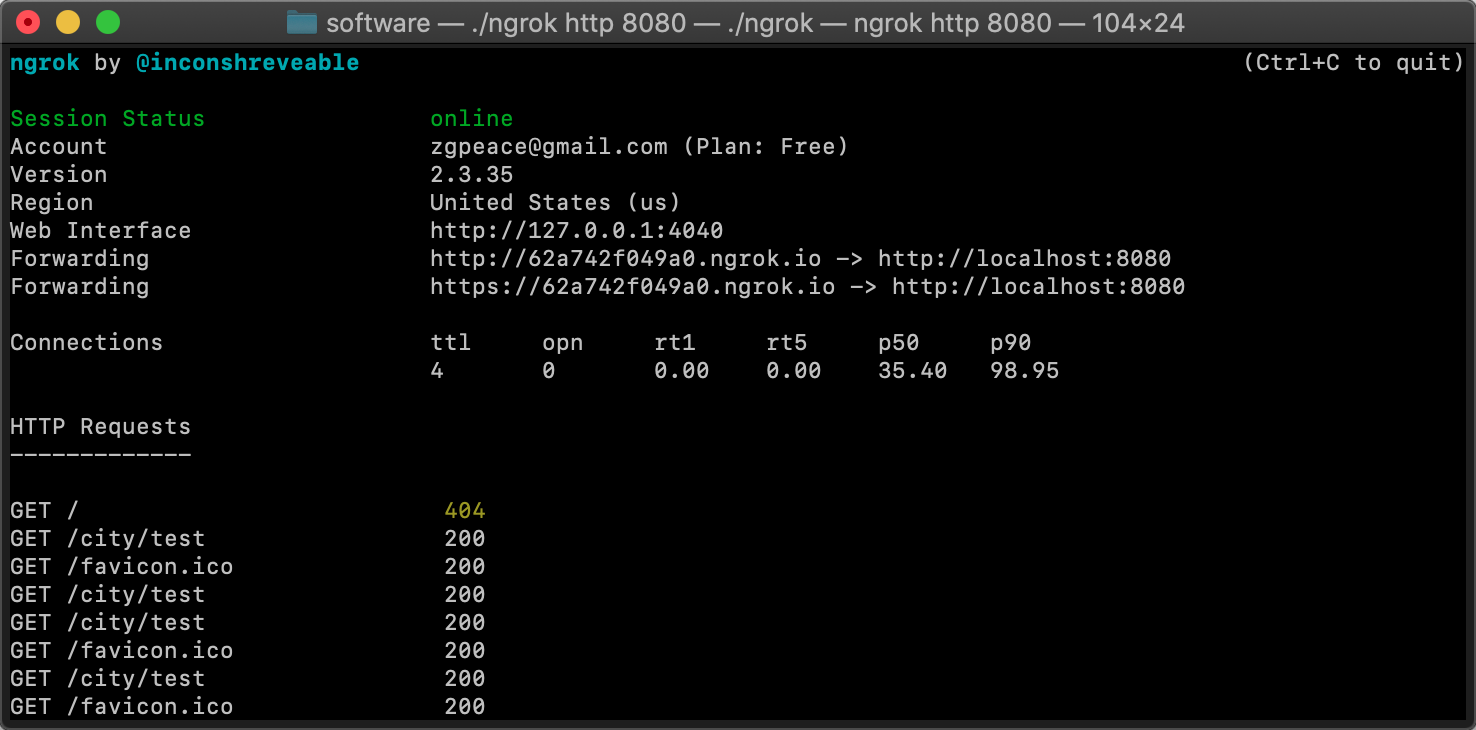
3.3. 映射本地8080端口为远程端口
ngrok http 8080 命令行里面显示了访问的记录。这里说明一下,需要梯子才能访问(⊙x⊙;)。
笔者本地访问

笔者用ngrok的域名访问

Bravo!!穿越成功🎉🎉
4. Share: 分享一篇有观点和思考的技术文章
写博客记录了李智慧老师的第一课,知道架构师的一些套路:
架构师不一定技术很牛,但是没有技术是不行的。
架构师最主要的靠悟性。悟性悟到了,就类似一层窗户纸,一捅就破,一点就通。
面对的问题、困难是什么?
解决的方法是什么?
真实的场景是什么?
用什么的思维方式去解决问题?