Spark HistoryServer日志解析&清理异常
一、背景介绍
线上集群在使用 Spark HistoryServer 曾出现过两类问题,一类问题是用户提交 Spark 任务后 HistoryServer 服务不能正常解析日志,导致任务完成后无法在 HistoryServer 中找到作业的执行记录,严重影响到用户查看日志的体验,另一类问题是每个 Spark 作业都会向 HDFS 中写入一个 eventlog 日志文件,而 HDFS 单个目录不含递归的最大目录数/文件数是有限制的,由参数 控制,默认上限是 1048576,HistoryServer 没能正常清理日志导致 HDFS 目录写满,Spark 任务无法正常提交。针对这两类问题,我们特地对 Spark 2.1 HistoryServer 源码进行了研究,找出根本问题出在内部的两个核心数据结构的使用存在异常导致的。
二、eventLog 日志文件及相关参数
2.1 eventLog 日志文件介绍
eventLog 是 Spark 任务在运行过程中,调用 EventLoggingListener#logEvent() 方法来输出 eventLog 内容,Spark 中定义各种类型的事件,一旦某个事件被触发,就会构造一个类型的 Event,然后获取相应的运行信息并设置进去,最终将该 event 对象序列化成 json 字符串,追加到 eventLog 日志文件中。
Spark 中 eventLog 默认是不开启的,由参数 来控制,开启这个配置后,任务运行的信息就会写到 eventLog 日志文件中,日志文件具体保存在参数 配置的目录下。
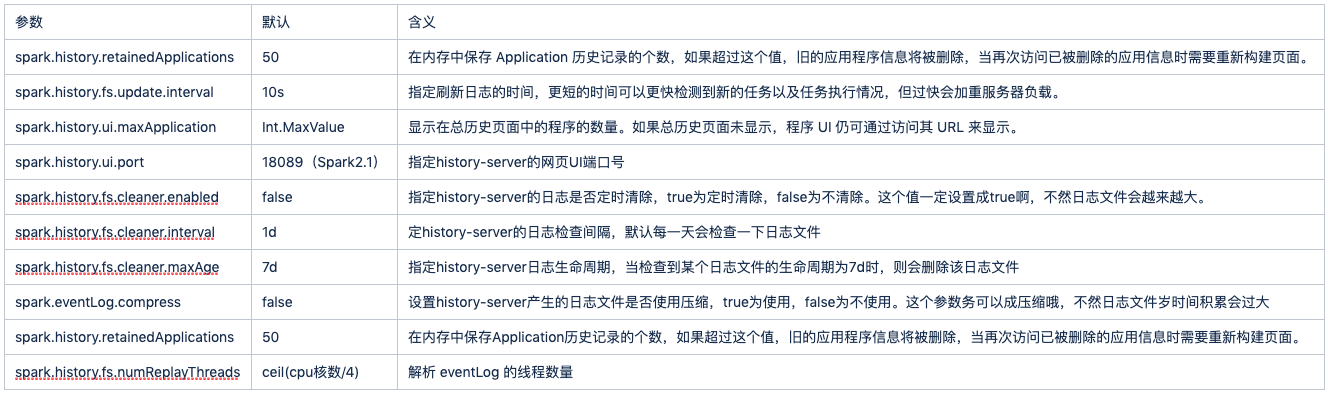
2.2 相关配置参数
一般这些配置放在 中。
注:但在实际自定义修改 Spark HistoryServer 配置时, 中并没有写入(具体原因待看)。但可以通过查看 HistoryServer 进程使用的 配置查看,在 Spark HistoryServer 所在机器上,通过 查看具体配置 ,这里会使用自定义更新的 HistoryServer 参数。
三、eventLog 日志解析及日志清理原理
3.1 两个定时任务
FsHistoryProvider 类在初始化时,会调用 startPolling() 方法,来启动两个定时任务,即日志文件解析任务和日志文件清理任务,两个任务均是由独立线程执行。当然,日志文件清理任务是否开启是由参数 控制(默认为 false,线上环境为 true,即开启了日志文件清理任务)。
//位置:core/src/main/scala/org/apache/spark/deploy/history/FsHistoryProvider.scala
  private[history] def initialize(): Thread = {
    if (!isFsInSafeMode()) {
      // 两个定时任务启动入口
      startPolling()
      null
    } else {
      startSafeModeCheckThread(None)
    }
  }

  private def startPolling(): Unit = {
    // Validate the log directory.
    val path = new Path(logDir)

    // Disable the background thread during tests.
    if (!conf.contains("spark.testing")) {
      // A task that periodically checks for event log updates on disk.
      logDebug(s"Scheduling update thread every $UPDATE_INTERVAL_S seconds")
      // 日志文件解析线程
      pool.scheduleWithFixedDelay(getRunner(checkForLogs), 0, UPDATE_INTERVAL_S, TimeUnit.SECONDS)

      if (conf.getBoolean("spark.history.fs.cleaner.enabled", false)) {
        // A task that periodically cleans event logs on disk.
        // 日志文件清理线程
        pool.scheduleWithFixedDelay(getRunner(cleanLogs), 0, CLEAN_INTERVAL_S, TimeUnit.SECONDS)
      }
    } else {
      logDebug("Background update thread disabled for testing")
    }
  }
3.2 eventLog 日志文件解析原理
3.2.1 关键数据结构
在介绍日志解析前,先来看看两个关键的数据结构。fileToAppInfo 和 applications。
fileToAppInfo 结构用于保存日志目录 下每一条 eventLog 日志文件。每次 HDFS 目录下新生成的文件都会更新到该数据结构。
val fileToAppInfo = new mutable.HashMap[Path, FsApplicationAttemptInfo]()applications 结构用于保存每个 App 对应的所有 AppAttempt 运行或完成的日志信息。
@volatile private var applications: mutable.LinkedHashMap[String, FsApplicationHistoryInfo] = new mutable.LinkedHashMap()举个例子:HDFS 日志目录下有同一个 App 的两个 eventLog 文件。
/user/spark/spark2ApplicationHistory/application_1599034722009_10003548_1
/user/spark/spark2ApplicationHistory/application_1599034722009_10003548_2
此时,fileToAppInfo 保存的数据格式为:(两条记录)
<'/user/spark/spark2ApplicationHistory/application_1599034722009_10003548_1', AttemptInfo>
<'/user/spark/spark2ApplicationHistory/application_1599034722009_10003548_2', AttemptInfo>
而 applications 保存的数据格式为:(一条记录)
<'application_1599034722009_10003548', HistoryInfo> 3.2.2 日志文件解析流程
eventLog 日志文件一次完整解析的流程大概分为以下几个步骤:
源码分析如下:
这段代码主要是前两个步骤的介绍,定期扫描日志目录(定期时间由参数 控制,线上环境为 30s),将文件大小有增加和新生成的文件保存在 logInfos 对象中。然后将新文件放到
replayExecutor 线程池中执行,该线程池大小默认为 机器cpu核数/4,由参数 控制,线上环境为 50。
//位置:core/src/main/scala/org/apache/spark/deploy/history/FsHistoryProvider.scala
  private[history] def checkForLogs(): Unit = {
    try {
      val newLastScanTime = getNewLastScanTime()
      logDebug(s"Scanning $logDir with lastScanTime==$lastScanTime")
      val statusList = Option(fs.listStatus(new Path(logDir))).map(_.toSeq)
        .getOrElse(Seq[FileStatus]())
      // logInfos 保存所有新的 eventLog 文件(包括大小增加的和新生成的文件)
      // filter:过滤出新的日志文件
      // flatMap:过滤空的entry对象
      // sortWith:根据日志文件更新时间降序排序
      val logInfos: Seq[FileStatus] = statusList
        .filter { entry =>
          try {
            val prevFileSize = fileToAppInfo.get(entry.getPath()).map{_.fileSize}.getOrElse(0L)
            !entry.isDirectory() &&
              !entry.getPath().getName().startsWith(".") &&
              prevFileSize < entry.getLen()
          } catch {
            case e: AccessControlException =>
              logDebug(s"No permission to read $entry, ignoring.")
              false
          }
        }
        .flatMap { entry => Some(entry) }
        .sortWith { case (entry1, entry2) =>
          entry1.getModificationTime() >= entry2.getModificationTime()
      }

      if (logInfos.nonEmpty) {
        logDebug(s"New/updated attempts found: ${logInfos.size} ${logInfos.map(_.getPath)}")
      }

      var tasks = mutable.ListBuffer[Future[_]]()

      try {
        for (file <- logInfos) {
          // 对扫描出来的文件进行解析
          tasks += replayExecutor.submit(new Runnable {
            override def run(): Unit = mergeApplicationListing(file)
          })
        }
      } catch {
        case e: Exception =>
          logError(s"Exception while submitting event log for replay", e)
      }
       ... //省略
 }
第三步流程主要在 mergeApplicationListing() 方法中处理。先来看看 fileToAppInfo 结构如何更新,这里的关键是 replay() 方法,这里会对 eventLog 进行初步解析,然后将解析后的内容更新到 fileToAppInfo 中。
//位置:core/src/main/scala/org/apache/spark/deploy/history/FsHistoryProvider.scala
  private def mergeApplicationListing(fileStatus: FileStatus): Unit = {
      // 函数监听两个事件:作业开始和作业结束
    val newAttempts = try {
      val eventsFilter: ReplayEventsFilter = { eventString =>
        eventString.startsWith(APPL_START_EVENT_PREFIX) ||
          eventString.startsWith(APPL_END_EVENT_PREFIX)
      }

      val logPath = fileStatus.getPath()

      val appCompleted = isApplicationCompleted(fileStatus)

      // UI 查看的关键,对 eventLog 日志文件进行解析回放
      val appListener = replay(fileStatus, appCompleted, new ReplayListenerBus(), eventsFilter)

      // 根据解析的结果构建 FsApplicationAttemptInfo 对象
      if (appListener.appId.isDefined) {
        val attemptInfo = new FsApplicationAttemptInfo(
          logPath.getName(),
          appListener.appName.getOrElse(NOT_STARTED),
          appListener.appId.getOrElse(logPath.getName()),
          appListener.appAttemptId,
          appListener.startTime.getOrElse(-1L),
          appListener.endTime.getOrElse(-1L),
          fileStatus.getModificationTime(),
          appListener.sparkUser.getOrElse(NOT_STARTED),
          appCompleted,
          fileStatus.getLen()
        )
        // 更新 fileToAppInfo 结构
        fileToAppInfo(logPath) = attemptInfo
        logDebug(s"Application log ${attemptInfo.logPath} loaded successfully: $attemptInfo")
        Some(attemptInfo)
      } else {
        logWarning(s"Failed to load application log ${fileStatus.getPath}. " +
          "The application may have not started.")
        None
      }

    }
    ... // 省略
}
那 applications 结构又是如何更新的呢?主要是先找出新的 App 对象,将旧的 App 列表和新的 App 列表进行合并,生成新的对象,并更新到 applications 中。
//位置:core/src/main/scala/org/apache/spark/deploy/history/FsHistoryProvider.scala
  private def mergeApplicationListing(fileStatus: FileStatus): Unit = {

      ... // 省略

      val newAppMap = new mutable.HashMap[String, FsApplicationHistoryInfo]()

      // 多线程同时更新 applications 对象,这里用 synchronized 实现同步访问该对象
    applications.synchronized {
      // newAttempts 对象是刚才解析 eventLog 构造的 FsApplicationAttemptInfo 对象列表
      // 这一步的目的就是要过滤出刚才新生成的App对象,并更新已存在但大小有增加的App对象
      newAttempts.foreach { attempt =>
        val appInfo = newAppMap.get(attempt.appId)
          .orElse(applications.get(attempt.appId))
          .map { app =>
            val attempts =
              app.attempts.filter(_.attemptId != attempt.attemptId) ++ List(attempt)
            new FsApplicationHistoryInfo(attempt.appId, attempt.name,
              attempts.sortWith(compareAttemptInfo))
          }
          .getOrElse(new FsApplicationHistoryInfo(attempt.appId, attempt.name, List(attempt)))
        newAppMap(attempt.appId) = appInfo
      }

      val newApps = newAppMap.values.toSeq.sortWith(compareAppInfo)
      val mergedApps = new mutable.LinkedHashMap[String, FsApplicationHistoryInfo]()
      def addIfAbsent(info: FsApplicationHistoryInfo): Unit = {
        if (!mergedApps.contains(info.id)) {
          mergedApps += (info.id -> info)
        }
      }

      // mergedApps 对象用于保存已有App对象和新生成的App对象进行合并后结果,产生最新的 applications 对象
      val newIterator = newApps.iterator.buffered
      val oldIterator = applications.values.iterator.buffered
      while (newIterator.hasNext && oldIterator.hasNext) {
        if (newAppMap.contains(oldIterator.head.id)) {
          oldIterator.next()
        } else if (compareAppInfo(newIterator.head, oldIterator.head)) {
          addIfAbsent(newIterator.next())
        } else {
          addIfAbsent(oldIterator.next())
        }
      }
      newIterator.foreach(addIfAbsent)
      oldIterator.foreach(addIfAbsent)

      applications = mergedApps
    }
}
3.3 eventLog 日志清理原理
了解了前面 fileToAppInfo 和 applications 数据结构,日志清理的原理相对而言就简单很多,主要是对 applications 对象进行处理。
日志清理大致流程如下:
源码分析:
//位置:core/src/main/scala/org/apache/spark/deploy/history/FsHistoryProvider.scala
   private[history] def cleanLogs(): Unit = {
    try {
      // 1、获取 eventLog 保存的生命周期时间
      val maxAge = conf.getTimeAsSeconds("spark.history.fs.cleaner.maxAge", "7d") * 1000

      val now = clock.getTimeMillis()
      val appsToRetain = new mutable.LinkedHashMap[String, FsApplicationHistoryInfo]()

      // 判断函数:超过生命周期并完成(后缀不是 .inprogress 结束)的任务可以正常清理
      def shouldClean(attempt: FsApplicationAttemptInfo): Boolean = {
        now - attempt.lastUpdated > maxAge && attempt.completed
      }

      // 2、扫描 applications 对象,将超过生命周期待清理的 eventLog 保存在 attemptsToClean 对象中,未超过的保存在 appsToRetain 对象中
      applications.values.foreach { app =>
        val (toClean, toRetain) = app.attempts.partition(shouldClean)
        attemptsToClean ++= toClean

        if (toClean.isEmpty) {
          appsToRetain += (app.id -> app)
        } else if (toRetain.nonEmpty) {
          appsToRetain += (app.id ->
            new FsApplicationHistoryInfo(app.id, app.name, toRetain.toList))
        }
      }

      // 3、更新 applications 对象
      applications = appsToRetain

      val leftToClean = new mutable.ListBuffer[FsApplicationAttemptInfo]
      // 4、调用 HDFS api 执行真正的清理操作
      attemptsToClean.foreach { attempt =>
        try {
          fs.delete(new Path(logDir, attempt.logPath), true)
        } catch {
          case e: AccessControlException =>
            logInfo(s"No permission to delete ${attempt.logPath}, ignoring.")
          case t: IOException =>
            logError(s"IOException in cleaning ${attempt.logPath}", t)
            leftToClean += attempt
        }
      }
      // 没有正常清理的对象重新更新到 attemptsToClean 中
      attemptsToClean = leftToClean
    } catch {
      case t: Exception => logError("Exception in cleaning logs", t)
    }
  }
四、原因分析&解决方案
上面日志解析和日志清理的逻辑都依赖 fileToAppInfo 和 applications 对象,Spark HistoryServer UI 界面展示的内容也是依赖这两个对象,所以,UI 无法加载任务信息也是由于这里的数据结构出现了多线程访问的线程安全问题。
4.1 HashMap 线程同步问题&解决方案
4.1.1 原因分析
fileToAppInfo 对象是 FsHistoryProvider 类的一个对象,数据结构采用 HashMap,是线程不安全的对象,但在多线程调用 mergeApplicationListing() 方法操作 fileToAppInfo 对象并不是同步访问,导致每次载入所有 eventLog 日志文件,会出现不能保证所有文件都能被正常加载。那为什么会出现这种情况呢?其实就是多线程访问同一个对象时经常出现的一个问题。
下图是多线程访问同一对象带来的线程安全问题的一个简单例子:
当线程 1 执行 x++ 后将结果更新到内存中,内存中此时 x=1,没有问题。
但由于线程 1 在读内存数据时线程 2 同时也读取内存中 x 的值,当线程 2 执行 x++ 后,将结果更新到内存中,此时内存中 x 的值还是 1。
而预期的结果是 x = 2,这种情况便是多线程访问同一对象的线程安全问题。
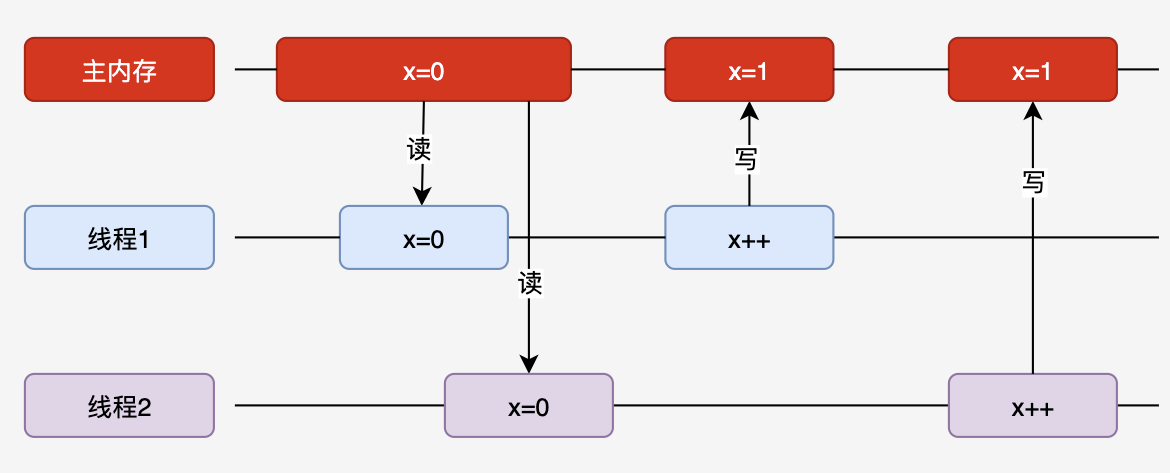
多线程访问同一对象带来的线程安全问题
4.1.2 解决方案
HashMap 对象带来的线程安全问题,解决方法比较简单,用 ConcurrentHashMap 替代即可。参考 patch:。
var fileToAppInfo = new ConcurrentHashMap[Path, FsApplicationAttemptInfo]()4.2 Synchronized 锁同步问题&解决方案
4.2.1 原因分析
在 Spark HistoryServer 中,applications 更新的玩法是这样的:
//位置:core/src/main/scala/org/apache/spark/deploy/history/FsHistoryProvider.scala
@volatile private var applications: mutable.LinkedHashMap[String, FsApplicationHistoryInfo]
    = new mutable.LinkedHashMap()

applications.synchronized {
  ... // 省略

  val mergedApps = new mutable.LinkedHashMap[String, FsApplicationHistoryInfo]()

  ... // 省略更新 mergedApps 的值

  applications = mergedApps
}
咋一看,这样使用 synchronized 锁住 applications 对象似乎没什么问题。但其实是有问题的,我们先来看一个例子。
class Synchronized {
    private List aList = new ArrayList();
    public void anyObject1() {
        // 和 HistoryServer 玩法一致,锁住 aList 对象,代码块中用 aList2 更新 aList 对象值
        synchronized (aList) {
            List aList2 = new ArrayList();
            for (int i = 0; i < 10; i++) {
                System.out.println("anyObject"  + "-" + Thread.currentThread());
                aList2.add(1);
            }
            aList = aList2;
            System.out.println("aList =" + aList.size());
        }
    }
}

public class SynchronizedDemo01 {

    public static void main(String[] args) {
        SynchronizedDemo01 syn = new SynchronizedDemo01();
        syn.anyObjTest();
    }

    public void anyObjTest() {
        final Synchronized syn = new Synchronized();
        // 启动5个线程去操作aList对象,每次打印10条记录
        for (int i = 0; i < 5; i++) {
            new Thread() {
                @Override
                public void run() {
                    syn.anyObject1();
                }
            }.start();
        }
    }
}


运行结果:(随机多运行几次)
anyObject-Thread[Thread-3,5,main]
anyObject-Thread[Thread-2,5,main]
anyObject-Thread[Thread-3,5,main]
anyObject-Thread[Thread-2,5,main]
anyObject-Thread[Thread-3,5,main]
aList =10
anyObject-Thread[Thread-3,5,main]
anyObject-Thread[Thread-3,5,main]
anyObject-Thread[Thread-3,5,main]
anyObject-Thread[Thread-3,5,main]
anyObject-Thread[Thread-3,5,main]
aList =10
anyObject-Thread[Thread-4,5,main]
anyObject-Thread[Thread-4,5,main]
anyObject-Thread[Thread-4,5,main]
通过这个例子,可以看出 Thread-3 在 Thread-2 线程中打印了信息,也就是说通过这种方式锁住 synchronized(aList 对象)(非 this 对象)是有问题的,线程并没有真正的锁住 aList 对象。那为什么会出现这种情况呢?我们接着看。
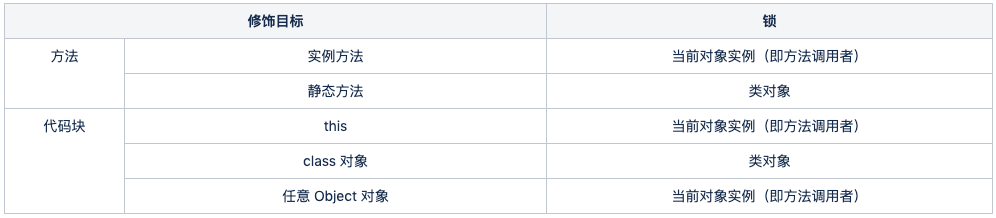
这里重点介绍下 synchronized 修饰目标为 this 和任意 Object 对象这两种情况。要理解他们之间的区别,就需要搞清楚 synchronized 到底锁住的是什么?在 这篇文章中,介绍了 synchronized 锁住的内容有两种,一种是类,另一种是对象实例。这里的关键就在于第二种情况,当使用 synchronized 锁住的是对象实例时,HistoryServer 和上面 aList 的例子那就有问题了,怎么说呢?我们来看看下面这张图。
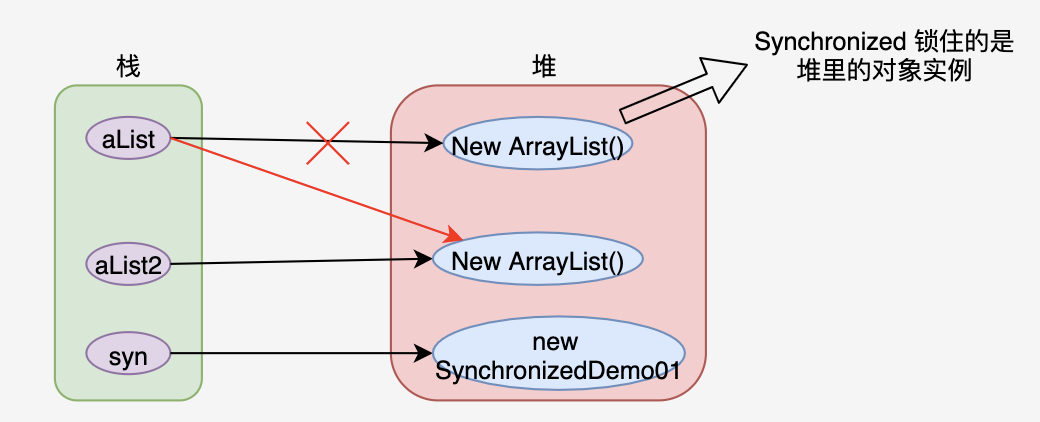
Synchronized 锁住的对象示意图
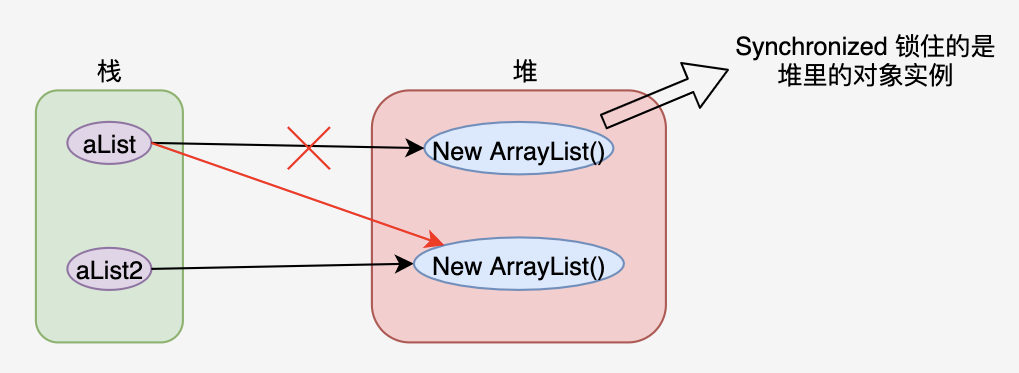
通过这张图就一目了然,synchronized(aList) 代码块锁住的是 aList 对象指向的堆中的对象实例,当在代码块中通过 aList = aList2 赋值后,aList 便指向的新的对象实例,导致原来的对象实例变成了无主状态,synchronized(aList) 代码块的锁其实也就失去了意义。所以才会出现线程安全的问题。
上面那段测试代码如果采用 synchronized(this) 则不会出现多线程错乱打印的情况,为什么呢?通过上表中我们知道 synchronized(this) 的锁是当前对象实例,即方法的调用者,在测试代码中也就是 这里创建 syn 对象实例,在内存中的表现为:
Synchronized 对象堆内表现示意图
使用 synchronized(this) 之所以不会出问题,是由于不管 aList 指向哪个对象实例,this 对象(即 syn 对象)指向的对象实例始终没有变,所以多线程访问 aList 不会出现线程安全问题。
至此,HistoryServer 中的那段代码块是有问题的,并不能实现 applications 对象的多线程安全访问。
4.2.2 解决方案
分析清楚了具体原因后,解决方法就比较容易了,将那段代码的 synchronized 锁住的对象从 applications 对象改成 this 对象即可。
//位置:core/src/main/scala/org/apache/spark/deploy/history/FsHistoryProvider.scala
@volatile private var applications: mutable.LinkedHashMap[String, FsApplicationHistoryInfo]
    = new mutable.LinkedHashMap()

this.synchronized {
  ... // 省略

  val mergedApps = new mutable.LinkedHashMap[String, FsApplicationHistoryInfo]()

  ... // 省略更新 mergedApps 的值

  applications = mergedApps
}
4.3.3 一点小扩展
上面解决了 synchronized 锁住 applications 非 this 对象的问题,那 Spark 中为什么不直接用 this 对象呢?这里还是有一点小窍门的。那就是 synchronzied(this) 比 Synchronized(非this) 的效率要低一些,为什么这么说呢?来看两个例子。
例子1:两个线程使用同一个对象分别访问 synchronized 方法和 synchronized(str) 代码块。
结论:两个线程是异步执行的,Thread1 锁住的 'str' Object 对象实例,而 Thread2 锁住的是 service 对象实例,互不影响。
public class SynchronizedDemo02 {
  static Service service = new Service();

  public static void main(String[] args) {
   new Thread () {
    @Override
    public void run() {
     service.method1();
    }
   }.start();
   new Thread () {
    @Override
    public void run() {
     service.method2();
    }
   }.start();
  }
}

class Service {
 String str = "test";

 public void method1() {
  synchronized (str) {
   System.out.println("method1 begin");

   try {
    Thread.sleep(1000);
   }catch (Exception e) {
    e.printStackTrace();
   }
   System.out.println("method1 end");
  }
 }

 public synchronized void method2() {
  System.out.println("method2 begin");
  try {
   Thread.sleep(1000);
  }catch (Exception e) {
   e.printStackTrace();
  }
  System.out.println("method2 end");
 }
}


结果输出:
method1 begin
method2 begin
method1 end
method2 end
例子2:两个线程使用同一个对象分别访问 synchronized 方法和 synchronized(this) 代码块。
结论:两个线程同步执行,锁住的是同一个 this 对象(即 service 对象),必须一个线程执行完才能执行另一个线程。
public class SynchronizedDemo02 {
  static Service service = new Service();

  public static  void main(String[] args) {
   new Thread () {
    @Override
    public void run() {
     service.method1();
    }
   }.start();
   new Thread () {
    @Override
    public void run() {
     service.method2();
    }
   }.start();
  }
}

class Service {
 String str = "test";

 public void method1() {
  synchronized (this) {
   System.out.println("method1 begin");

   try {
    Thread.sleep(1000);
   }catch (Exception e) {
    e.printStackTrace();
   }
   System.out.println("method1 end");
  }
 }

 public synchronized  void method2() {
  System.out.println("method2 begin");
  try {
   Thread.sleep(1000);
  }catch (Exception e) {
   e.printStackTrace();
  }
  System.out.println("method2 end");
 }
}


结果输出:
method1 begin
method1 end
method2 begin
method2 end
所以,采用 synchronized(非 this 对象) 会减少当前对象锁与其他 synchorinzed(this) 代码块或 synchronized 方法之间的锁竞争,与其他 synchronized 代码异步执行,互不影响,会提高代码的执行效率。
【参考资料】