Java锁总论
一. 概述
在SMP体系结构下,往往出现执行并发执行等情况的出现;在编程时,考虑并发性问题;基于并发性问题,java提供了锁机制来限制对竞争资源的操作。当抢到锁时,才能访问该资源。那么在java体系中,都有哪些锁呢,且是如何体现的呢?
二. java锁以及原理
在java开发中,对某项资源或者某一项代码块进行加锁的形式有两种。一种是通过synchronize关键字进行加锁;另外一种是声明Lock对象进行加锁。
2.1 synchronize
2.1.1 使用场景
该关键字可以
public class Test{
  public static synchronized void compute(int i){
    //.....
  }
}
也可以
public class Test{
  public synchronized void compute(int i){
    //.....
  }
}
修饰类实例方法,粒度有点大,还可以缩小范围,
public class Test{
  public void compute(int i){
    synchronized (this){
      //.....
    }
  }
}
2.1.2 原理
通过 可以得知:修饰方法时,是在方法修饰符上打上ACC_SYNCHRONIZED 标志,表明是原子操作;而修饰代码块,在对应代码开始前加上monitorenter和代码执行完后加上monitorexit指令。
指令的介绍如下:
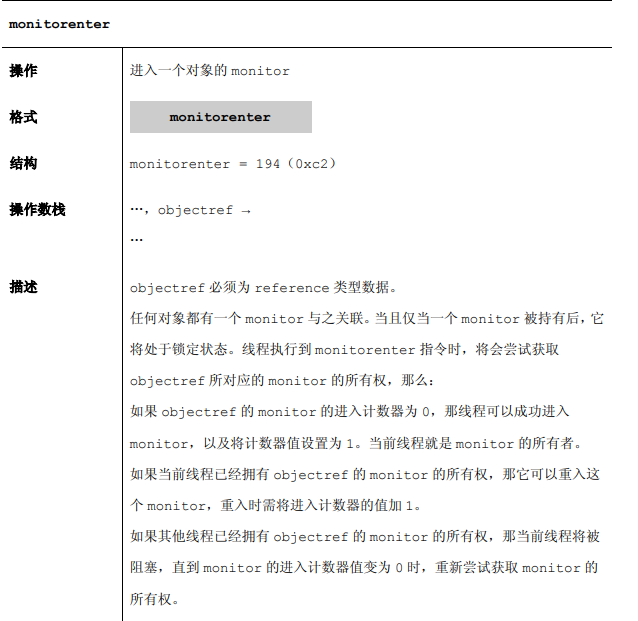
为了理解虚拟机规范说讲述的,我将以例子的形式进行说明:
public class LockTest {
  public void com6() {
          int i = 9;
          synchronized (LockTest.class) {
              i = 12;
              System.out.println("hello word");
          }
  }
}
查看该字节码:
  Constant pool:
   ......
  #7 = Class              #33            // LockTest
   ......
  #33 = Utf8               LockTest

  public void com6();
    descriptor: ()V
    flags: ACC_PUBLIC
    Code:
      stack=2, locals=4, args_size=1
         0: bipush        9
         2: istore_1
         3: ldc           #7      // class LockTest 从常量池中推送至栈顶,注意这个是指针
         5: dup   //复制栈顶的数值并压入栈顶,之所以复制,是为将该指针存放到本地变量内,给monitorexit使用
         6: astore_2
         7: monitorenter   //进入竞争资源区域
         8: bipush        12
        10: istore_1
        11: getstatic     #4          // Field java/lang/System.out:Ljava/io/PrintStream;
        14: ldc           #5         // String hello word
        16: invokevirtual #6         // Method java/io/PrintStream.println:(Ljava/lang/String;)V
        19: aload_2   //将第6步存放的值,压入栈顶,供给下一个指令使用
        20: monitorexit   //推出竞争资源区域
        21: goto          29
        24: astore_3
        25: aload_2
        26: monitorexit
        27: aload_3
        28: athrow
        29: return
结合字节码以及指令的介绍,monitor对象就是LockTest对象。这里可能会有一个疑惑:为什么26行会有monitorexit指令?是由于异常情况。因为20行的退出指令是正常情况释放锁的,而异常情况下是不会执行到的,而26行的退出指令就是异常情况执行的;
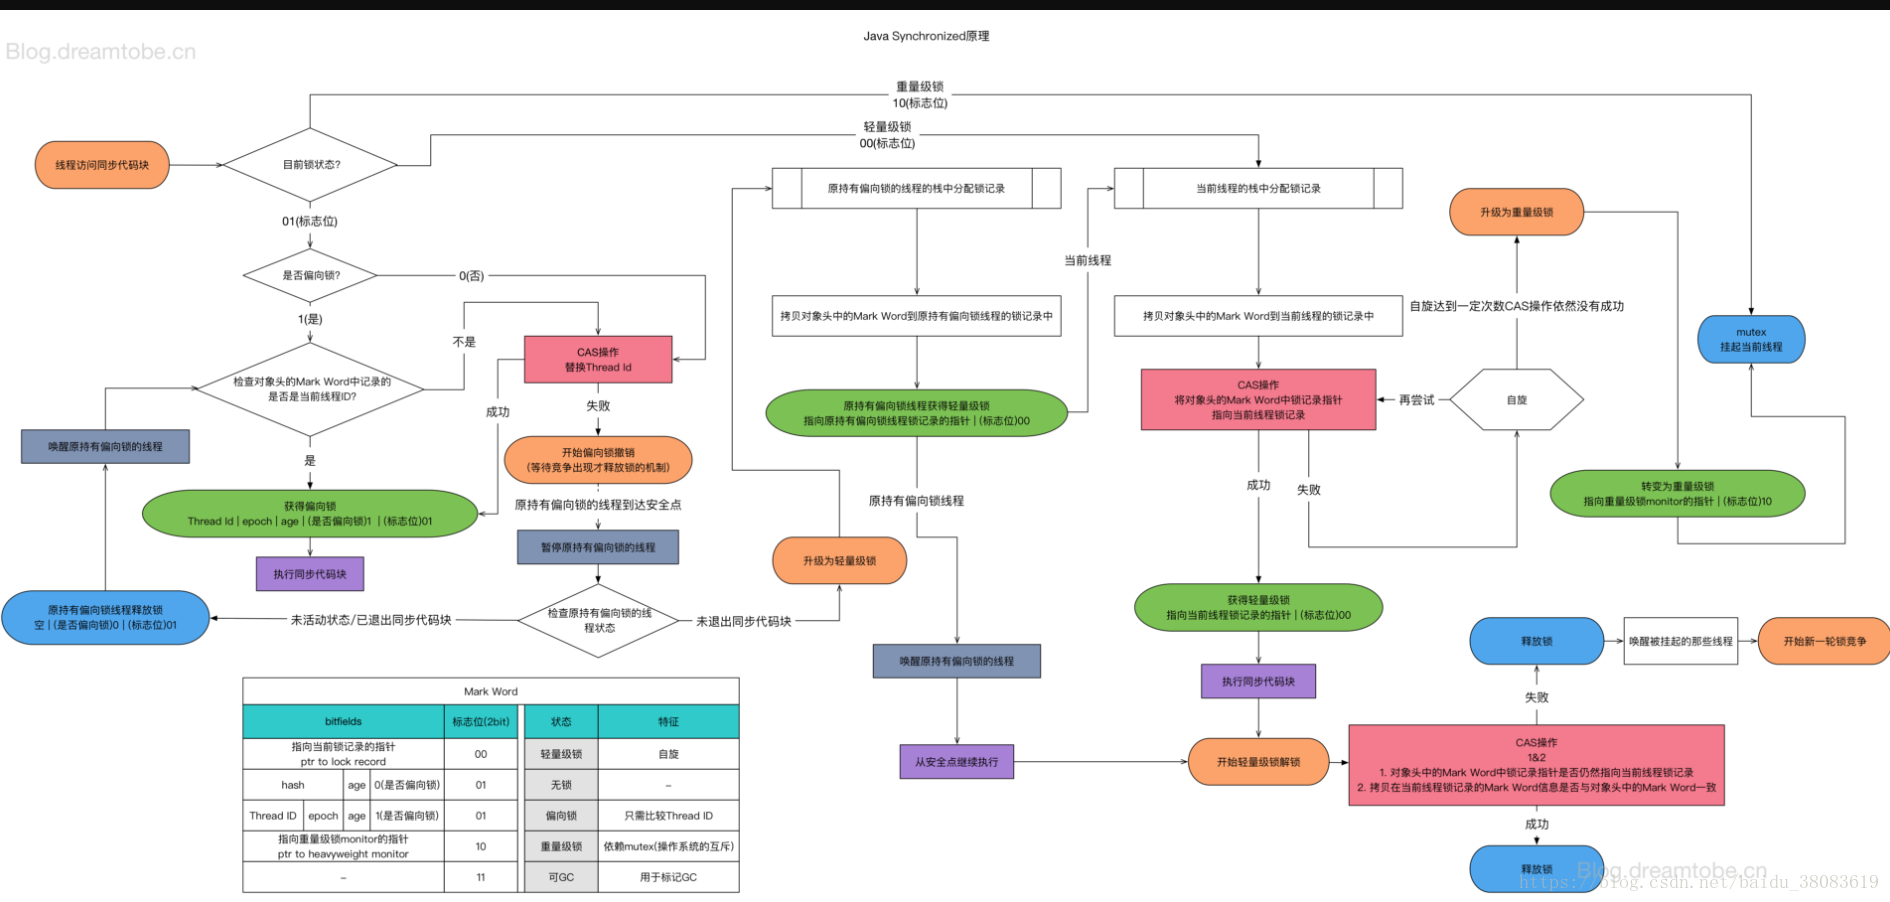
自从JDK1.6后,JDK团队对synchronized关键字锁对应的锁进行了优化;具体的细节,可以参考
PS. 一个概念
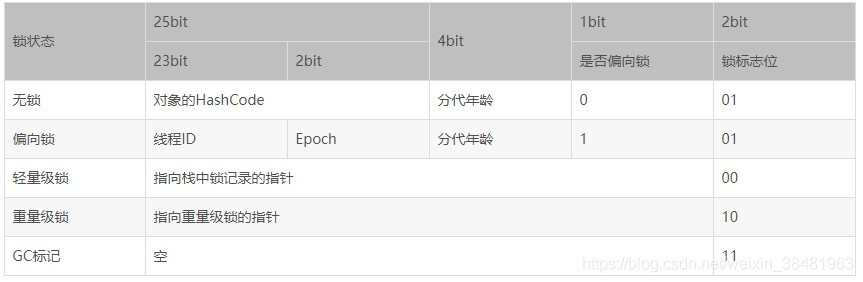
其中无锁的“对象的HashCode”以及偏向锁的“线程ID”都可以理解;而轻量级锁中的“指向栈中锁记录的指针”是什么意思呢?通过《深入理解Java虚拟机》第2版中第13章 线程安全与锁优化介绍,在当前线程的栈帧中建立一个名为锁记录的空间,用于存储对象目前的Mark Work的拷贝,然后通过CAS操作将对象的Mark Word更新为指向Lock Record的指针。
2.2 Lock
Lock是JDK提供出来的一个接口,具体的锁的特性交给子类来实现。其暴露的接口如下:
基于Condition的使用,有如下例子。详细的原理会在2.3.3 ConditionObject里有讲解
import java.util.LinkedList;
import java.util.concurrent.ConcurrentLinkedQueue;
import java.util.concurrent.locks.Condition;
import java.util.concurrent.locks.Lock;
import java.util.concurrent.locks.ReentrantLock;

public class LockConditionTest {
    private ConcurrentLinkedQueue queue = new ConcurrentLinkedQueue();

    private Lock lock = new ReentrantLock();

    private int maxSize = 5;
    //生产者
    private Condition providerCondition = lock.newCondition();
    // 消费者
    private Condition consumerCondition = lock.newCondition();

    public void provide(String value) {
        try {
            lock.lock();
            while (queue.size() == maxSize) {
                //当队列满了以后,停止当前线程执行,并将该线程保存到providerCondition对象里面
                System.out.println(System.currentTimeMillis()+"-"+Thread.currentThread().getName()+"-provide queue = " + queue);
                providerCondition.await();
            }
            System.out.println("provide - value = " + value);
            queue.add(value);
            //激活消费者线程继续消费队列里面的消息,如果consumerCondition里没有阻塞线程,不用做任何处理
            consumerCondition.signal();
        } catch (InterruptedException e) {
            e.printStackTrace();
        } finally {
            lock.unlock();
        }
    }

    public String consume() {
        String result = null;
        try {
            lock.lock();
            while (queue.size() == 0) {
                //当队列空了,停止当前线程,并将该线程保存到consumerCondition对象里面
                System.out.println(System.currentTimeMillis()+"-"+Thread.currentThread().getName()+" -consume queue = " + queue);
                consumerCondition.await();
            }
            result = queue.poll();
            System.out.println("consume - result = " + result);
            //激活生产者线程继续生产消息
            providerCondition.signal();
        } catch (InterruptedException e) {
            e.printStackTrace();
        } finally {
            lock.unlock();
        }
        return result;
    }

    public static void main(String[] args) {
        LockConditionTest t = new LockConditionTest();
        new Thread(() -> {
            int i = 0;
            while (true) {
                t.provide(i++ + "");
            }
        }).start();
        new Thread(() -> {
            while (true) {
                t.consume();
            }
        }).start();
    }
}
2.2.1 ReentrantLock
这个是可重入锁。具体的使用如下:
Lock lock = new ReentrantLock();里面的方法可以参考上一章节介绍。
需要说明的是ReentrantLock内部调用了
2.2.2 **Lock与**LockView
WriteLock与ReadLock是ReentrantReadWriteLock类的内部类;
ReentrantReadWriteLock readWriteLock = new ReentrantReadWriteLock();
ReentrantReadWriteLock.WriteLock writeLock = readWriteLock.writeLock();
ReentrantReadWriteLock.ReadLock readLock = readWriteLock.readLock();
具体的介绍,有ReentrantReadWriteLock详细解读
WriteLockView与ReadLockView是StampedLock内部类:
StampedLock stampedLock = new StampedLock();
Lock readLock = stampedLock.asReadLock();
Lock writeLock = stampedLock.asWriteLock();
具体的介绍,有StampedLock详细解读
2.3 AbstractQueuedSynchronizer
从类名可以看出来,它是个抽象类,同时也包含队列特性,还有更加关键的是提供原子操作功能;
2.3.1 属性
A. 队列 从下面的代码,可以看出它是链表结构;当线程去获取锁时,发现锁已经被使用,那么就会自动将当前线程设置休眠状态,同时封装成Node对象,插入到AQS队列中去。等待锁的释放再去竞争。
private transient volatile Node head;
private transient volatile Node tail;
static final class Node {
  volatile int waitStatus; //thread的状态
  volatile Node prev; // 上一个节点指针
  volatile Node next; //下一个节点指针
  volatile Thread thread; //线程
  Node nextWaiter; //当使用lock.newCondition时将记录下一个阻塞线程。而没有使用的情况下,将记录是排他模式还是共享模式
  //.......
}
B. 原子操作 JDK封装Unsafe类提供原子操作,其原理是通过CAS机制进行原子操作。
private static final Unsafe unsafe = Unsafe.getUnsafe();
private static final long stateOffset;
//.....
static {
  try {
    stateOffset = unsafe.objectFieldOffset(AbstractQueuedSynchronizer.class.getDeclaredField("state"));
   	//.....
  } catch (Exception ex) { throw new Error(ex); }
}
C state 是共享变量。当并发情况下,通过CAS操作达到线程间”通信“。这里的“通信”就是加锁释放锁等信息。
2.3.2 方法
下面将对主要的方法进行解读
1. acquire
public final void acquire(int arg) {
  if (!tryAcquire(arg) &&
      acquireQueued(addWaiter(Node.EXCLUSIVE), arg))
    selfInterrupt();
}
private Node addWaiter(Node mode) {
  Node node = new Node(Thread.currentThread(), mode);
  // Try the fast path of enq; backup to full enq on failure
  Node pred = tail;
  if (pred != null) {
    node.prev = pred;
    if (compareAndSetTail(pred, node)) {
      pred.next = node;
      return node;
    }
  }
  enq(node);
  return node;
}
当当前队列没有阻塞线程节点时,将创建一个空节点保存到head, 将入参的节点保存到尾部tail.
private Node enq(final Node node) {
  for (;;) {
    Node t = tail;
    if (t == null) { // Must initialize
      if (compareAndSetHead(new Node()))
        tail = head;
    } else {
      //
      node.prev = t;
      if (compareAndSetTail(t, node)) {
        t.next = node;
        return t;
      }
    }
  }
}
插入到队尾后,代码如下。该逻辑是:判断刚插入的节点的前驱节点(上一个节点)是否是头部节点。如果是,则尝试再次获取资源。意味者:
final boolean acquireQueued(final Node node, int arg) {
  boolean failed = true;
  try {
    boolean interrupted = false;
    for (;;) {
      //获取上一个节点的对象
      final Node p = node.predecessor();
      if (p == head && tryAcquire(arg)) {
        setHead(node);
        p.next = null; // help GC
        failed = false;
        return interrupted;
      }
      if (shouldParkAfterFailedAcquire(p, node) &&
          parkAndCheckInterrupt())
        interrupted = true;
    }
  } finally {
    if (failed)
      cancelAcquire(node);
  }
}private void setHead(Node node) {
head = node;
node.thread = null;
node.prev = null;
}依然获取不到资源,则将当前节点的当前线程失效,放弃CPU资源。
private final boolean parkAndCheckInterrupt() {
  //释放CPU资源,等待其他线程来激活
  LockSupport.park(this);
  return Thread.interrupted();
}
当被其他线程激活时,则会重复之前的步骤,来进行尝试获取资源。
2. acquireInterruptibly
该方法支持中断,当尝试获取资源时,直接中断,会丢出一个中断异常。如果不是,则尝试获取资源。
public final void acquireInterruptibly(int arg)
  throws InterruptedException {
  if (Thread.interrupted())
    throw new InterruptedException();
  if (!tryAcquire(arg))
    doAcquireInterruptibly(arg);
}
当获取不到资源,该逻辑跟acquire的逻辑差不多。只是稍微不同的是,当该线程被中断,则直接丢出异常,而不是再次尝试获取资源。
private void doAcquireInterruptibly(int arg)
  throws InterruptedException {
  final Node node = addWaiter(Node.EXCLUSIVE);
  boolean failed = true;
  try {
    for (;;) {
      final Node p = node.predecessor();
      if (p == head && tryAcquire(arg)) {
        setHead(node);
        p.next = null; // help GC
        failed = false;
        return;
      }
      if (shouldParkAfterFailedAcquire(p, node) &&
          parkAndCheckInterrupt())
        throw new InterruptedException();
    }
  } finally {
    if (failed)
      cancelAcquire(node);
  }
}
3. tryAcquireNanos
这里跟acquireInterruptibly方法逻辑差不多,只是多出两个逻辑:
private boolean doAcquireNanos(int arg, long nanosTimeout)
  throws InterruptedException {
  if (nanosTimeout <= 0L)
    return false;
  //截至时间戳
  final long deadline = System.nanoTime() + nanosTimeout;
  final Node node = addWaiter(Node.EXCLUSIVE);
  boolean failed = true;
  try {
    for (;;) {
      final Node p = node.predecessor();
      if (p == head && tryAcquire(arg)) {
        setHead(node);
        p.next = null; // help GC
        failed = false;
        return true;
      }
      nanosTimeout = deadline - System.nanoTime();
      //当过期,则说明已经超时,直接返回
      if (nanosTimeout <= 0L)
        return false;
      //spinForTimeoutThreshold = 1000纳秒
      //当间隔时间大于自旋时间,则直接休眠该间隔时间
      if (shouldParkAfterFailedAcquire(p, node) &&
          nanosTimeout > spinForTimeoutThreshold)
        LockSupport.parkNanos(this, nanosTimeout);
      if (Thread.interrupted())
        throw new InterruptedException();
    }
  } finally {
    if (failed)
      cancelAcquire(node);
  }
}
4. acquireShared
public final void acquireShared(int arg) {
  if (tryAcquireShared(arg) < 0)
    doAcquireShared(arg);
}
将当前线程封装成一个节点,该节点的nextWaiter是共享模式,插入队尾里面。
private void doAcquireShared(int arg) {
  final Node node = addWaiter(Node.SHARED);
  boolean failed = true;
  try {
    boolean interrupted = false;
    for (;;) {
      final Node p = node.predecessor();
      if (p == head) {
        //再次尝试获取资源
        int r = tryAcquireShared(arg);
        if (r >= 0) {
          //说明获取到该资源,则会头节点以及设置“传递”机制
          setHeadAndPropagate(node, r);
          p.next = null; // help GC
          if (interrupted)
            selfInterrupt();
          failed = false;
          return;
        }
      }
      //请参考acquire章节的介绍
      if (shouldParkAfterFailedAcquire(p, node) &&
          parkAndCheckInterrupt())
        interrupted = true;
    }
  } finally {
    if (failed)
      cancelAcquire(node);
  }
}
里面跟acquire章节的介绍逻辑差不多。我们重点看一下setHeadAndPropagate方法。只有当有资源且资源是大于0,或者是头节点的当前线程的状态是小于0时,才会获取node的下一个节点,去判断是否是共享模式的。如果是,则激活正在阻塞的共享模式下的线程。
private void setHeadAndPropagate(Node node, int propagate) {
  Node h = head; // Record old head for check below
  //请参考acquire章节的介绍
  setHead(node);
  if (propagate > 0 || h == null || h.waitStatus < 0 ||
      (h = head) == null || h.waitStatus < 0) {
    Node s = node.next;
    if (s == null || s.isShared())
      doReleaseShared();
  }
}
当头部节点的状态为SIGNAL时,说明有阻塞线程存在,则可以直接激活该线程;该线程没有抢占到CPU资源时,说明16行的代码判断条件为真,则直接跳出去。如果该线程抢占到CPU资源了,但是依然获取不到资源,也不会更改head节点,条件也是为真,也会直接跳出去;如果获取到资源了,则更改head节点指针,条件为假,则再一次循环做判断;所以,该方法会激活所有正在阻塞的所有线程。
当状态为0时,则说明无阻塞线程存在,说明当前线程是的上一个前驱节点(上一个节点)就是头结点。当执行到16行时,条件为真,则直接跳出循环;
private void doReleaseShared() {
  for (;;) {
    Node h = head;
    if (h != null && h != tail) {
      int ws = h.waitStatus;
      if (ws == Node.SIGNAL) {
        if (!compareAndSetWaitStatus(h, Node.SIGNAL, 0))
          continue;            // loop to recheck cases
        unparkSuccessor(h);
      }
      else if (ws == 0 &&
               !compareAndSetWaitStatus(h, 0, Node.PROPAGATE))
        continue;                // loop on failed CAS
    }
    //当头结点没有发生变化,说明这个时间段没有线程释放
    if (h == head)                   // loop if head changed
      break;
  }
}
5. release
public final boolean release(int arg) {
  //释放该资源
  if (tryRelease(arg)) {
    Node h = head;
    if (h != null && h.waitStatus != 0)
      //表明有阻塞线程在队列中,则去激活
      unparkSuccessor(h);
    return true;
  }
  return false;
}private void unparkSuccessor(Node node) {
int ws = node.waitStatus;
if (ws < 0)
//将该节点的等待状态置为0
compareAndSetWaitStatus(node, ws, 0);
Node s = node.next;
if (s == null || s.waitStatus > 0) {
//当下一个节点为空,说明没有阻塞线程;大于0说明,说该阻塞线程已经cancel了
//会从尾部往前遍历,最后一个阻塞线程的。
s = null;
for (Node t = tail; t != null && t != node; t = t.prev)
if (t.waitStatus <= 0)
s = t;
}
if (s != null)
LockSupport.unpark(s.thread);
}6. releaseShared
doReleaseShared可以参考“acquireShared”里面介绍。
public final boolean releaseShared(int arg) {
  if (tryReleaseShared(arg)) {
    doReleaseShared();
    return true;
  }
  return false;
}
2.3.3 ConditionObject
现在我们着重解读一下condition,其实现类为
 public class ConditionObject implements Condition, java.io.Serializable {
   private transient Node firstWaiter;//第一个节点
   private transient Node lastWaiter;//第二个节点
   //...
 }
按照2.2.1 ReentrantLock的介绍,要先获取锁;根据上文的对该方法的介绍,会获取该资源;
final void lock() {
  acquire(1);
}
获取成功后,条件满足会调用condition.await()方法,进行阻塞。
2.3.3.1 condition.await
public final void await() throws InterruptedException {
  if (Thread.interrupted())
    throw new InterruptedException();
  //将当前线程封装成Node,保存到队列里面
  Node node = addConditionWaiter();
  //释放所有资源
  int savedState = fullyRelease(node);
  int interruptMode = 0;
  //是否是同步队列,这个地方很关键
  while (!isOnSyncQueue(node)) {
    //释放当前线程CPU资源,阻塞状态
    LockSupport.park(this);
    //检测是不是被中断了
    if ((interruptMode = checkInterruptWhileWaiting(node)) != 0)
      break;
  }
  //acquireQueued在上面有讲解过,这里就不用在一一说明了
  if (acquireQueued(node, savedState) && interruptMode != THROW_IE)
    interruptMode = REINTERRUPT;
  if (node.nextWaiter != null) // clean up if cancelled
    unlinkCancelledWaiters();
  if (interruptMode != 0)
    reportInterruptAfterWait(interruptMode);
}
private Node addConditionWaiter() {
Node t = lastWaiter;
// If lastWaiter is cancelled, clean out.
if (t != null && t.waitStatus != Node.CONDITION) {
//清理掉不是Condition的所有节点。
unlinkCancelledWaiters();
t = lastWaiter;
}
Node node = new Node(Thread.currentThread(), Node.CONDITION);
if (t == null)
firstWaiter = node;
else
t.nextWaiter = node;
lastWaiter = node;
return node;
}
final boolean isOnSyncQueue(Node node) {
//当condition.signal()时,会将该状态置为0;详细的讲解稍微给出
if (node.waitStatus == Node.CONDITION || node.prev == null)
return false;
if (node.next != null) // If has successor, it must be on queue
return true;
return findNodeFromTail(node);
}
private boolean findNodeFromTail(Node node) {
Node t = tail;
for (;;) {
if (t == node)
return true;
if (t == null)
return false;
t = t.prev;
}
}2.3.3.2 condition.signal
public final void signal() {
  if (!isHeldExclusively())
    throw new IllegalMonitorStateException();
  Node first = firstWaiter;
  if (first != null)
    //激活first的线程
    doSignal(first);
}
private void doSignal(Node first) {
  do {
    if ( (firstWaiter = first.nextWaiter) == null)
      lastWaiter = null;
    first.nextWaiter = null;
  } while (!transferForSignal(first) &&
           (first = firstWaiter) != null);
}
final boolean transferForSignal(Node node) {
  //这里将node的状态置为0
  if (!compareAndSetWaitStatus(node, Node.CONDITION, 0))
    return false;
  //将node插入到队尾里
  Node p = enq(node);
  int ws = p.waitStatus;
  if (ws > 0 || !compareAndSetWaitStatus(p, ws, Node.SIGNAL))
    LockSupport.unpark(node.thread);
  return true;
}
2.3.4 汇总
通过以上的几个关键方法的介绍,我们得知:
2.3.4.1 Node. waitStatus
static final int CANCELLED =  1; //表示当前的线程被取消
static final int SIGNAL    = -1;//表示当前节点的后继节点包含的线程需要运行,需要进行unpark操作
static final int PROPAGATE = -3;//表示当前场景下后续的acquireShared能够得以执行。
//值为0,表示当前节点在sync queue中,等待着获取锁
2.3.4.2 Node.nextWaiter
//当没有使用lock.newCondition情况下,该属性的值只能为如下两中状态
static final Node SHARED = new Node();//共享模式
static final Node EXCLUSIVE = null;//排他模式
//当在使用lock.newCondition的情况,阻塞的节点都会存放该属性上,以此为链路
2.4 AbstractQueuedSynchronizer实现类
上文有说过,其有几个方法没有实现,交给子类来实现;
protected boolean tryAcquire(int arg) {
  throw new UnsupportedOperationException();
}
protected boolean tryRelease(int arg) {
  throw new UnsupportedOperationException();
}
protected int tryAcquireShared(int arg) {
  throw new UnsupportedOperationException();
}
protected boolean tryReleaseShared(int arg) {
  throw new UnsupportedOperationException();
}
为什么没有实现该方法呢,由于
private volatile int state;2.4.1 Semaphore
这是是信号锁,其内部有一个属性sync,该对象实现了AbstractQueuedSynchronizer类。代码有点多,索性就不粘贴了,直接阐述就差不多了。
初始化,会将state设置指定的值。例如,state = 3,当第一次获取锁时,发现state >= 0。 将state修改为2. 并直接返回2. 上游方法会判断是否大于等于0.如果条件为真,则说明获取锁;否则获取锁失败。
所以,每次获取锁,state都会-1.每次释放锁,state都会+1。换句话说,state在代表是同时允许state个线程去执行;使用这个类,可以有效的控制线程数量同时执行;
2.4.2 ReentrantReadWriteLock
读写锁,意味者:允许可以多个线程并发读操作,当有一个线程在写操作时,其他线程都会被阻塞。
这里的state分为两部分,
例如,初始化读写锁后.
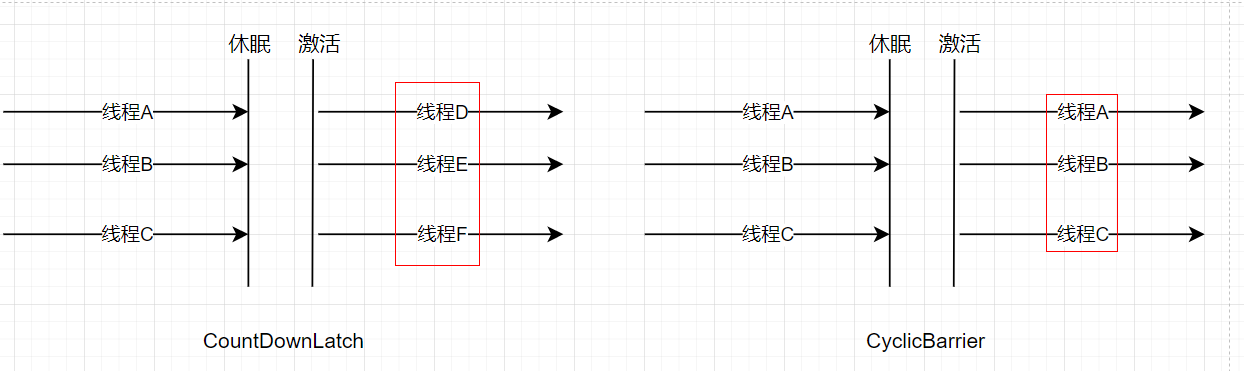
2.4.3 CountDownLatch
这是一个或多个线程等待其他线程完成后,才会执行它自身的操作。举个例子:E、F线程等待A、B、C、D线程完成后,E、F才会被激活去完成自己的操作;如下例子:
CountDownLatch countDownLatch = new CountDownLatch(4);
Thread A = new Thread(()->{
  countDownLatch.countDown();
  System.out.println("A thread run.... ");
});
Thread B = new Thread(()->{
  countDownLatch.countDown();
  System.out.println("B thread run.... ");
});
Thread C = new Thread(()->{
  countDownLatch.countDown();
  System.out.println("C thread run.... ");
});
Thread D = new Thread(()->{
  countDownLatch.countDown();
  System.out.println("D thread run.... ");
});
Thread E = new Thread(()->{
  try {
    countDownLatch.await();
  } catch (InterruptedException e) {
    e.printStackTrace();
  }
  System.out.println("E thread run.... ");
});
Thread F = new Thread(()->{
  try {
    countDownLatch.await();
  } catch (InterruptedException e) {
    e.printStackTrace();
  }
  System.out.println("F thread run.... ");
});
A.start();
B.start();
C.start();
D.start();
E.start();
F.start();
创建CountDownLatch对象,会初始化state的值,该值有构成函数传入;当调用await方法时,会判断state是否等于0,如果条件为真,则说明无需等待其他线程完成,因为state=0代表其他线程已经完成了。
如果条件为假,则将当前线程插入到队列中去;等待其他线程来激活;调用countDown方法,会将state-1,当state=0时,会去激活其他阻塞线程。
2.4.4 ThreadPoolExecutor
在线程池中有一个内部类Worker实现了。这里逻辑比较简单,就不多阐述了。里面有一行代码,需要重新留意的,
其实代码也说明了,获取锁是为了避免线程中暴露的方法去暴力中断该线程。
2.4.5 公平锁与非公平锁
在AbstractQueuedSynchronized的实现字类中,都会有公平锁和非公平锁,之所以单独抽离来讲解,而不是在各个子类进行阐述,是因为他们的业务逻辑都是一样的。
公平锁,当队列有阻塞的线程时,先有新的线程A尝试获取锁,则就会将线程A直接插入队尾中去。
非公平锁,当队列有阻塞的线程时,先有新的线程A尝试获取锁,则会尝试获取锁,如果获取锁,则直接执行线程A后续的操作,否则将线程A插入到队尾中,等待其他线程被释放。
2.5 CyclicBarrier
这个类跟CountDownLatch类有点类似;允许多个
CyclicBarrier cyclicBarrier = new CyclicBarrier(6);
Thread A = new Thread(()->{
  try {
    cyclicBarrier.await();
  } catch (Exception e) {
    e.printStackTrace();
  }
  System.out.println("A thread run.... ");
});
Thread B = new Thread(()->{
  try {
    cyclicBarrier.await();
  } catch (Exception e) {
    e.printStackTrace();
  }
  System.out.println("B thread run.... ");
});
Thread C = new Thread(()->{
  try {
    cyclicBarrier.await();
  } catch (Exception e) {
    e.printStackTrace();
  }
  System.out.println("C thread run.... ");
});
Thread D = new Thread(()->{
  try {
    cyclicBarrier.await();
  } catch (Exception e) {
    e.printStackTrace();
  }
  System.out.println("D thread run.... ");
});
Thread E = new Thread(()->{
  try {
    cyclicBarrier.await();
  } catch (Exception e) {
    e.printStackTrace();
  }
  System.out.println("E thread run.... ");
});
Thread F = new Thread(()->{
  try {
    cyclicBarrier.await();
  } catch (Exception e) {
    e.printStackTrace();
  }
  System.out.println("F thread run.... ");
});
A.start();
B.start();
C.start();
D.start();
E.start();
F.start();
创建CyclicBarrier对象,会初始化state的值,该值有构成函数传入。当调用await方法时,会将state-1,接着判断state是否等于0,如果条件为真,则说明其他线程都已经达到了这个”点“,激活其他线程线程,并且
2.5.1 CyclicBarrier与CountDownLatch的区别
2.6 StampedLock
ReentrantReadWriteLock是重量级的读写锁,而StampedLock是轻量级读写锁。为什么这么说呢?
有多个读操作线程在执行且没有释放锁,当有一个写操作的线程A进来,ReentanttReadWriteLock会直接阻塞线程A,并且插入到队尾中;而StampedLock会认为锁很快就会被释放,所以自旋一定的次数依然获取不到锁,才阻塞并插入到队尾中。
常规的用法跟ReentrantReadWriteLock差不多。
StampedLock stampedLock = new StampedLock();
long stamp = stampedLook.writeLock();//获取写锁
long stamp = stampedLock.readLock();//获取读锁
stampedLock.unLock(stamp);
Lock readLock = stampedLock.asReadLock();//获取读操作锁对象
readLock.lock();
readLock.unLock();
Lock writeLock = stampedLock.asWriteLock();//获取读操作锁对象
writeLock.lock();
writeLock.unLock();
StampedLock的结构跟ReentrantReadWriteLock对象的结构差不多;该实现原理跟其是差不多的。但并没有内部实现AbstractQueuedSynchronized抽象,而是自己实现一套新的方案,且新增自旋获取逻辑(乐观锁)。
StampedLock的state的组成结构:
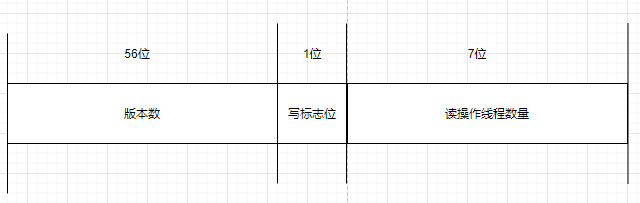
StampedLock还提供了不加锁的且更高性能的原子化操作。如下代码
StampedLock stampedLock = new StampedLock();
//如果第8没有标志,即没有写操作线程,则置state读操作数量为0后返回。
//如果有写操作的,则返回0
long stamp = sl.tryOptimisticRead();
//添加内存屏障,保障前面的代码被执行完。同时比对现有stampedLock的state值中的版本数是否与stamp一致。
//以及是否写标志位是否置为1.
//如果一致,则说明目前阶段没有写操作对该资源进行更新。数据是最新的。
//如果不一致,则说明已经有写操作正在更新过程中,则进行去获取读锁。
if (!stampedLock.validate(stamp)) {
  stamp = sl.readLock();
  try {
    //.....
  } finally {
    sl.unlockRead(stamp);
  }
}
StampedLock的其他方法,根据该方法名可以猜测出具体做的功能,不是很难理解,就不一一介绍了。
另外,需要解读一下自旋获取锁的关键方法,acquireWrite方法解读。
private long acquireWrite(boolean interruptible, long deadline) {
  //p是parent的缩写,通过自旋依然获取不到锁,会将当前线程封装节点node插入到队尾。
  //p就是node的父节点,也就是前驱节点。
        WNode node = null, p;
 		 //通过自旋,尝试去获取锁。当自旋次数完后,依然没有获取锁,则初始化一个节点,插入到未节点中去
    	//,接着跳出该循环
        for (int spins = -1;;) { // spin while enqueuing
            long m, s, ns;
          // 当低8位都为0时,说明没有读写操作的线程,则尝试将state+128.
            if ((m = (s = state) & ABITS) == 0L) {
                if (U.compareAndSwapLong(this, STATE, s, ns = s + WBIT))
                    return ns;
            }
            else if (spins < 0)
              //当state的写标志位为1,则说明有一个线程正在做写操作。那么设置spin=64,可以自旋至少64次。
              //尝试去获取锁。
                spins = (m == WBIT && wtail == whead) ? SPINS : 0;
            else if (spins > 0) {
                if (LockSupport.nextSecondarySeed() >= 0)
                    --spins;
            }
            else if ((p = wtail) == null) { // initialize queue
              //如英文注释,先初始化队列
              //注意,这里的模式为写模式。
                WNode hd = new WNode(WMODE, null);
                if (U.compareAndSwapObject(this, WHEAD, null, hd))
                    wtail = hd;
            }
            else if (node == null)
              //初始化一个节点
                node = new WNode(WMODE, p);
            else if (node.prev != p)
              //将初始化的节点的前驱指针指向未节点。
                node.prev = p;
            else if (U.compareAndSwapObject(this, WTAIL, p, node)) {
              //插入到队尾,跳出循环
                p.next = node;
                break;
            }
        }

        for (int spins = -1;;) {
          // np是new Parent的缩写,
            WNode h, np, pp; int ps;
            if ((h = whead) == p) {
              //当刚插入的节点的父节点为头部节点,则说明只有当前线程正在获取锁,并没有其他线程跟它竞争锁
              //则可以自旋尝试去获取锁。
                if (spins < 0)
                    spins = HEAD_SPINS;
                else if (spins < MAX_HEAD_SPINS)
                    spins <<= 1;
                for (int k = spins;;) { // spin at head
                    long s, ns;
                    if (((s = state) & ABITS) == 0L) {
                      //当低8位都为0时,说明没有任何线程,则尝试将state+128.即将第8为置为1.
                        if (U.compareAndSwapLong(this, STATE, s,
                                                 ns = s + WBIT)) {
                          ///......重点....
                          //将刚才插入的节点设置为头结点。
                            whead = node;
                            node.prev = null;
                            return ns;
                        }
                    }
                    else if (LockSupport.nextSecondarySeed() >= 0 &&
                             --k <= 0)
                        break;
                }
            }
            else if (h != null) { // help release stale waiters
              //头结点不为空时,则将节点中的阻塞的读操作线程激活。
                WNode c; Thread w;
                while ((c = h.cowait) != null) {
                    if (U.compareAndSwapObject(h, WCOWAIT, c, c.cowait) &&
                        (w = c.thread) != null)
                        U.unpark(w);
                }
            }
          //当没有其他线程去修改头结点时,意味者没有其他线程已经获取锁资源。
            if (whead == h) {
                if ((np = node.prev) != p) {
                  //修复链表中的链路,当p节点为cancel状态,会更改其连续,具体可以看到下面的cancel逻辑
                    if (np != null)
                        (p = np).next = node;   // stale
                }
                else if ((ps = p.status) == 0)
                  //设置父节点为等待状态
                    U.compareAndSwapInt(p, WSTATUS, 0, WAITING);
                else if (ps == CANCELLED) {
                  //如果是cancel状态,则更该其链路
                    if ((pp = p.prev) != null) {
                        node.prev = pp;
                        pp.next = node;
                    }
                }
                else {
                    long time; // 0 argument to park means no timeout
                    if (deadline == 0L)
                        time = 0L;
                    else if ((time = deadline - System.nanoTime()) <= 0L)
                        return cancelWaiter(node, node, false);
                    Thread wt = Thread.currentThread();
                    U.putObject(wt, PARKBLOCKER, this);
                    node.thread = wt;
                    if (p.status < 0 && (p != h || (state & ABITS) != 0L) &&
                        whead == h && node.prev == p)
                      //阻塞当前节点
                        U.park(false, time);  // emulate LockSupport.park
                    node.thread = null;
                    U.putObject(wt, PARKBLOCKER, null);
                    if (interruptible && Thread.interrupted())
                        return cancelWaiter(node, node, true);
                }
            }
        }
    }
private long acquireRead(boolean interruptible, long deadline) {
//p 指向的尾节点
WNode node = null, p;
for (int spins = -1;;) {
WNode h;
//当当前队列没有任何阻塞的线程时,通过自旋去获取锁
if ((h = whead) == (p = wtail)) {
for (long m, s, ns;;) {
if ((m = (s = state) & ABITS) < RFULL ?
U.compareAndSwapLong(this, STATE, s, ns = s + RUNIT) :
(m < WBIT && (ns = tryIncReaderOverflow(s)) != 0L))
return ns;
else if (m >= WBIT) {
if (spins > 0) {
if (LockSupport.nextSecondarySeed() >= 0)
--spins;
}
else {
if (spins == 0) {
WNode nh = whead, np = wtail;
if ((nh == h && np == p) || (h = nh) != (p = np))
break;
}
spins = SPINS;
}
}
}
}
if (p == null) { // initialize queue
WNode hd = new WNode(WMODE, null);
if (U.compareAndSwapObject(this, WHEAD, null, hd))
wtail = hd;
}
else if (node == null)
//注意。这里是读模式
node = new WNode(RMODE, p);
else if (h == p || p.mode != RMODE) {
//当父节点的模式不是读模式,则将node节点插入到队尾中。并跳出这个死循环。
if (node.prev != p)
node.prev = p;
else if (U.compareAndSwapObject(this, WTAIL, p, node)) {
//重点代码
p.next = node;
break;
}
}
//如果是读模式下的,则将node插入p节点中的cowait头部。
else if (!U.compareAndSwapObject(p, WCOWAIT,
node.cowait = p.cowait, node))
node.cowait = null;
else {
for (;;) {
WNode pp, c; Thread w;
//激活头结点的cowait列表中线程
if ((h = whead) != null && (c = h.cowait) != null &&
U.compareAndSwapObject(h, WCOWAIT, c, c.cowait) &&
(w = c.thread) != null) // help release
U.unpark(w);
if (h == (pp = p.prev) || h == p || pp == null) {
//当父节点是头结点,或者父节点的父节点是头结点或空,则说明当前node是排到最前面的。
//意味者写操作刚刚释放锁,或者cancel掉了;
//又或者是另外的一种情景:当前没有写操作,然而循环自旋,
//一直做tryIncReaderOverflow返回0.这个方法,稍后讲解。
long m, s, ns;
do {
if ((m = (s = state) & ABITS) < RFULL ?
U.compareAndSwapLong(this, STATE, s,
ns = s + RUNIT) :
(m < WBIT &&
(ns = tryIncReaderOverflow(s)) != 0L))
return ns;
} while (m < WBIT);
}
if (whead == h && p.prev == pp) {
long time;
if (pp == null || h == p || p.status > 0) {
//当其他线程释放锁时,或者父节点已经cancel状态,才会跳出这个死循环。
//换句话说,只有node的前驱节点都执行完,才会跳出该循环。
node = null; // throw away
break;
}
if (deadline == 0L)
time = 0L;
else if ((time = deadline - System.nanoTime()) <= 0L)
return cancelWaiter(node, p, false);
Thread wt = Thread.currentThread();
U.putObject(wt, PARKBLOCKER, this);
node.thread = wt;
if ((h != pp || (state & ABITS) == WBIT) &&
whead == h && p.prev == pp)
//阻塞
U.park(false, time);
node.thread = null;
U.putObject(wt, PARKBLOCKER, null);
if (interruptible && Thread.interrupted())
return cancelWaiter(node, p, true);
}
}
}
}
for (int spins = -1;;) {
WNode h, np, pp; int ps;
if ((h = whead) == p) {
if (spins < 0)
spins = HEAD_SPINS;
else if (spins < MAX_HEAD_SPINS)
spins <<= 1;
////自旋获取锁
for (int k = spins;;) { // spin at head
long m, s, ns;
if ((m = (s = state) & ABITS) < RFULL ?
U.compareAndSwapLong(this, STATE, s, ns = s + RUNIT) :
(m < WBIT && (ns = tryIncReaderOverflow(s)) != 0L)) {
WNode c; Thread w;
whead = node;
node.prev = null;
while ((c = node.cowait) != null) {
if (U.compareAndSwapObject(node, WCOWAIT,
c, c.cowait) &&
(w = c.thread) != null)
U.unpark(w);
}
return ns;
}
else if (m >= WBIT &&
LockSupport.nextSecondarySeed() >= 0 && --k <= 0)
break;
}
}
else if (h != null) {
WNode c; Thread w;
while ((c = h.cowait) != null) {
if (U.compareAndSwapObject(h, WCOWAIT, c, c.cowait) &&
(w = c.thread) != null)
U.unpark(w);
}
}
if (whead == h) {
if ((np = node.prev) != p) {
if (np != null)
(p = np).next = node; // stale
}
else if ((ps = p.status) == 0)
U.compareAndSwapInt(p, WSTATUS, 0, WAITING);
else if (ps == CANCELLED) {
if ((pp = p.prev) != null) {
node.prev = pp;
pp.next = node;
}
}
else {
long time;
if (deadline == 0L)
time = 0L;
else if ((time = deadline - System.nanoTime()) <= 0L)
return cancelWaiter(node, node, false);
Thread wt = Thread.currentThread();
U.putObject(wt, PARKBLOCKER, this);
node.thread = wt;
if (p.status < 0 &&
(p != h || (state & ABITS) == WBIT) &&
whead == h && node.prev == p)
U.park(false, time);
node.thread = null;
U.putObject(wt, PARKBLOCKER, null);
if (interruptible && Thread.interrupted())
return cancelWaiter(node, node, true);
}
}
}
}private long tryIncReaderOverflow(long s) {
//当读操作数量等于126时,且没有其他线程更改state,才会操作成功。
//否则直接返回失败。
if ((s & ABITS) == RFULL) {
if (U.compareAndSwapLong(this, STATE, s, s | RBITS)) {
++readerOverflow;
state = s;
return s;
}
}
else if ((LockSupport.nextSecondarySeed() &
OVERFLOW_YIELD_RATE) == 0)
Thread.yield();
return 0L;
}三. 并发设计模式
我们在平常写代码,或多或少会涉及设计模式,装饰模式,组合模式,工厂模式,策略模式,观察者模式等;那么在编写并发代码,也会有对应的设计模式可以借鉴,从而是我们的代码更加美观,可拓展。
具体的内容,可以仔细阅读《Java 多线程编程》设计模式篇
详细的就不多说了
四. 锁的底层原理
在操作层面,锁是如何实现的;其主要是依赖于硬件层面上的逻辑处理。在其他文章也有涉及到。
《 Intel® 64 and IA-32 Architectures Software Developer’s Manual, Volume 3A》第8章,可以详细的去阅读该章节的知识点。然而我没花太多时间,只看到关键的介绍以及参考其他文章进行总结。
The Intel 64 and IA-32 architectures provide mechanisms for managing and improving the performance of multiple processors connected to the same system bus. These include:
•
Bus locking(总线锁) and/or cache coherency(缓存一致性) management for performing atomic operations on system memory .• Serializing instructions.
.......
4.1 总线锁
重量级锁。当某个指令加上了# lock,意味该指令访问的地址被加上一个锁,阻塞其他CPU访问该地址。
4.2 缓存锁
轻量级锁。采用缓存一致性(MES)协议,保证缓存一致性问题。及保证了各个CPU访问的缓存都是一致性的。
在第2章节,我们所介绍的各种锁基本都是采用该机制。synchronized关键比较特殊,刚开始是采用缓存锁来处理,当一直获取不到锁时,会升级到重量级锁,也就是总线索。
5. 汇总
在操作系统层面的锁机制,有两种实现方式:
在java体系中,基本上都是采用缓存一致性原理来实现锁;
java体系中,最核心的就是AQS抽象类,进行竞争锁,阻塞其他线程,激活其他线程等线程通信。
六. 参考资源