SpringCloud Gateway 动态路由
SpringCloud Gateway系列文章共五篇,由我行开发工程师 提供,带大家深入剖析Gateway工作原理,及如何基于Gateway进行定制化开发以适应企业特定环境需求。
第五篇:SpringCloud Gateway 过滤器。
SpringCloud Gateway 简介
SpringCloud Gateway是Spring出品的SpringCloud微服务体系中的API Gateway,基于Spring5、Project Reactor、WebFlux构建的一个高效的非阻塞式网关,提供了以下功能:
可以根据所有的请求属性作为路由条件(Routing Predicates)
提供了作用于指定路由的网关过滤器(Gateway Filter)
提供了作用于所有路由的全局过滤器(Global filter)
提供了断路器集成(Circuit Breaker)
提供了服务发现集成(Discovery Client)
提供了限流组件集成(Rate Limiting)
路径重写(Path Rewriting)
本文内容主要涉及第一部分,路由查找。
Gateway提供了多种路由加载方式,包括基于配置文件、服务发现、存储器等,本文从源码入手,详细解析路由查找-加载过程,并通过分析这个过程,研究如何进行拓展路由存储及加载方式,进而实现动态路由。
何谓动态路由
动态路由即:在不进行网关应用重启的情况下,可以通过管理API或者管理UI的方式添加路由,能实时或准实时生效;且在网关应用重启后,动态添加的路由仍然存在。
动态路由的两个基本要求:实时性和持久性。
Gateway工作原理
查阅SringCloud Gateway ,Gateway 工作原理如下图(本文主要涉及红框部分):
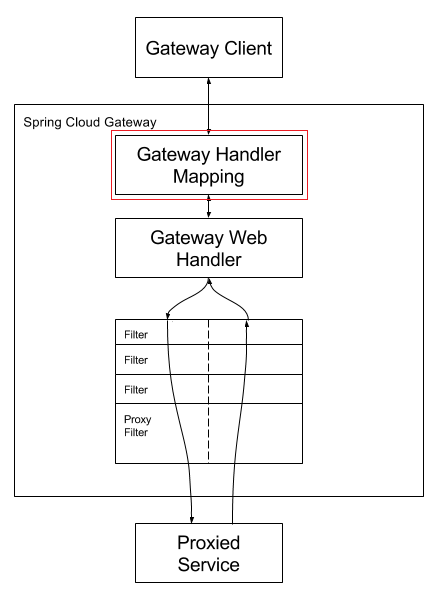
Clients make requests to Spring Cloud Gateway. If the Gateway Handler Mapping determines that a request matches a route, it is sent to the Gateway Web Handler. This handler runs the request through a filter chain that is specific to the request. The reason the filters are divided by the dotted line is that filters can run logic both before and after the proxy request is sent. All “pre” filter logic is executed. Then the proxy request is made. After the proxy request is made, the “post” filter logic is run.
客户端请求,首先会被处理,用以在
Gateway源码解读
通过解读官方源码,梳理gateway工作机制,并寻找扩展点,以便实现
RoutePredicateHandlerMapping
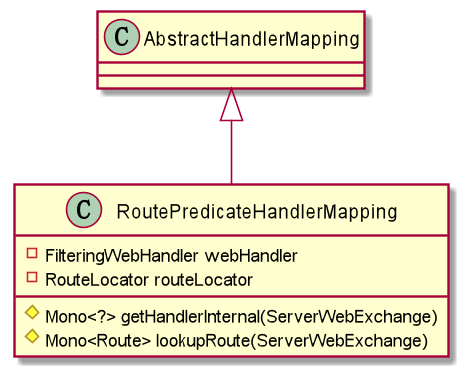
Gateway中实现路由查找逻辑的 是 类,该类在 中实现自动装配(Gateway的Bean自动装备都是由此类实现) ,源码260-266行如下
@Bean
public RoutePredicateHandlerMapping routePredicateHandlerMapping(
    FilteringWebHandler webHandler, RouteLocator routeLocator,
    GlobalCorsProperties globalCorsProperties, Environment environment) {
  return new RoutePredicateHandlerMapping(webHandler, routeLocator,
      globalCorsProperties, environment);
}
首先可以看到,这里装配是无条件的,没有留出拓展点(我 对此用了特殊的方法进行了拓展),重点是两个Bean的注入:
下面代码为路由查找的过程,重点是, 源码上增加了注释便于理解
@Override
protected Mono getHandlerInternal(ServerWebExchange exchange) {
//... 忽略之上代码
// lookupRoute 用于查找路由
return lookupRoute(exchange)
// 将查找到的路由记录到 ServerWebExchange 上下文中,然后,返回 FilteringWebHandler
.flatMap((Function>) r -> {
exchange.getAttributes().remove(GATEWAY_PREDICATE_ROUTE_ATTR);
if (logger.isDebugEnabled()) {
logger.debug(
"Mapping [" + getExchangeDesc(exchange) + "] to " + r);
}
// 后续会从Attributes获取到路由对象,进而获取路由过滤器,执行过滤器等列操作
exchange.getAttributes().put(GATEWAY_ROUTE_ATTR, r);
return Mono.just(webHandler);
//... 忽略后续代码 protected Mono lookupRoute(ServerWebExchange exchange) {
// this.routeLocator.getRoutes() 该方法是重点,后续需要继续分析
// RouteLocator 的实现类 是如何 getRoutes()
return this.routeLocator.getRoutes()
.concatMap(route -> Mono.just(route).filterWhen(r -> {
exchange.getAttributes().put(GATEWAY_PREDICATE_ROUTE_ATTR, r.getId());
// 根据请求、当前路由的断言,判断当前当前路由断言是否命中,非本文重点,不展开
return r.getPredicate().apply(exchange);
})
//... 忽略后续代码 RouteLocator 实现类

// 转化方法
@Override
public Flux getRoutes() {
  // 注意这里的 getRouteDefinitions()
  Flux routes = this.routeDefinitionLocator.getRouteDefinitions()
      .map(this::convertToRoute);
// ... 下略 @Bean
public RouteLocator routeDefinitionRouteLocator(GatewayProperties properties,
// 注入所有过滤器工厂(不含全局过滤器),用于根据RouteDefinition组装Route
List gatewayFilters,
// 注入所有断言工厂,用于根据RouteDefinition组装Route
List predicates,
// 注入RouteDefinition的加载器,这里是下文重点
RouteDefinitionLocator routeDefinitionLocator,
ConfigurationService configurationService) {
return new RouteDefinitionRouteLocator(routeDefinitionLocator, predicates,
gatewayFilters, properties, configurationService);
}
@Bean
@Primary
@ConditionalOnMissingBean(name = "cachedCompositeRouteLocator")
public RouteLocator cachedCompositeRouteLocator(List routeLocators) {
return new CachingRouteLocator(
new CompositeRouteLocator(Flux.fromIterable(routeLocators)));
} 在 中并没有直接装配 CompositeRouteLocator,而是嵌套在了CachingRouteLocator 中,上述代码块17行表示所有RouteLocator的实现类都会被装配到 中(也包含,16行巧妙的通过一个Conditional避免了对自身的循环依赖),这样注入到 其实只有 ,这里可以由玩家进行拓展。
本文不进行展开说明,在你创建路由后,需发布一个 事件,然后这个Locator就可以监听到该事件,并刷新路由。
public RouteDefinitionRouteLocator(RouteDefinitionLocator routeDefinitionLocator,
    List predicates,
    List gatewayFilterFactories,
    GatewayProperties gatewayProperties,
    ConfigurationService configurationService) {
  this.routeDefinitionLocator = routeDefinitionLocator;
  this.configurationService = configurationService;
  // 断言工厂初始化,同下面过滤器器工厂类似,也有截去RoutePredicateFactory的操作
  initFactories(predicates);
  gatewayFilterFactories.forEach(
      // factory.name() 用以获取过滤器工厂的名字,具体代码实现就是 末尾截去"GatewayFilterFactory"
      // 这也是为什么我们自定义过滤器工厂时需要以GatewayFilterFactory结尾命名
      factory -> this.gatewayFilterFactories.put(factory.name(), factory));
  this.gatewayProperties = gatewayProperties;
}
结合上面代码块的内容,例如我们在使用Gateway 时定义一个路由:
spring:
  cloud:
    gateway:
      routes:
      - id: path_route
        uri: https://example.org
        predicates:
        - Path=/red/{segment},/blue/{segment}
        filters:
        - AddRequestHeader=X-Request-red, blue
Path 对应 PathRoutePredicateFactory,AddRequestHeader 对应 AddRequestHeaderGatewayFilterFactory。
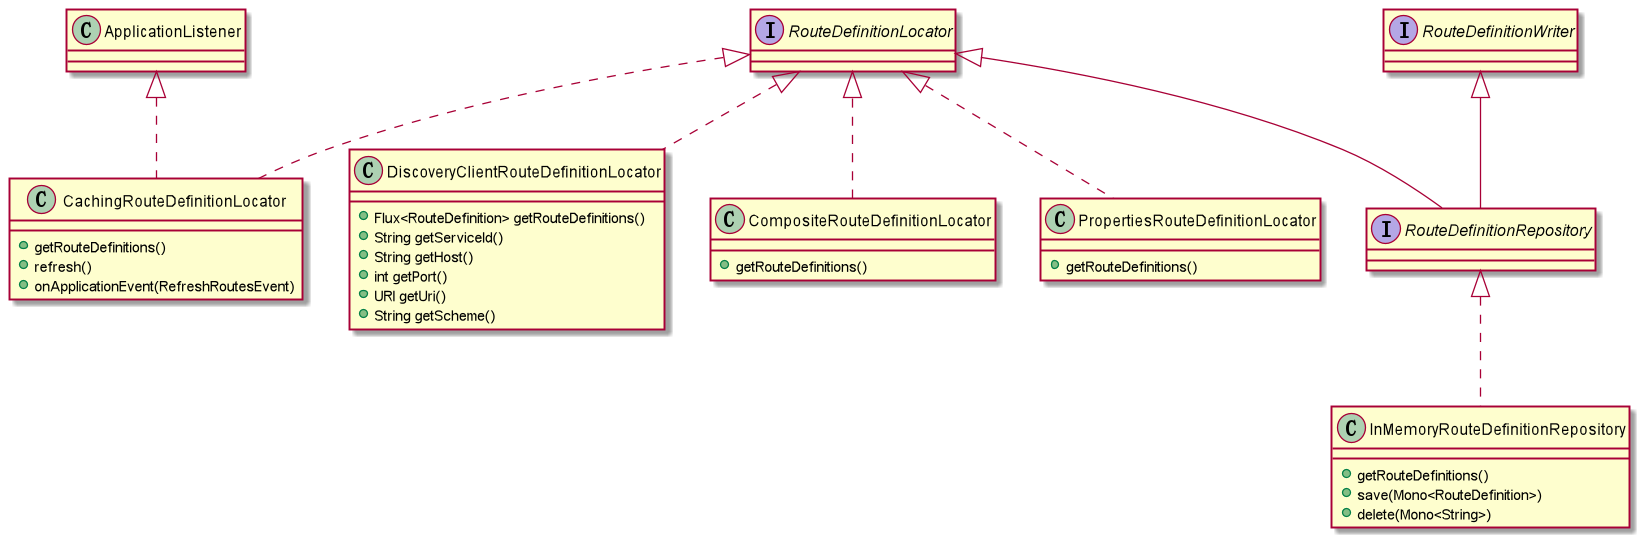
RouteDefinitionLocator 实现类
装配 RouteDefinitionRouteLocator 时注入了一个 类型为 的Bean,回到 看 RouteDefinitionLocator 是如何装配的,源码208-214行
@Bean
@Primary
// 注意 @Primary 决定了上面被注入的是这个Bean,
// 在GatewayAutoConfiguration 中装配了多个RouteDefinitionLocator的子类,包括
// CompositeRouteDefinitionLocator、InMemoryRouteDefinitionRepository,
// 还在其他配置类中装配的
// PropertiesRouteDefinitionLocator 、DiscoveryClientRouteDefinitionLocator
public RouteDefinitionLocator routeDefinitionLocator(
  List routeDefinitionLocators) {
  return new CompositeRouteDefinitionLocator(Flux.fromIterable(routeDefinitionLocators));
}
这里采用了一个 对所有 的实现类进行了组合封装,这些实现了,都实现了具体的 方法。
# 开启此locator
spring.cloud.gateway.discovery.locator.enabled=true
# 开启默认为 reactive 模式,需显示关闭可调整为阻塞模式
spring.cloud.discovery.reactive.enabled=false基于内存存储的路由加载器,可以通过SpringCloud Gateway提供的 management endpoint 进行路由管理,但由于基于内存实现,并未持久化。
@Bean // 只有在没有装配RouteDefinitionRepository的其他实现Bean时,才生效, // 我们可以通过该扩展点实现动态路由及持久化 @ConditionalOnMissingBean(RouteDefinitionRepository.class) public InMemoryRouteDefinitionRepository inMemoryRouteDefinitionRepository() { return new InMemoryRouteDefinitionRepository(); }
是对其他 RouteDefinitionLocator 的组合,通过 可以看到其装配代码,源码208-214行
@Bean @Primary public RouteDefinitionLocator routeDefinitionLocator( List
routeDefinitionLocators) { return new CompositeRouteDefinitionLocator( Flux.fromIterable(routeDefinitionLocators)); } 可以看到前面 中注入的 就是CompositeRouteDefinitionLocator,而装配它是注入了所有RouteDefinitionLocator的实现,其中包括RouteDefinitionRepository的实现(默认情况下为InMemoryRouteDefinitionRepository)。
分析到这里就比较明确了,如果需要实现可持久化存储的动态路由,我们只需基于数据库(或其他持久化存储),参考InMemoryRouteDefinitionRepository实现一个RouteDefinitionRepository即可。
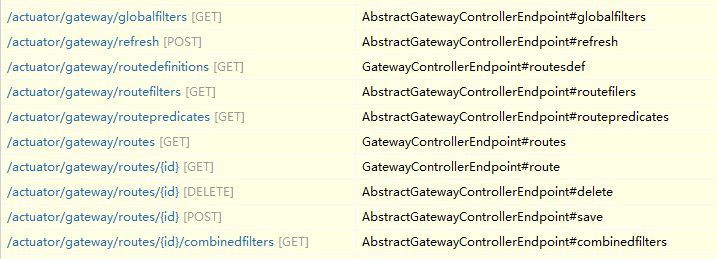
另外Gateway自带了管理端点,用于对路由进行动态管理,不过默认的实现是基于内存的,无法持久化:
基于数据库存储的动态路由
对上文归纳总结如下:
下文是采用MongoDB进行路由存储的实现代码示例,选用MongoDB出于几点考虑:
代码片段
MongoRouteDefinition 仅仅对原生的类进行了继承,未添加任何属性,仅用于添加数据库存储注解(这个类是非必须的,不过定义后,后面代码会有较大简化)
@Document("gwRoutes")
public class MongoRouteDefinition extends RouteDefinition {
public static MongoRouteDefinition from(RouteDefinition route) {
MongoRouteDefinition newRoute = new MongoRouteDefinition();
BeanUtils.copyProperties(route, newRoute);
return newRoute;
}
}RouteRepositoryOperations 数据库操作接口,JPA风格
public interface RouteRepositoryOperations extends
ReactiveMongoRepository {
/**
* 获取所有路由(分页查询)
*
* @param pageable 分页
* @return 当前页
*/
@Query(value = "{}", sort = "{_id:1}")
Flux findAll(Pageable pageable);
} MongoRouteDefinitionRepository 实现动态路由的主体代码,封装了路由操作
@Slf4j
@Component
public class MongoRouteDefinitionRepository
implements RouteDefinitionRepository, ApplicationEventPublisherAware {
private ApplicationEventPublisher eventPublisher;
private Map cache = new ConcurrentHashMap<>();
private final RouteRepositoryOperations repositoryOperation;
public MongoRouteDefinitionRepository(RouteRepositoryOperations repositoryOperation) {
this.repositoryOperation = repositoryOperation;
}
@Override
public Flux getRouteDefinitions() {
return Flux.fromIterable(cache.values());
}
@Override
public Mono save(Mono route) {
return route.flatMap(
r -> repositoryOperation.save(MongoRouteDefinition.from(r))
.doOnNext(this::addCache)
.then(Mono.empty())
);
}
@Override
public Mono delete(Mono routeId) {
return repositoryOperation.findById(routeId)
.map(RouteDefinition::getId)
.doOnNext(this::removeCache)
.flatMap(repositoryOperation::deleteById);
}
@Override
public void setApplicationEventPublisher(ApplicationEventPublisher eventPublisher) {
this.eventPublisher = eventPublisher;
}
/**
* 将指定路由加入到缓存中。
*
* 为了能实时加载路由,可以通过MongoDB的ChangeStream,监听到数据变化后调用此方法
*/
public void addCache(RouteDefinition route) {
this.cache.putIfAbsent(route.getId(), route);
// 前文中的CachingRouteLocator会监听此事件,并清空缓存重新从RouteDefinitionLocator中加载路由
this.publishEvent();
}
/**
* 将指定路由从缓存中删除。
*
* 为了能实时加载路由,可以通过MongoDB的ChangeStream,监听到数据变化后调用此方法
*/
public void removeCache(String routeId) {
if (this.cache.remove(routeId) != null) {
this.publishEvent();
}
}
void publishEvent() {
eventPublisher.publishEvent(new RefreshRoutesEvent(this));
}
RouteRepositoryOperations getRepositoryOperation() {
return repositoryOperation;
}
Map getCache() {
return cache;
}
void setCache(
Map cache) {
this.cache = cache;
}
}
RouteChangeStreamHandler 实现路由的准实时动态加载(注意单机版MongoDB不支持ChangeStream):
@Lazy(false)
@Component
@ConditionalOnProperty(value = "changeStream.enabled", havingValue = "true", matchIfMissing = true)
public class RouteChangeStreamHandler {
private final ReactiveMongoTemplate mongoTemplate;
private final MongoRouteDefinitionRepository routeRepository;
public RouteChangeStreamHandler(
MongoRouteDefinitionRepository routeRepository, ReactiveMongoTemplate mongoTemplate) {
this.routeRepository = routeRepository;
this.mongoTemplate = mongoTemplate;
}
@PostConstruct
public void run() {
new Thread(this::startMonitor, "ChangeStream-Monitor-routes").start();
}
public void startMonitor() {
Aggregation aggregation = Aggregation.newAggregation(Aggregation
.match(Criteria.where("operationType").in("insert", "delete", "update", "replace")));
ChangeStreamOptions options = ChangeStreamOptions.builder()
.filter(aggregation)
.returnFullDocumentOnUpdate()
.build();
String collectionName = MongoRouteDefinition.class.getAnnotation(Document.class).value();
Flux> changeStream = mongoTemplate
.changeStream(collectionName, options, MongoRouteDefinition.class);
changeStream
.log()
.doOnNext(e -> {
if (OperationType.INSERT == e.getOperationType()
|| OperationType.UPDATE == e.getOperationType()
|| OperationType.REPLACE == e.getOperationType()) {
Optional.ofNullable(e.getBody()).ifPresent(routeRepository::addCache);
} else if (OperationType.DELETE == e.getOperationType()) {
getId(e).ifPresent(routeRepository::removeCache);
}
}).blockLast();
}
private Optional getId(ChangeStreamEvent e) {
return Optional.ofNullable(e.getRaw())
.flatMap(raw -> Optional.ofNullable(raw.getDocumentKey()))
.flatMap(docKey -> Optional.ofNullable(docKey.getObjectId("_id")))
.flatMap(bson -> Optional.of(bson.getValue().toHexString()));
}
} RouteRefresher 定时任务,全量刷新数据库中存储的路由
@Slf4j
@Component
@ConditionalOnProperty(value = "route.schedule.enabled", havingValue = "true", matchIfMissing = true)
public class RouteRefresher {
private final MongoRouteDefinitionRepository repository;
public RouteRefresher(
MongoRouteDefinitionRepository repository) {
this.repository = repository;
}
/**
* 固定间隔重新加载一次缓存
*/
@Scheduled(initialDelay = 10000, fixedDelay = 60 * 60 * 1001)
private void refresh() {
RouteRepositoryOperations operation = repository.getRepositoryOperation();
int page = 0;
int pageSize = 1000;
int total = Math.toIntExact(operation.count().blockOptional().orElse(0L));
Map oldCache = repository.getCache();
Map newCache = new ConcurrentHashMap<>(total);
int oldTotal = oldCache.size();
if (oldTotal < 1) {
// 首次同步刷新
repository.setCache(newCache);
}
while (page * pageSize < total) {
operation.findAll(PageRequest.of(page++, pageSize))
.doOnNext(route -> newCache.putIfAbsent(route.getId(), route))
.blockLast();
log.info("动态路由表当前总大小为:{}, 新路由表当前大小为:{}", oldTotal, newCache.size());
}
repository.setCache(newCache);
log.info("新路由表加载完成,当前大小为:{}", newCache.size());
oldCache.clear();
repository.publishEvent();
}
} 全文总结
本文依据SpringCloud Gateway工作原理,从入口代码入手,逐渐深入解析路由加载的机制,进而找到动态路由的拓展点,然后基于路由数据结构的特征及SpringCloud Gateway 的特点,选择了基于MongoDB实现一个简单的动态路由示例。
通过阅读本文,你可以了解SpringCloud Gateway的工作原理,掌握对其源码的分析方法(适用于其他Springboot工程),初步领略响应式编程的魅力。
希望本文可以为你带来更多收获与思考。