ReactNative进阶(三十五):应用脚手架 Yo 构建 RN 页面
一、前言
前期将脚手架安装成功,本篇博文主要讲解如何利用提供的代码自动生成功能生成项目代码。
二、Bloc 数据流讲解
Bloc 数据流工具安装:
sudo npm install -g yo
sudo npm install -g generator-bloc
安装完成后通过执行 命令,查看模板生成位置。执行结果如下:
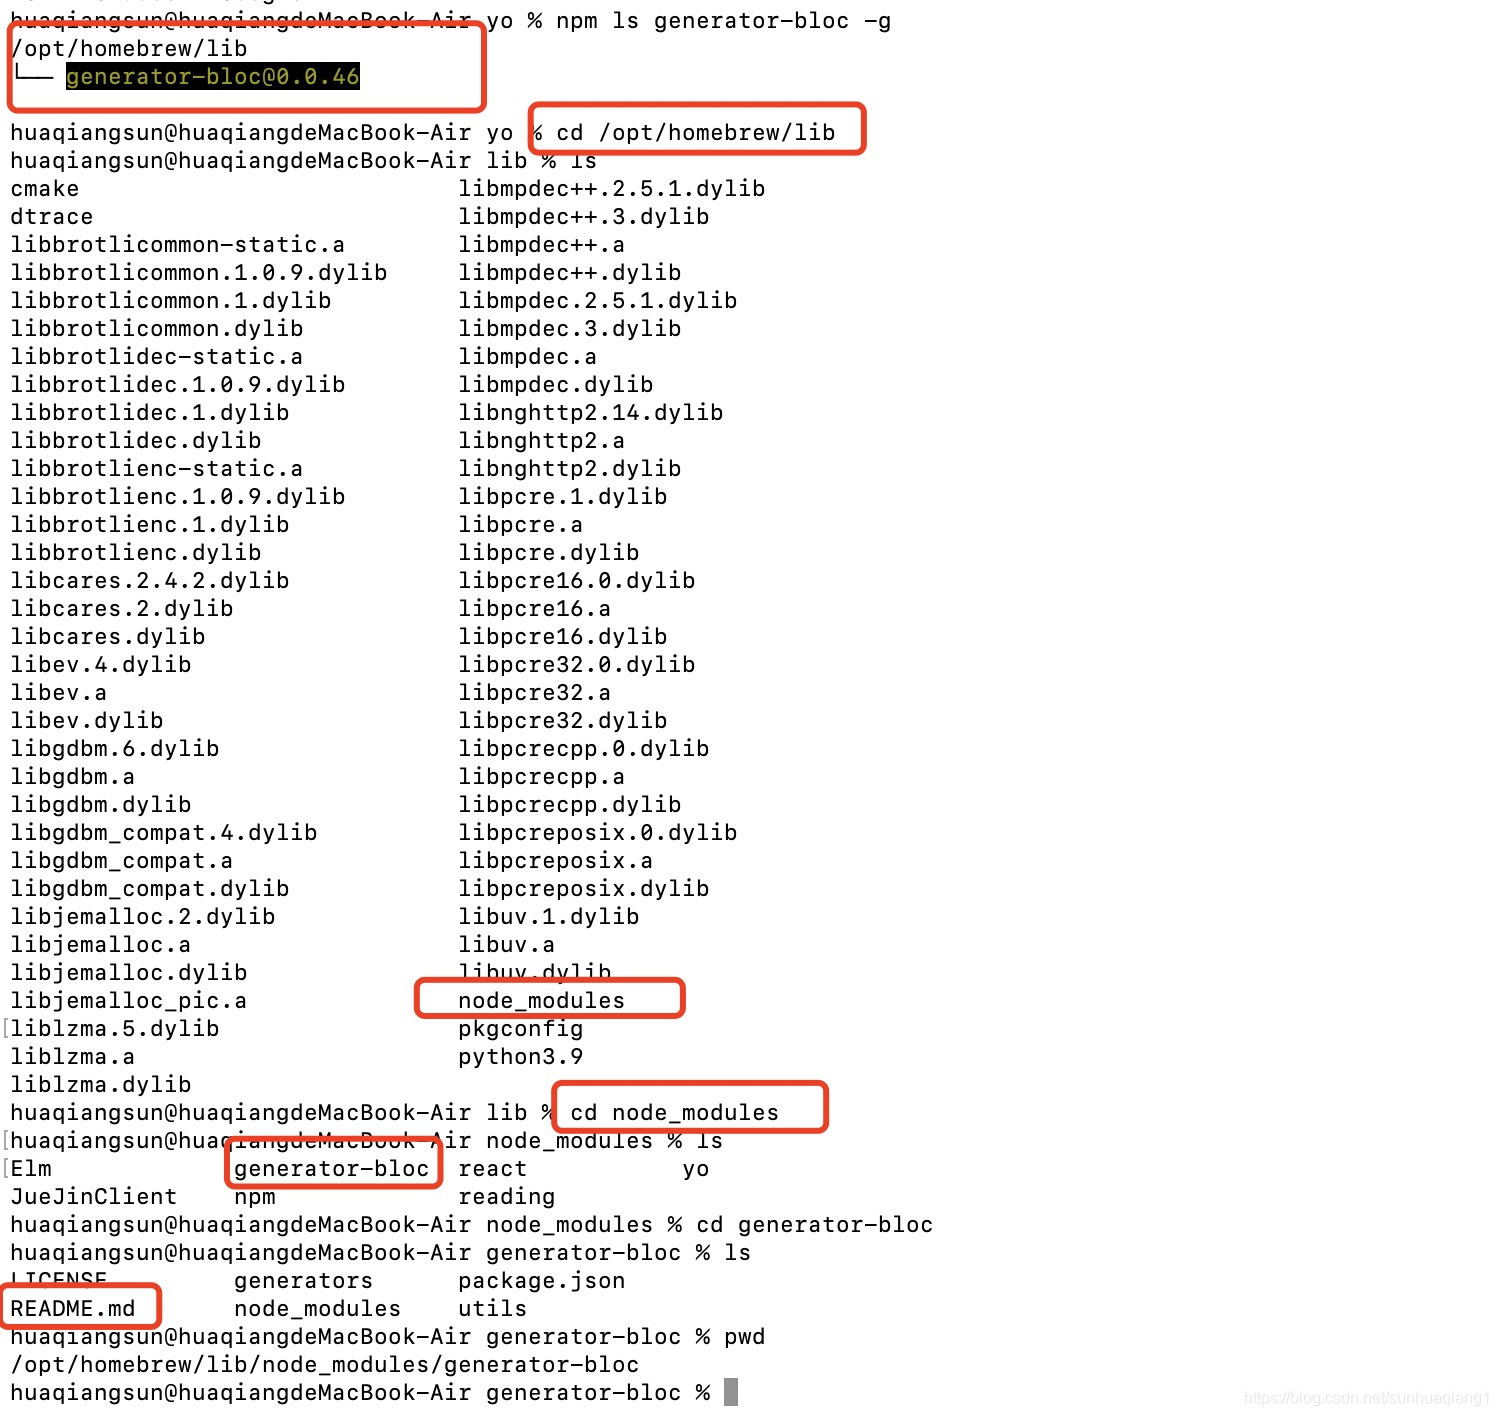
进入目录,可看到生成的文件夹,进入该文件夹,查看文件。
文件内容如下:
> # generator-bloc [![NPM version][npm-image]][npm-url] [![Build Status][travis-image]][travis-url] [![Dependency
> Status][daviddm-image]][daviddm-url] [![Coverage
> percentage][coveralls-image]][coveralls-url]
> > react-bloc cli
>
> ## Installation
>
> First, install [Yeoman](http://yeoman.io) and generator-bloc using
> [npm](https://www.npmjs.com/) (we assume you have pre-installed
> [node.js](https://nodejs.org/)).
>
> ```bash npm install -g yo npm install -g generator-bloc ```
>
> Then generate your new project:
>
> ```bash yo bloc ```
>
> ## Getting To Know Yeoman
>
>  * Yeoman has a heart of gold.
>  * Yeoman is a person with feelings and opinions, but is very easy to work with.
>  * Yeoman can be too opinionated at times but is easily convinced not to be.
>  * Feel free to [learn more about Yeoman](http://yeoman.io/).
>
> ## License
>
> MIT © [MeePwn](https://github.com/maybewaityou)
>
>
> [npm-image]: https://badge.fury.io/js/generator-bloc.svg [npm-url]:
> https://npmjs.org/package/generator-bloc [travis-image]:
> https://travis-ci.org/maybewaityou/generator-bloc.svg?branch=master
> [travis-url]: https://travis-ci.org/maybewaityou/generator-bloc
> [daviddm-image]:
> https://david-dm.org/maybewaityou/generator-bloc.svg?theme=shields.io
> [daviddm-url]: https://david-dm.org/maybewaityou/generator-bloc
> [coveralls-image]:
> https://coveralls.io/repos/maybewaityou/generator-bloc/badge.svg
> [coveralls-url]: https://coveralls.io/r/maybewaityou/generator-bloc
三、利用代码自动生成功能创建新页面
此处以新建test界面为例介绍使用bloc创建界面的方法步骤,页面新建在项目中page-new目录下。
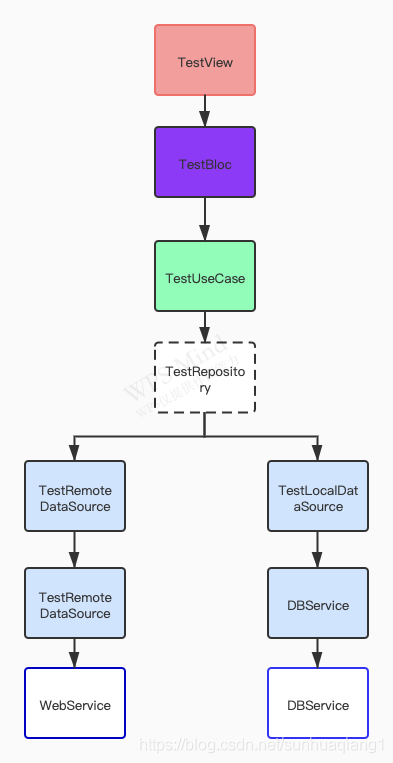
通过以上步骤信息结合项目结构可知,
脚手架yo为我们新生成了等文件。
在文件中新增bloc标识:
export const DATA_SOURCE_TYPES = {
  HomeRemoteDataSource: Symbol.for('HomeRemoteDataSource'),
  HomeLocalDataSource: Symbol.for('HomeLocalDataSource'),

  TestRemoteDataSource: Symbol.for('TestRemoteDataSource'),
  TestLocalDataSource: Symbol.for('TestLocalDataSource'),
};
export const USE_CASE_TYPES = {
  HomeUseCase: Symbol.for('HomeUseCase'),
  TestUseCase: Symbol.for('TestUseCase'),
};
export const REPOSITORY_TYPES = {
  HomeRepository: Symbol.for('HomeRepository'),
  TestRepository: Symbol.for('TestRepository'),
};
export const BLOC_TYPES = {
  HomeBloc: Symbol.for('HomeBloc'),
  TestBloc: Symbol.for('TestBloc'),
};
在文件中新增容器配置:
import TestBloc from '../TestBloc';
import TestUseCase from '../interactor/TestUseCase';
import TestRepository from '../data/source/TestRepository';
import { TestRemoteDataSource } from '../data/source/remote/TestRemoteDataSource';
import { TestLocalDataSource } from '../data/source/local/TestLocalDataSource';

container.bind(DATA_SOURCE_TYPES.TestRemoteDataSource).to(TestRemoteDataSource);
container.bind(DATA_SOURCE_TYPES.TestLocalDataSource).to(TestLocalDataSource);
container.bind(REPOSITORY_TYPES.TestRepository).to(TestRepository);
container.bind(USE_CASE_TYPES.TestUseCase).to(TestUseCase);
container.bind(BLOC_TYPES.TestBloc).to(TestBloc);
在将新建页面添加到路由中;
将TestView添加到中即可使用跳转到该页面。
注:本项目路由使用:
四、Bloc数据流使用说明
数据流采用的形式绑定数据,当绑定的数据有改变时,便会重新渲染界面,类似于的,下面以刚创建的TestView为例介绍使用步骤:
export default (props) => {
let _bloc = null;
try {
_bloc = BlocProvider.of(BLOC_TYPES.TestBloc);
} catch (error) {
_bloc = container.get(BLOC_TYPES.TestBloc);
}
const params = props.navigation.state.params;
_bloc.init(params);
return 其中init方法在TestBloc中定义。
function _viewBuilder() {
  const _bloc = BlocProvider.of(BLOC_TYPES.TestBloc);
  return (


  );
}
其中为TestBloc中定义的数据,为界面,会获取绑定数据的快照,即为绑定的数据。
function _testBuilder(snapshot){
if(snapshot.hasData){
return (
{JSON.stringify(snapshot.data)}
)
} else
return (
可以绑定多个数据流:
listData = {
    viewState: {
      isRefresh: false,
      isLoading: true,
      hasMore: true,
      hint: '加载中...',
      pageNo: '1',
      pageSize: '15',
    },
    list: [],
    data: {},
  };
  listData$ = new EnhanceSubject(this.listData);

  viewState = {
    open: false,
    pickerItems: [{ text: '待发货', handleFlag: '1' }, { text: '已发货', handleFlag: '2' }],
    pickedItem: {
      text: '待发货',
      handleFlag: '1',
    },
    totalSize: 0,
  };
  viewState$ = new EnhanceSubject(this.viewState);
即为TestView中绑定的数据,当改变时界面就会重新渲染,例如:
init = (params) => {
    this.listData= processModify(this.listData, {
      viewState: {
        isRefresh: params.isRefresh,
        isLoading: params.isLoading,
        hint: '加载中...'
      },
    });
    this.listData$.add(this.listData); // 相当于RN的setState
  };
!注:定义在TestBloc中的方法建议使用箭头函数,防止指向跑偏。
在中定义异步接口方法,
queryList = async (refresh, handleFlag) => {
    let index = refresh ? '1' : this.listData.viewState.pageNo;
    this.listData = processModify(this.listData, {
      viewState: {
        ...this.listData.viewState,
        isRefresh: refresh,
        isLoading: !refresh,
        hint: '加载中...'
      },
    });
    this.listData$.add(this.listData); // 发起请求时刷新界面状态
  // 使用userCase调用接口,返回的是两个对象,第一个为接口报错(非业务逻辑错)时的对象,第二个为接口正常返回的对象
    const [error, data] = await this.useCase.execute({
      bizline: '4',
      tasktyp: '25',
      handleFlag: handleFlag || this.viewState.pickedItem.handleFlag,
      pageNo: index,
      pageSize: this.listData.viewState.pageSize,
      meta: { silence: true },
    });
    if (error) {
      ...
      this.listData$.add(this.listData); // 接口报错时更新界面UI
      return;
    }
    let hasList = this.listData.list || [];
    if (refresh) {
      hasList = [];
    }
    let list = data.resultList;
    let isMore = list.length >= parseInt(this.listData.viewState.pageSize);
    let hint = '';
    if (hasList.length < 1 && list.length < 1) {
      hint = '抱歉~没有相关信息';
    }
    this.listData = processModify(this.listData, {
      list: hasList.concat(list),
      data,
      viewState: {
        ...this.listData.viewState,
        isRefresh: false,
        isLoading: false,
        hasMore: isMore,
        pageNo: `${parseInt(index) + 1}`,
        hint: hint || (isMore ? '加载更多' : '没有更多了'),
      }
    });
    this.listData$.add(this.listData); // 请求得到后台数据后刷新界面数据
    this.viewState = processModify(this.viewState, {
      totalSize: data.totalSize,
    });
    this.viewState$.add(this.viewState); // 刷新界面状态
  };
添加:
buildUseCasePromise(params) {
    return this.repository.queryList(params);
}
添加接口参数,也就是传过来的参数,userCase的方法执行的是方法,如果是其它方法需要自定义:
  handleCheck(params) {
    return to(this.repository.handleCheck(params));
  }
此时需要将结果用包裹,以规范返回数据的格式:
import { to } from '../../../../main/utilities';
调用自定义方法时,需要将bloc里的调用方法由改为;
然后定义数据流策略,使用远程服务器数据还是本地数据库数据(定义在:):
queryList(params) {
    return this.remoteDataSource.queryList(params);
}
在该处可以进行数据的并行或者串行请求或者数据的其它一些处理:
async queryList(params) {
    const data = await this.remoteDataSource.queryList({ meta: { silence: true } });
    if (data.list.length > 0) {
      let customeridStr = '';
      data.list.forEach((item) => {
        customeridStr += item.customerid + ',';
      });
    // 串行接口
      const signalData = await this.remoteDataSource.queryNewsTheme(
        { customeridStr, flag: 'index', ...params, meta: { silence: true } });
      let listIndex = []
      for (let i = 0; i < signalData.listIndex.length; i++) {
    ...
      }
      return { totalSize: signalData.totalSize, listIndex };
    } else {
      return { 'listIndex': [] }
    }
  }
最后就是调用webService请求后台接口:
queryList(params) {
    return this.webService.request(queryTaskPageList, params);
 }
其中params是传过来的,queryTaskPageList为接口名称,需要自定义:
const queryTaskPageList = 'queryTaskPageList';
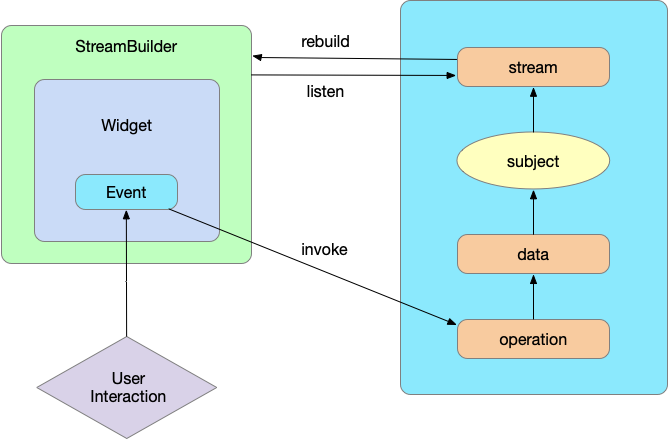
数据流如下图所示: