深入理解Nginx的四级指针
Nginx源码有一个四级指针——。一级指针都不容易理解,更何况四级。今天就来说说这个四级指针。
Nginx从1.9开始支持三层代理,这个模块叫 stream。它的虽然在功能上比 http 模块简单很多,但是用来分析这个四级指针还是绰绰有余的。
stream 模块默认不开启,我们需要编译时显式开启:
./auto/configure --with-stream --without-http --prefix=/tmp/ngx
make install
然后修改内容如下:
daemon off;
events {}
stream {
    server {
        listen 1024;
        return "hello\n";
    }
}
运行Nginx命令后,使用 telnet 连接 。你会看到Nginx输出并关闭连接。
➜ ngx telnet 127.0.0.1 1024
Trying 127.0.0.1...
Connected to localhost.
Escape character is '^]'.
hello
Connection closed by foreign host.
到现在,我们对 stream 模块就有了一个感性的认识。接下来我们开始揭开这个四级指针的神秘面纱。
Nginx的函数有200多行,但跟模块加载相关的只有下面几行:
int main(int argc, char *const *argv) {
    // ...
    ngx_cycle_t      *cycle, init_cycle;
    // ...
    if (ngx_preinit_modules() != NGX_OK) { return 1; }

    cycle = ngx_init_cycle(&init_cycle);
    // ...
}
先看这个函数:
ngx_int_t ngx_preinit_modules(void) {
    for (ngx_uint_t i = 0; ngx_modules[i]; i++) {
        ngx_modules[i]->index = i;                  // 设置模块编号
        ngx_modules[i]->name = ngx_module_names[i]; // 设置模块名称
    }

    ngx_modules_n = i; // 模块总数
    // 模块最大数量,含动态加载模块
    ngx_max_module = ngx_modules_n + NGX_MAX_DYNAMIC_MODULES;

    return NGX_OK;
}
代码一看就明白,但这里的是从哪来的呢?
还记得最开始的脚本吗?这个脚本有很多参数。我们可以通过它们控制要编译哪些模块以及模块的加载顺序。
脚本执行完成后会生成文件。就是在这个文件定义的。
是一个数组。在本例中内容如下:
ngx_module_t *ngx_modules[] = {
      &ngx_core_module,
      &ngx_errlog_module,
      &ngx_conf_module,
      &ngx_events_module,
      &ngx_event_core_module,
      &ngx_kqueue_module,
      &ngx_stream_module,
      &ngx_stream_core_module,
      &ngx_stream_write_filter_module,
      &ngx_stream_return_module,
      // ...
      NULL
};
我们以为例看看如何声明一个模块:
ngx_module_t  ngx_core_module = {
      NGX_MODULE_V1,
      &ngx_core_module_ctx,   /* module context */
      ngx_core_commands,      /* module directives */
      NGX_CORE_MODULE,        /* module type */
      NULL,                   /* init master */
      NULL,                   /* init module */
      NULL,                   /* init process */
      NULL,                   /* init thread */
      NULL,                   /* exit thread */
      NULL,                   /* exit process */
      NULL,                   /* exit master */
      NGX_MODULE_V1_PADDING
};
和都是Nginx为代码清晰起见定义的快速填充宏,多是空值填充,大可不必纠结。这里最核心的是,和三个字段。
这个就是模块的类型。每个种类型的模块可以有不同的和对应不同的。Nginx的核心模块的类型为,对应的都是类型的:
typedef struct {
      ngx_str_t    name;
      void      *(*create_conf)(ngx_cycle_t *cycle);
      char      *(*init_conf)(ngx_cycle_t *cycle, void *conf);
} ngx_core_module_t;
有两个函数指针,要想理解它们的用途,我们就得看一下这个函数。函数有近一千行,但跟模块相关的大约有以下30多行:
ngx_cycle_t * ngx_init_cycle(ngx_cycle_t *old_cycle) {
    // ...
    cycle->conf_ctx = ngx_pcalloc(pool, ngx_max_module * sizeof(void *));
    // ...
    if (ngx_cycle_modules(cycle) != NGX_OK) { /* ... */ }
    // ...
    for (i = 0; cycle->modules[i]; i++) {
       if (cycle->modules[i]->type != NGX_CORE_MODULE) { continue; }
       module = cycle->modules[i]->ctx;
       if (module->create_conf) {
           rv = module->create_conf(cycle);
           cycle->conf_ctx[cycle->modules[i]->index] = rv;
       }
    }
    // ...
    conf.ctx = cycle->conf_ctx;
    conf.cycle = cycle;
    conf.module_type = NGX_CORE_MODULE;
    conf.cmd_type = NGX_MAIN_CONF;
    // ...
    if (ngx_conf_parse(&conf, &cycle->conf_file) != NGX_CONF_OK) { /* ... */ }
    // ...
    for (i = 0; cycle->modules[i]; i++) {
        // ...
        if (module->init_conf) {
            if (module->init_conf(cycle, cycle->conf_ctx[cycle->modules[i]->index]) == NGX_CONF_ERROR) { /*..*/ }
        }
    }
    // ...
}这个四级指针指向了一个数组,其长度为,也就说为每一个模块预留了一个位置。Nginx的核心模块可以通过设置函数指针来动态分配内存存储配置。等配置解析完成后,Nginx还会调用,为核心模块提供一个初始化的机会。
那问题来了,哪些核心模块设置了指针呢?一共有六个:
ngx_core_module
ngx_errlog_module
ngx_google_perftools_module
ngx_openssl_module
ngx_regex_module
ngx_thread_pool_module
咋看没有什么规律,实则不然。在揭晓迷底之前我们有必要看一下结构:
static ngx_command_t  ngx_core_commands[] = {
    { ngx_string("daemon"),                         // name
      NGX_MAIN_CONF|NGX_DIRECT_CONF|NGX_CONF_FLAG,  // type
      ngx_conf_set_flag_slot,                       // set function
      0,                                            // conf
      offsetof(ngx_core_conf_t, daemon),            // offset
      NULL                                          // post
    },
    // ...
}

static ngx_command_t  ngx_events_commands[] = {
    { ngx_string("events"),
      NGX_MAIN_CONF|NGX_CONF_BLOCK|NGX_CONF_NOARGS,
      ngx_events_block,
      0,
      0,
      NULL
    },
    ngx_null_command
};
大家注意的类型包含和。所谓就是Nginx的顶级配置。
在本文的例子中, daemon, events, stream 都是顶级配置。
虽然同为,它们又有区别。比如,包含,而和则包含。对应的配置文件上则表现为可对应配置值,而 和 对应一个。
只有定义了 指令的核心模块才需要设置 函数!
我们知道,设置 是为了分配内存保存配置。而 , 这些模块没有分配内存,那它们的配置存到哪呢?其实还是保存在 。只不过它们是在配置文件解析的过程中动态分配的。对于 ngx_core_module 这样的模块,它们指定了 ,所以对应的内存在解析配文件之前就分配好了。那为这样做有什么好处呢?好处只有一个,省内存!像 , 这些模块,只要不配置,Nginx就不会为它们分配额外的内存。其实也省不了多少内存,但设计很清真。
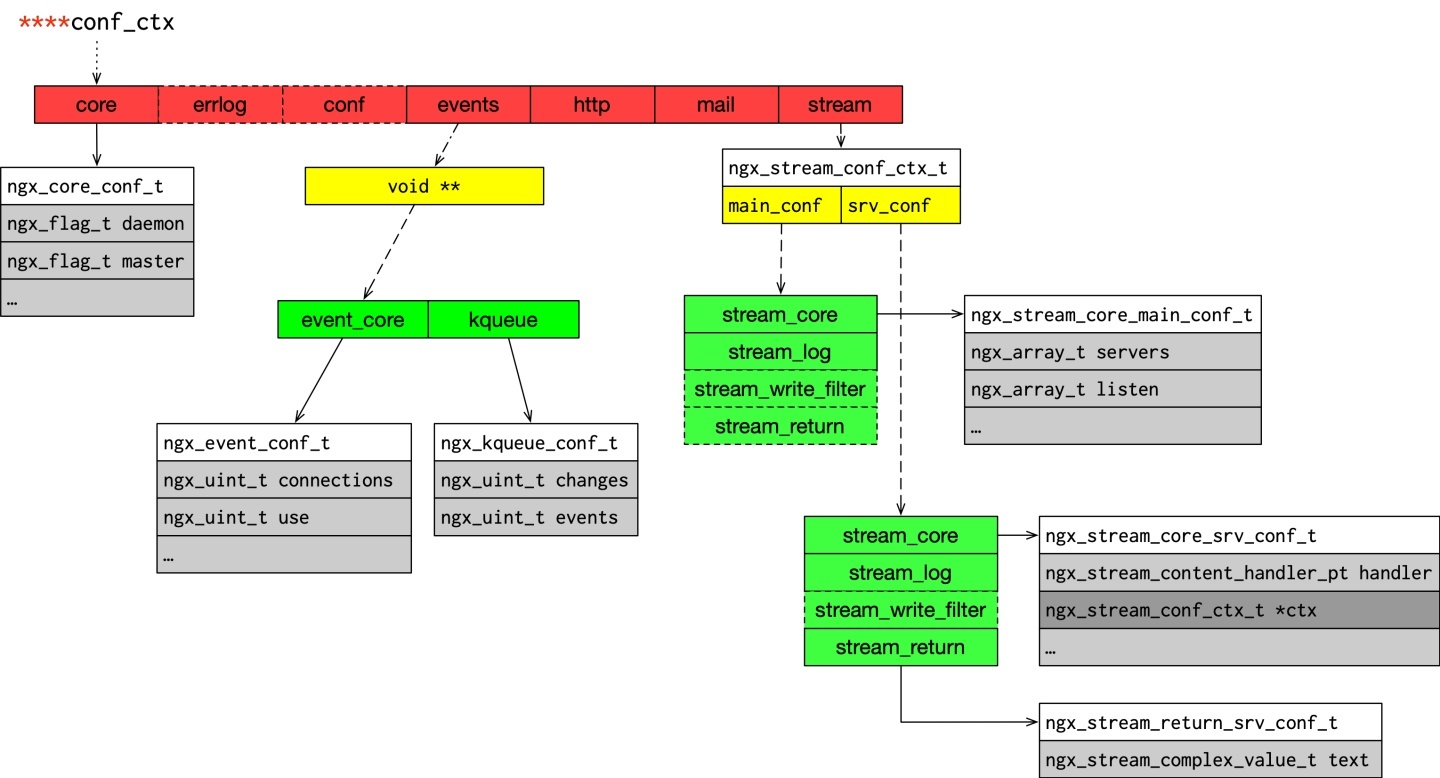
对应设置了 的模块, 指向的其实是一块连续的内存区域。比如,ngx_core_module 指向的内存结构为 。
等等, 是四级指针, 就是三级指针,不是应该指向一个二级指针吗?Nginx没有拘泥于此,而是采用了强转类型赋值。这里的四级指针只是逻辑上的四级指针而非真正的四级指针。
为了深入理解这个四级指针,我们有必要看一下 函数,其核心逻辑如下:
char * ngx_conf_parse(ngx_conf_t *cf, ngx_str_t *filename) {
      // ...
      for ( ;; ) {
          // 解析单个指令及其参数
          rc = ngx_conf_read_token(cf);
          // ...
      // 保存配置内容
          rc = ngx_conf_handler(cf, rc);
      // ...
      }
      // ...
}
的任务是扫描配置文件内容,识别配指令和参数。比如:
解析后对应的 保存
解析后对应的 保存
基于状态机解析配置文件,代码非常经典。而后面执行的 函数是我们理解四级指针的另一个关键:
static ngx_int_t ngx_conf_handler(ngx_conf_t *cf, ngx_int_t last) {
    // ...
    for (i = 0; cf->cycle->modules[i]; i++) {
        cmd = cf->cycle->modules[i]->commands;
        // ...
        for ( /* void */ ; cmd->name.len; cmd++) {
            // ...
            if (cmd->type & NGX_DIRECT_CONF) {
                conf = ((void **) cf->ctx)[cf->cycle->modules[i]->index];
            } else if (cmd->type & NGX_MAIN_CONF) {
                conf = &(((void **) cf->ctx)[cf->cycle->modules[i]->index]);
            } else if (cf->ctx) {
                confp = *(void **) ((char *) cf->ctx + cmd->conf);
                if (confp) {
                    conf = confp[cf->cycle->modules[i]->ctx_index];
                }
            }
            rv = cmd->set(cf, cmd, conf);
            // ...
        }
    }
    // ...
}
这里有三个分支。
对于前面说的 配置,因为已经分配好了内存,所以直接调用 函数就行了。
对于像 和 这样的指令,Nginx 将 也就是 的地址传给了 函数。此处传地址,就是为了让这些自行分配内存,并将地址保存到。
第三个分支则是第二个分支的延伸情形。要想弄清这两种情况,我们须要考查 对应的 函数,其主要流程如下:
static char * ngx_stream_block(ngx_conf_t *cf, ngx_command_t *cmd, void *conf) {
    // ...
    if (*(ngx_stream_conf_ctx_t **) conf) { return "is duplicate"; }
    ctx = ngx_pcalloc(cf->pool, sizeof(ngx_stream_conf_ctx_t));
    // ...
    *(ngx_stream_conf_ctx_t **) conf = ctx;
    ngx_stream_max_module = ngx_count_modules(cf->cycle, NGX_STREAM_MODULE);
    // ...
    ctx->main_conf = ngx_pcalloc(cf->pool, sizeof(void *) * ngx_stream_max_module);
    // ...
    ctx->srv_conf = ngx_pcalloc(cf->pool, sizeof(void *) * ngx_stream_max_module);
    // ...
    for (m = 0; cf->cycle->modules[m]; m++) {
        if (cf->cycle->modules[m]->type != NGX_STREAM_MODULE) { continue; }

        module = cf->cycle->modules[m]->ctx;
        mi = cf->cycle->modules[m]->ctx_index;

        if (module->create_main_conf) {
            ctx->main_conf[mi] = module->create_main_conf(cf);
            if (ctx->main_conf[mi] == NULL) { return NGX_CONF_ERROR; }
        }

        if (module->create_srv_conf) {
            ctx->srv_conf[mi] = module->create_srv_conf(cf);
            if (ctx->srv_conf[mi] == NULL) { return NGX_CONF_ERROR; }
        }
    }

    // 备份 cf 状态
    pcf = *cf;
    cf->ctx = ctx;
    // ...
    cf->module_type = NGX_STREAM_MODULE;
    cf->cmd_type = NGX_STREAM_MAIN_CONF;
    rv = ngx_conf_parse(cf, NULL);
    // ...
    // 恢复 cf 状态
    *cf = pcf;
    // ...
}
Nginx解析配置文件如果扫描到 则会执行 ,这个时候正是函数的分支二。首先要检查 有没有被赋值。如果有,则说明配置文件有多个 ,需要报错。然后分配一段内存,其类型是 ,并将其地址保存到 。我们看看 的结构:
typedef struct {
    void  **main_conf;
    void  **srv_conf;
} ngx_stream_conf_ctx_t;
stream 模块工作在传输层,只有 和 两级配置,所以 也只有 和 两个成员。
接着 Nginx 会调用 统计 stream 子模块的数量,并依次编号,编号保存在该模块的 字段。然后就是为所有子模块分配内存地址指针。这一步跟 很类似。
stream 所有子模块都是 类型,对应的 则为 。 比 要复杂:
typedef struct {
    ngx_int_t   (*preconfiguration)(ngx_conf_t *cf);
    ngx_int_t   (*postconfiguration)(ngx_conf_t *cf);

    void       *(*create_main_conf)(ngx_conf_t *cf);
    char       *(*init_main_conf)(ngx_conf_t *cf, void *conf);

    void       *(*create_srv_conf)(ngx_conf_t *cf);
    char       *(*merge_srv_conf)(ngx_conf_t *cf, void *prev, void *conf);
} ngx_stream_module_t;
这里的 和 跟之前的 很类似。
接着,Nginx 会把配置解析切换成 stream 模式,然后继续解析配置,这个时候,就会进入前面说的第三个分支。
if (cmd->type & NGX_DIRECT_CONF) {
    // ...
} else if (cmd->type & NGX_MAIN_CONF) {
    // ...
} else if (cf->ctx) {
    confp = *(void **) ((char *) cf->ctx + cmd->conf);
    if (confp) {
        conf = confp[cf->cycle->modules[i]->ctx_index];
    }
}
rv = cmd->set(cf, cmd, conf);
这个时候 自然是刚才的 了,那这里的 是什么呢?让我们看一下本文例子中 的定义:
#define NGX_STREAM_SRV_CONF_OFFSET offsetof(ngx_stream_conf_ctx_t, srv_conf)

static ngx_command_t  ngx_stream_return_commands[] = {
    { ngx_string("return"),
      NGX_STREAM_SRV_CONF|NGX_CONF_TAKE1,
      ngx_stream_return,
      NGX_STREAM_SRV_CONF_OFFSET,
      0,
      NULL },

      ngx_null_command
};
这个 就是 中 的遍移量。所以此时 就是 。这正是在 中 新分配的内存。最终的内存结构如下:
【文章福利】小编推荐自己的整理了一些个人觉得比较好的学习书籍、大厂面试题、有趣的项目和热门技术教学视频资料共享在里面(包括C/C++,Linux,Nginx,ZeroMQ,MySQL,Redis,fastdfs,MongoDB,ZK,流媒体,CDN,P2P,K8S,Docker,TCP/IP,协程,DPDK等等.),有需要的可以自行添加哦!~