Serverless 在 SaaS 领域的最佳实践
SaaS 系统面临的挑战
在消费互联网时代,大家是搜索想要的东西,各个厂商在云计算、大数据、人工智能等技术基座之上建立流量最大化的服务与生态,基于海量内容分发与流量共享为逻辑构建系统。而到了产业互联网时代,供给关系发生了变化,大家是定制想要的东西,需要从供给与需求两侧出发进行双向建设,这个时候系统的灵活性和扩展性面临着前所未有的挑战,尤其是 ToB 的 SaaS 领域。


如何应对挑战
然而不是所有 SaaS 公司都有财力和时间去孵化和打磨自己的 aPaaS 平台,但市场的变化、用户的诉求是实实在在存在的。若要生存,就要求变。这个变的核心就是能够让自己目前的 SaaS 系统变得灵活起来,相对建设困难的 aPaaS 平台,我们其实可以选择轻量且有效的 Serverless 方案来提升现有系统的灵活性和可扩展性,从而实现用户不同的定制需求。
Serverless工作流
在上一篇文章中,已经对Serverless的概念做过阐述了,并且也介绍了 Serverless 函数计算(FC)的概念和实践。这篇文章中介绍一下构建系统灵活性的核心要素服务编排—— Serverless 工作流。
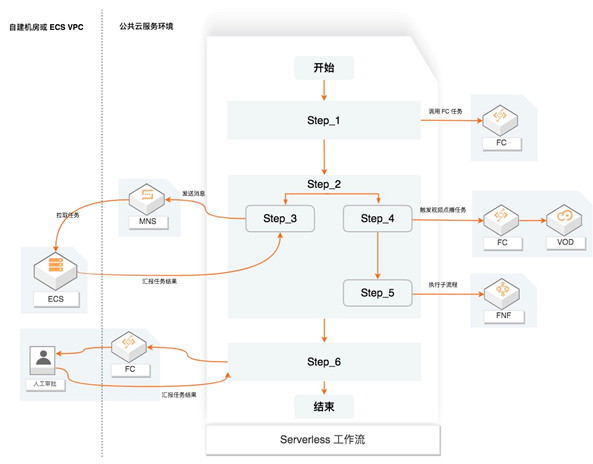
Serverless 工作流是一个用来协调多个分布式任务执行的全托管云服务。在 Serverless工作流中,可以用顺序、分支、并行等方式来编排分布式任务,Serverless 工作流会按照设定好的步骤可靠地协调任务执行,跟踪每个任务的状态转换,并在必要时执行您定义的重试逻辑,以确保工作流顺利完成。Serverless 工作流通过提供日志记录和审计来监视工作流的执行,可以轻松地诊断和调试应用。
下面这张图描述了 Serverless 工作流如何协调分布式任务,这些任务可以是函数、已集成云服务API、运行在虚拟机或容器上的程序。
看完 Serverless 工作流的介绍,大家可能已经多少有点思路了吧。系统灵活性和可扩展性的核心是服务可编排,无论是以前的BPM还是现在的 aPaaS。所以基于 Serverless 工作流重构SaaS系统灵活性方案的核心思路,是将系统内用户最希望定制的功能进行梳理、拆分、抽离,再配合函数计算(FC)提供无状态的能力,通过 Serverless 工作流进行这些功能点的编排,从而实现不同的业务流程。
通过函数计算 FC 和 Serverless 工作流搭建灵活的订餐模块
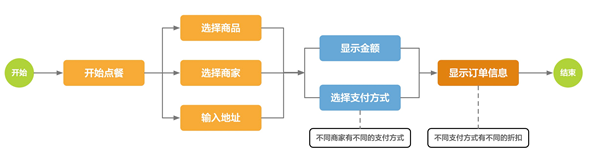
订餐场景相信大家都不会陌生,在家叫外卖或者在餐馆点餐,都涉及到这个场景。当下也有很多提供点餐系统的 SaaS 服务厂商,有很多不错的 SaaS 点餐系统。随着消费互联网向产业互联网转换,这些 SaaS 点餐系统面临的定制化的需求也越来越多,其中有一个需求是不同的商家在支付时会显示不同的支付方式,比如从A商家点餐后付款时显示支付宝、微信支付、银联支付,从B商家点餐后付款时显示支付宝、京东支付。突然美团又冒出来了美团支付,此时B商家接了美团支付,那么从B商家点餐后付款时显示支付宝、京东支付、美团支付。诸如此类的定制化需求越来越多,这些 SaaS 产品如果没有 PaaS 平台,那么就会疲于不断的通过硬代码增加条件判断来实现不同商家的需求,这显然不是一个可持续发展的模式。
那么我们来看看通过函数计算 FC 和 Serverless 工作流如何优雅的解决这个问题。先来看看这个点餐流程:
通过Serverless工作流创建流程
首选我需要将上面用户侧的流程转变为程序侧的流程,此时就需要使用 Serverless 工作流来担任此任务了。
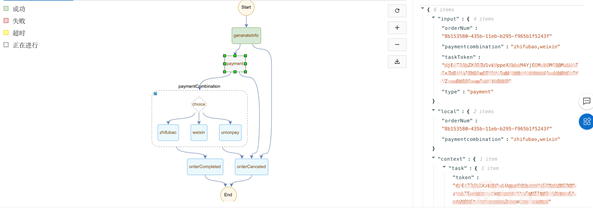
打开 Serverless 控制台,创建订餐流程,这里 Serverless 工作流使用流程定义语言 FDL 创建工作流,如何使用FDL创建工作流请参阅文档。流程图如下图所示:

FDL 代码为:
version: v1beta1
type: flow
timeoutSeconds: 3600
steps:
  - type: task
    name: generateInfo
    timeoutSeconds: 300
    resourceArn: acs:mns:::/topics/generateInfo-fnf-demo-jiyuan/messages
    pattern: waitForCallback
    inputMappings:
      - target: taskToken
        source: $context.task.token
      - target: products
        source: $input.products
      - target: supplier
        source: $input.supplier
      - target: address
        source: $input.address
      - target: orderNum
        source: $input.orderNum
      - target: type
        source: $context.step.name
    outputMappings:
      - target: paymentcombination
        source: $local.paymentcombination
      - target: orderNum
        source: $local.orderNum
    serviceParams:
      MessageBody: $
      Priority: 1
    catch:
      - errors:
          - FnF.TaskTimeout
        goto: orderCanceled
  -type: task
    name: payment
    timeoutSeconds: 300
    resourceArn: acs:mns:::/topics/payment-fnf-demo-jiyuan/messages
    pattern: waitForCallback
    inputMappings:
      - target: taskToken
        source: $context.task.token
      - target: orderNum
        source: $local.orderNum
      - target: paymentcombination
        source: $local.paymentcombination
      - target: type
        source: $context.step.name
    outputMappings:
      - target: paymentMethod
        source: $local.paymentMethod
      - target: orderNum
        source: $local.orderNum
      - target: price
        source: $local.price
      - target: taskToken
        source: $input.taskToken
    serviceParams:
      MessageBody: $
      Priority: 1
    catch:
      - errors:
          - FnF.TaskTimeout
        goto: orderCanceled
  - type: choice
    name: paymentCombination
    inputMappings:
      - target: orderNum
        source: $local.orderNum
      - target: paymentMethod
        source: $local.paymentMethod
      - target: price
        source: $local.price
      - target: taskToken
        source: $local.taskToken
    choices:
      - condition: $.paymentMethod == "zhifubao"
        steps:
          - type: task
            name: zhifubao
            resourceArn: acs:fc:cn-hangzhou:your_account_id:services/FNFDemo-jiyuan/functions/zhifubao-fnf-demo
            inputMappings:
              - target: price
                source: $input.price
              - target: orderNum
                source: $input.orderNum
              - target: paymentMethod
                source: $input.paymentMethod
              - target: taskToken
                source: $input.taskToken
      - condition: $.paymentMethod == "weixin"
        steps:
          - type: task
            name: weixin
            resourceArn: acs:fc:cn-hangzhou:your_account_id:services/FNFDemo-jiyuan.LATEST/functions/weixin-fnf-demo
            inputMappings:
            - target: price
              source: $input.price
            - target: orderNum
              source: $input.orderNum
            - target: paymentMethod
              source: $input.paymentMethod
            - target: taskToken
              source: $input.taskToken
      - condition: $.paymentMethod == "unionpay"
        steps:
          - type: task
            name: unionpay
            resourceArn: acs:fc:cn-hangzhou:your_account_id:services/FNFDemo-jiyuan.LATEST/functions/union-fnf-demo
            inputMappings:
            - target: price
              source: $input.price
            - target: orderNum
              source: $input.orderNum
            - target: paymentMethod
              source: $input.paymentMethod
            - target: taskToken
              source: $input.taskToken
    default:
      goto: orderCanceled
  - type: task
    name: orderCompleted
    resourceArn: acs:fc:cn-hangzhou:your_account_id:services/FNFDemo-jiyuan.LATEST/functions/orderCompleted
    end: true
  - type: task
    name: orderCanceled
    resourceArn: acs:fc:cn-hangzhou:your_account_id:services/FNFDemo-jiyuan.LATEST/functions/cancerOrder
在解析整个流程之前,我先要说明的一点是,我们不是完全通过 Serverless 函数计算和 Serverless 工作流来搭建订餐模块,只是用它来解决灵活性的问题,所以这个示例的主体应用是Java编写的,然后结合了 Serverless 函数计算和 Serverless 工作流。下面我们来详细解析这个流程。
启动流程
按常理,开始点餐时流程就应该启动了,所以在这个示例中,我的设计是当我们选择完商品和商家、填完地址后启动流程:

这里我们通过 Serverless 工作流提供的 OpenAPI 来启动流程。
Java 启动流程
这个示例我使用 Serverless 工作流的 Java SDK,首先在 POM 文件中添加依赖:
    com.aliyun
    aliyun-java-sdk-core
    [4.3.2,5.0.0)


    com.aliyun
    aliyun-java-sdk-fnf
    [1.0.0,5.0.0)
然后创建初始化 Java SDK 的 Config 类:
@Configuration
public class FNFConfig {

    @Bean
    public IAcsClient createDefaultAcsClient(){
        DefaultProfile profile = DefaultProfile.getProfile(
                "cn-xxx",          // 地域ID
                "ak",      // RAM 账号的AccessKey ID
                "sk"); // RAM 账号Access Key Secret
        IAcsClient client = new DefaultAcsClient(profile);
        return client;
    }

}
再来看 Controller 中的 startFNF 方法,该方法暴露 GET 方式的接口,传入三个参数:
1、fnfname:要启动的流程名称。
2、execuname:流程启动后的流程实例名称。
3、input:启动输入参数,比如业务参数。
   @GetMapping("/startFNF/{fnfname}/{execuname}/{input}")
    public StartExecutionResponse startFNF(@PathVariable("fnfname") String fnfName,
                                           @PathVariable("execuname") String execuName,
                                           @PathVariable("input") String inputStr) throws ClientException {
        JSONObject jsonObject = new JSONObject();
        jsonObject.put("fnfname", fnfName);
        jsonObject.put("execuname", execuName);
        jsonObject.put("input", inputStr);
        return fnfService.startFNF(jsonObject);
    }
再来看 Service 中的 startFNF 方法,该方法分两部分,第一个部分是启动流程,第二部分是创建订单对象,并模拟入库(示例中是放在 Map 里了):
    @Override
    public StartExecutionResponse startFNF(JSONObject jsonObject) throws ClientException {
        StartExecutionRequest request = new StartExecutionRequest();
        String orderNum = jsonObject.getString("execuname");
        request.setFlowName(jsonObject.getString("fnfname"));
        request.setExecutionName(orderNum);
        request.setInput(jsonObject.getString("input"));

        JSONObject inputObj = jsonObject.getJSONObject("input");
        Order order = new Order();
        order.setOrderNum(orderNum);
        order.setAddress(inputObj.getString("address"));
        order.setProducts(inputObj.getString("products"));
        order.setSupplier(inputObj.getString("supplier"));
        orderMap.put(orderNum, order);

        return iAcsClient.getAcsResponse(request);
    }
启动流程时,流程名称和启动流程实例的名称是需要传入的参数,这里我将每次的订单编号作为启动流程的实例名称。至于 Input,可以根据需求构造 JSON 字符串传入。这里我将商品、商家、地址、订单号构造了 JSON 字符串在流程启动时传入流程中。
另外,创建了此次订单的 Order 实例,并存在 Map 中,模拟入库,后续环节还会查询该订单实例更新订单属性。
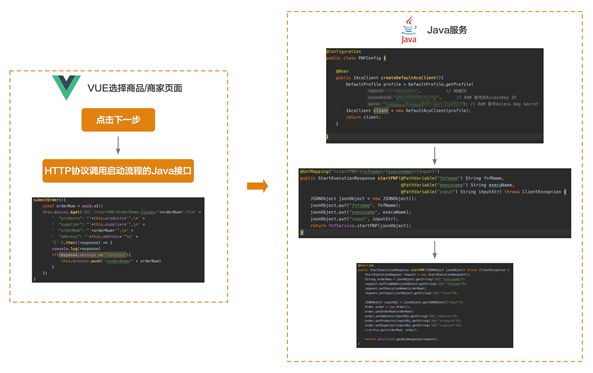
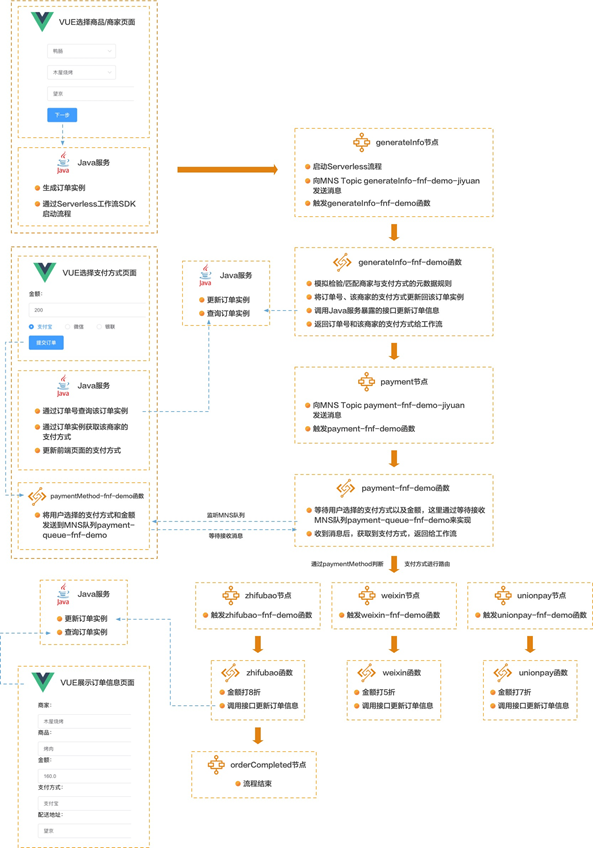
VUE 选择商品/商家页面
前端我使用 VUE 搭建,当点击选择商品和商家页面中的下一步后,通过 GET 方式调用 HTTP 协议的接口/startFNF/{fnfname}/{execuname}/{input}。和上面的 Java 方法对应。
1、fnfname:要启动的流程名称。
2、execuname:随机生成 uuid,作为订单的编号,也作为启动流程实例的名称。
3、input:将商品、商家、订单号、地址构建为 JSON 字符串传入流程。
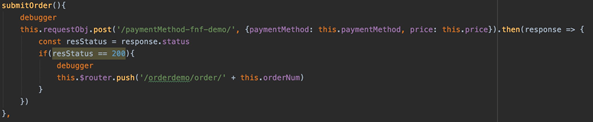
            submitOrder(){
                const orderNum = uuid.v1()
                this.$axios.$get('/startFNF/OrderDemo-Jiyuan/'+orderNum+'/{\n' +
                    '  "products": "'+this.products+'",\n' +
                    '  "supplier": "'+this.supplier+'",\n' +
                    '  "orderNum": "'+orderNum+'",\n' +
                    '  "address": "'+this.address+'"\n' +
                    '}' ).then((response) => {
                    console.log(response)
                    if(response.message == "success"){
                        this.$router.push('/orderdemo/' + orderNum)
                    }
                })
            }
generateInfo 节点
第一个节点 generateInfo,先来看看 FDL 的含义:
  - type: task
    name: generateInfo
    timeoutSeconds: 300
    resourceArn: acs:mns:::/topics/generateInfo-fnf-demo-jiyuan/messages
    pattern: waitForCallback
    inputMappings:
      - target: taskToken
        source: $context.task.token
      - target: products
        source: $input.products
      - target: supplier
        source: $input.supplier
      - target: address
        source: $input.address
      - target: orderNum
        source: $input.orderNum
      - target: type
        source: $context.step.name
    outputMappings:
      - target: paymentcombination
        source: $local.paymentcombination
      - target: orderNum
        source: $local.orderNum
    serviceParams:
      MessageBody: $
      Priority: 1
    catch:
      - errors:
          - FnF.TaskTimeout
        goto: orderCanceled
1、name:节点名称。
2、timeoutSeconds:超时时间。该节点等待的时长,超过时间后会跳转到 goto 分支指向的 orderCanceled 节点。
3、pattern:设置为 waitForCallback,表示需要等待确认。inputMappings:该节点入参。
taskToken:Serverless 工作流自动生成的 Token。
products:选择的商品。
supplier:选择的商家。
address:送餐地址。
orderNum:订单号。
4、outputMappings:该节点的出参。
paymentcombination:该商家支持的支付方式。
orderNum:订单号。
5、catch:捕获异常,跳转到其他分支。
这里 resourceArn 和 serviceParams 需要拿出来单独解释。Serverless 工作流支持与多个云服务集成,即将其他服务作为任务步骤的执行单元。服务集成方式由 FDL 语言表达,在任务步骤中,可以使用 resourceArn 来定义集成的目标服务,使用 pattern 定义集成模式。所以可以看到在 resourceArn 中配置 acs:mns:::/topics/generateInfo-fnf-demo-jiyuan/messages 信息,即在 generateInfo 节点中集成了 MNS 消息队列服务,当 generateInfo 节点触发后会向 generateInfo-fnf-demo-jiyuanTopic 中发送一条消息。那么消息正文和参数则在 serviceParams 对象中指定。MessageBody 是消息正文,配置$表示通过输入映射 inputMappings 产生消息正文。
看完第一个节点的示例,大家可以看到,在 Serverless 工作流中,节点之间的信息传递可以通过集成 MNS 发送消息来传递,也是使用比较广泛的方式之一。
generateInfo-fnf-demo 函数
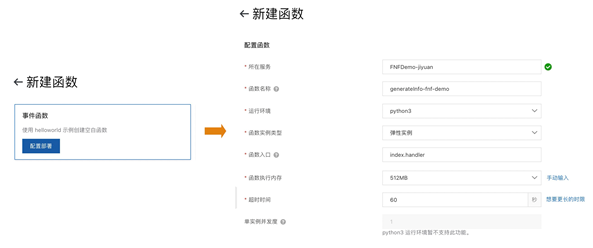
向 generateInfo-fnf-demo-jiyuanTopic 中发送的这条消息包含了商品信息、商家信息、地址、订单号,表示一个下订单流程的开始,既然有发消息,那么必然有接受消息进行后续处理。所以打开函数计算控制台,创建服务,在服务下创建名为 generateInfo-fnf-demo 的事件触发器函数,这里选择 Python Runtime:
创建 MNS 触发器,选择监听 generateInfo-fnf-demo-jiyuanTopic。
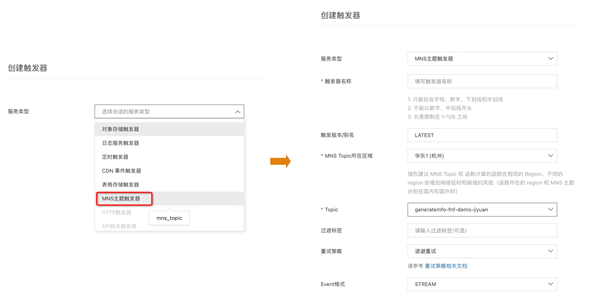
打开消息服务 MNS 控制台,创建 generateInfo-fnf-demo-jiyuanTopic:

做好函数的准备工作,我们来开始写代码:
# -*- coding: utf-8 -*-
import logging
import json
import time
import requests
from aliyunsdkcore.client import AcsClient
from aliyunsdkcore.acs_exception.exceptions import ServerException
from aliyunsdkfnf.request.v20190315 import ReportTaskSucceededRequest
from aliyunsdkfnf.request.v20190315 import ReportTaskFailedRequest


def handler(event, context):
    # 1. 构建Serverless工作流Client
    region = "cn-hangzhou"
    account_id = "XXXX"
    ak_id = "XXX"
    ak_secret = "XXX"
    fnf_client = AcsClient(
        ak_id,
        ak_secret,
        region
    )
    logger = logging.getLogger()
    # 2. event内的信息即接受到Topic generateInfo-fnf-demo-jiyuan中的消息内容,将其转换为Json对象
    bodyJson = json.loads(event)
    logger.info("products:" + bodyJson["products"])
    logger.info("supplier:" + bodyJson["supplier"])
    logger.info("address:" + bodyJson["address"])
    logger.info("taskToken:" + bodyJson["taskToken"])
    supplier = bodyJson["supplier"]
    taskToken = bodyJson["taskToken"]
    orderNum = bodyJson["orderNum"]
    # 3. 判断什么商家使用什么样的支付方式组合,这里的示例比较简单粗暴,正常情况下,应该使用元数据配置的方式获取
    paymentcombination = ""
    if supplier == "haidilao":
        paymentcombination = "zhifubao,weixin"
    else:
        paymentcombination = "zhifubao,weixin,unionpay"

    # 4. 调用Java服务暴露的接口,更新订单信息,主要是更新支付方式
    url = "http://xx.xx.xx.xx:8080/setPaymentCombination/" + orderNum + "/" + paymentcombination + "/0"
    x = requests.get(url)

    # 5. 给予generateInfo节点响应,并返回数据,这里返回了订单号和支付方式
    output = "{\"orderNum\": \"%s\", \"paymentcombination\":\"%s\" " \
                         "}" % (orderNum, paymentcombination)
    request = ReportTaskSucceededRequest.ReportTaskSucceededRequest()
    request.set_Output(output)
    request.set_TaskToken(taskToken)
    resp = fnf_client.do_action_with_exception(request)
    return 'hello world'
因为 generateInfo-fnf-demo 函数配置了MNS触发器,所以当 TopicgenerateInfo-fnf-demo-jiyuan 有消息后就会触发执行 generateInfo-fnf-demo 函数。
整个代码分五部分:
1、构建 Serverless 工作流 Client。
2、event 内的信息即接受到 TopicgenerateInfo-fnf-demo-jiyuan 中的消息内容,将其转换为 Json 对象。
3、判断什么商家使用什么样的支付方式组合,这里的示例比较简单粗暴,正常情况下,应该使用元数据配置的方式获取。比如在系统内有商家信息的配置功能,通过在界面上配置该商家支持哪些支付方式,形成元数据配置信息,提供查询接口,在这里进行查询。
4、调用Java服务暴露的接口,更新订单信息,主要是更新支付方式。
5、给予 generateInfo 节点响应,并返回数据,这里返回了订单号和支付方式。因为该节点的 pattern 是 waitForCallback,所以需要等待响应结果。
payment节点
我们再来看第二个节点 payment,先来看 FDL 代码
- type: task
    name: payment
    timeoutSeconds: 300
    resourceArn: acs:mns:::/topics/payment-fnf-demo-jiyuan/messages
    pattern: waitForCallback
    inputMappings:
      - target: taskToken
        source: $context.task.token
      - target: orderNum
        source: $local.orderNum
      - target: paymentcombination
        source: $local.paymentcombination
      - target: type
        source: $context.step.name
    outputMappings:
      - target: paymentMethod
        source: $local.paymentMethod
      - target: orderNum
        source: $local.orderNum
      - target: price
        source: $local.price
      - target: taskToken
        source: $input.taskToken
    serviceParams:
      MessageBody: $
      Priority: 1
    catch:
      - errors:
          - FnF.TaskTimeout
        goto: orderCanceled
当流程流转到 payment 节点后,意味着用户进入了支付页面。
这时 payment 节点会向 MNS 的 Topicpayment-fnf-demo-jiyuan 发送消息,会触发 payment-fnf-demo 函数。
payment-fnf-demo函数
payment-fnf-demo 函数的创建方式和 generateInfo-fnf-demo 函数类似,这里不再累赘。我们直接来看代码:
# -*- coding: utf-8 -*-
import logging
import json
import os
import time
import logging
from aliyunsdkcore.client import AcsClient
from aliyunsdkcore.acs_exception.exceptions import ServerException
from aliyunsdkcore.client import AcsClient
from aliyunsdkfnf.request.v20190315 import ReportTaskSucceededRequest
from aliyunsdkfnf.request.v20190315 import ReportTaskFailedRequest
from mns.account import Account  # pip install aliyun-mns
from mns.queue import *


def handler(event, context):
    logger = logging.getLogger()
    region = "xxx"
    account_id = "xxx"
    ak_id = "xxx"
    ak_secret = "xxx"
    mns_endpoint = "http://your_account_id.mns.cn-hangzhou.aliyuncs.com/"
    queue_name = "payment-queue-fnf-demo"
    my_account = Account(mns_endpoint, ak_id, ak_secret)
    my_queue = my_account.get_queue(queue_name)
    # my_queue.set_encoding(False)
    fnf_client = AcsClient(
        ak_id,
        ak_secret,
        region
    )
    eventJson = json.loads(event)

    isLoop = True
    while isLoop:
        try:
            recv_msg = my_queue.receive_message(30)
            isLoop = False
            # body = json.loads(recv_msg.message_body)
            logger.info("recv_msg.message_body:======================" + recv_msg.message_body)
            msgJson = json.loads(recv_msg.message_body)
            my_queue.delete_message(recv_msg.receipt_handle)
            # orderCode = int(time.time())
            task_token = eventJson["taskToken"]
            orderNum = eventJson["orderNum"]
            output = "{\"orderNum\": \"%s\", \"paymentMethod\": \"%s\", \"price\": \"%s\" " \
                         "}" % (orderNum, msgJson["paymentMethod"], msgJson["price"])
            request = ReportTaskSucceededRequest.ReportTaskSucceededRequest()
            request.set_Output(output)
            request.set_TaskToken(task_token)
            resp = fnf_client.do_action_with_exception(request)
        except Exception as e:
            logger.info("new loop")
    return 'hello world'
该函数的核心思路是等待用户在支付页面选择某个支付方式确认支付。所以这里使用了 MNS 的队列来模拟等待。循环等待接收队列 payment-queue-fnf-demo 中的消息,当收到消息后将订单号和用户选择的具体支付方式以及金额返回给 payment 节点。
VUE选择支付方式页面
因为经过 generateInfo 节点后,该订单的支付方式信息已经有了,所以对于用户而言,当填完商品、商家、地址后,跳转到的页面就是该确认支付页面,并且包含了该商家支持的支付方式。
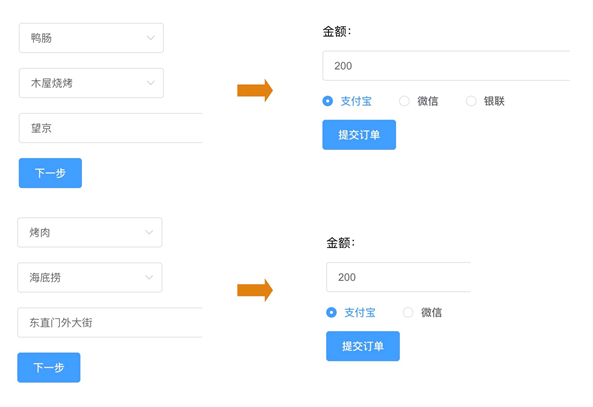
当进入该页面后,会请求 Java 服务暴露的接口,获取订单信息,根据支付方式在页面上显示不同的支付方式。代码片段如下:

当用户选定某个支付方式点击提交订单按钮后,向 payment-queue-fnf-demo 队列发送消息,即通知 payment-fnf-demo 函数继续后续的逻辑。
这里我使用了一个 HTTP 触发器类型的函数,用于实现向 MNS 发消息的逻辑,paymentMethod-fnf-demo 函数代码如下。
# -*- coding: utf-8 -*-

import logging
import urllib.parse
import json
from mns.account import Account  # pip install aliyun-mns
from mns.queue import *
HELLO_WORLD = b'Hello world!\n'

def handler(environ, start_response):
    logger = logging.getLogger()
    context = environ['fc.context']
    request_uri = environ['fc.request_uri']
    for k, v in environ.items():
      if k.startswith('HTTP_'):
        # process custom request headers
        pass
    try:
        request_body_size = int(environ.get('CONTENT_LENGTH', 0))
    except (ValueError):
        request_body_size = 0
    request_body = environ['wsgi.input'].read(request_body_size)
    paymentMethod = urllib.parse.unquote(request_body.decode("GBK"))
    logger.info(paymentMethod)
    paymentMethodJson = json.loads(paymentMethod)

    region = "cn-xxx"
    account_id = "xxx"
    ak_id = "xxx"
    ak_secret = "xxx"
    mns_endpoint = "http://your_account_id.mns.cn-hangzhou.aliyuncs.com/"
    queue_name = "payment-queue-fnf-demo"
    my_account = Account(mns_endpoint, ak_id, ak_secret)
    my_queue = my_account.get_queue(queue_name)
    output = "{\"paymentMethod\": \"%s\", \"price\":\"%s\" " \
                         "}" % (paymentMethodJson["paymentMethod"], paymentMethodJson["price"])
    msg = Message(output)
    my_queue.send_message(msg)

    status = '200 OK'
    response_headers = [('Content-type', 'text/plain')]
    start_response(status, response_headers)
    return [HELLO_WORLD]
该函数的逻辑很简单,就是向 MNS 的队列 payment-queue-fnf-demo 发送用户选择的支付方式和金额。
VUE代码片段如下:
paymentCombination 节点
paymentCombination 节点是一个路由节点,通过判断某个参数路由到不同的节点,这里自然使用 paymentMethod 作为判断条件。FDL 代码如下:
- type: choice
    name: paymentCombination
    inputMappings:
      - target: orderNum
        source: $local.orderNum
      - target: paymentMethod
        source: $local.paymentMethod
      - target: price
        source: $local.price
      - target: taskToken
        source: $local.taskToken
    choices:
      - condition: $.paymentMethod == "zhifubao"
        steps:
          - type: task
            name: zhifubao
            resourceArn: acs:fc:cn-hangzhou:your_account_id:services/FNFDemo-jiyuan/functions/zhifubao-fnf-demo
            inputMappings:
              - target: price
                source: $input.price
              - target: orderNum
                source: $input.orderNum
              - target: paymentMethod
                source: $input.paymentMethod
              - target: taskToken
                source: $input.taskToken
      - condition: $.paymentMethod == "weixin"
        steps:
          - type: task
            name: weixin
            resourceArn: acs:fc:cn-hangzhou:your_account_id:services/FNFDemo-jiyuan.LATEST/functions/weixin-fnf-demo
            inputMappings:
            - target: price
              source: $input.price
            - target: orderNum
              source: $input.orderNum
            - target: paymentMethod
              source: $input.paymentMethod
            - target: taskToken
              source: $input.taskToken
      - condition: $.paymentMethod == "unionpay"
        steps:
          - type: task
            name: unionpay
            resourceArn: acs:fc:cn-hangzhou:your_account_id:services/FNFDemo-jiyuan.LATEST/functions/union-fnf-demo
            inputMappings:
            - target: price
              source: $input.price
            - target: orderNum
              source: $input.orderNum
            - target: paymentMethod
              source: $input.paymentMethod
            - target: taskToken
              source: $input.taskToken
    default:
      goto: orderCanceled
这里的流程是,用户选择支付方式后,通过消息发送给 payment-fnf-demo 函数,然后将支付方式返回,于是流转到 paymentCombination 节点通过判断支付方式流转到具体处理支付逻辑的节点和函数。
zhifubao节点
我们具体来看一个 zhifubao 节点:
    choices:
      - condition: $.paymentMethod == "zhifubao"
        steps:
          - type: task
            name: zhifubao
            resourceArn: acs:fc:cn-hangzhou:your_account_id:services/FNFDemo-jiyuan/functions/zhifubao-fnf-demo
            inputMappings:
              - target: price
                source: $input.price
              - target: orderNum
                source: $input.orderNum
              - target: paymentMethod
                source: $input.paymentMethod
              - target: taskToken
                source: $input.taskToken
这个节点的 resourceArn 和之前两个节点的不同,这里配置的是函数计算中函数的 ARN,也就是说当流程流转到这个节点时会触发 zhifubao-fnf-demo 函数,该函数是一个事件触发函数,但不需要创建任何触发器。流程将订单金额、订单号、支付方式传给 zhifubao-fnf-demo 函数。
zhifubao-fnf-demo函数
现在我们来看zhifubao-fnf-demo函数的代码:
# -*- coding: utf-8 -*-
import logging
import json
import requests
import urllib.parse
from aliyunsdkcore.client import AcsClient
from aliyunsdkcore.acs_exception.exceptions import ServerException
from aliyunsdkfnf.request.v20190315 import ReportTaskSucceededRequest
from aliyunsdkfnf.request.v20190315 import ReportTaskFailedRequest


def handler(event, context):
  region = "cn-xxx"
  account_id = "xxx"
  ak_id = "xxx"
  ak_secret = "xxx"
  fnf_client = AcsClient(
    ak_id,
    ak_secret,
    region
  )
  logger = logging.getLogger()
  logger.info(event)
  bodyJson = json.loads(event)
  price = bodyJson["price"]
  taskToken = bodyJson["taskToken"]
  orderNum = bodyJson["orderNum"]
  paymentMethod = bodyJson["paymentMethod"]
  logger.info("price:" + price)
  newPrice = int(price) * 0.8
  logger.info("newPrice:" + str(newPrice))
  url = "http://xx.xx.xx.xx:8080/setPaymentCombination/" + orderNum + "/" + paymentMethod + "/" + str(newPrice)
  x = requests.get(url)

  return {"Status":"ok"}
示例中的代码逻辑很简单,接收到金额后,将金额打8折,然后将价格更新回订单。其他支付方式的节点和函数如法炮制,变更实现逻辑就可以。在这个示例中,微信支付打了5折,银联支付打7折。
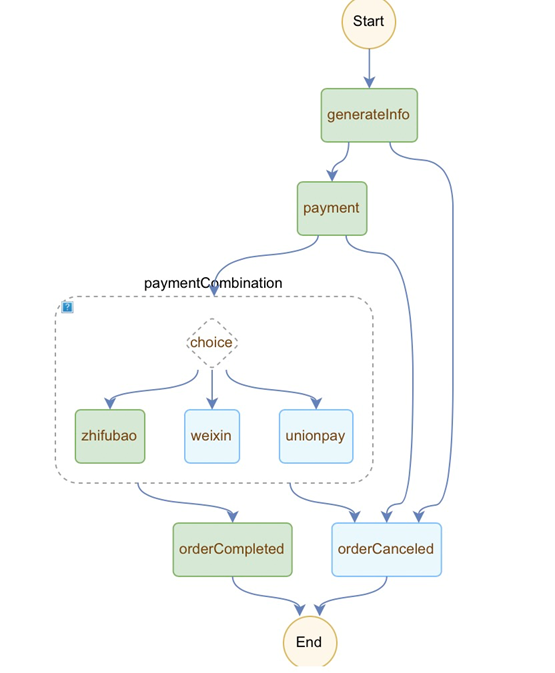
完整流程
从Serverless工作流中看到的节点流转是这样的:
总结
到此,我们基于 Serverless 工作流和 Serverless 函数计算构建的订单模块示例就算完成了,在示例中,有两个点需要大家注意:
1. 配置商家和支付方式的元数据规则。
2. 确认支付页面的元数据规则。
因为在实际生产中,我们需要将可定制的部分都抽象为元数据描述,需要有配置界面制定商家的支付方式即更新元数据规则,然后前端页面基于元数据信息展示相应的内容。
所以如果之后需要接入其他的支付方式,只需在 paymentCombination 路由节点中确定好路由规则,然后增加对应的支付方式函数即可。通过增加元数据配置项,就可以在页面显示新加的支付方式,并且路由到处理新支付方式的函数中。