自己动手写Docker系列 -- 3.1构造实现run命令版本的容器
简介
通过对前面Linux的Namespace、Cgroups、Union File System的学习,对Docker实现的基础知识有了一点点了解,接下来就跟着作者开始编写
源码说明
同时放到了Gitee和Github上,都可进行获取
本章节对应的版本标签是:3.1,防止后面代码过多,不好查看,可切换到标签版本进行查看
思路整理
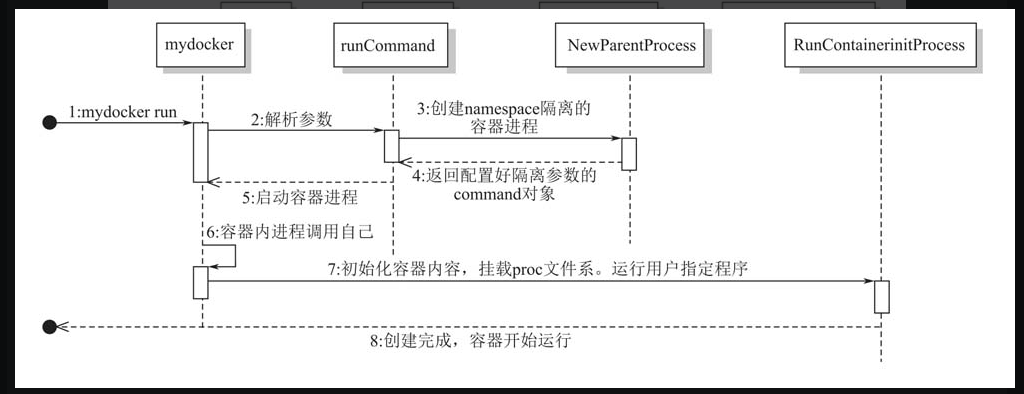
下图是《自己动手写docker》中这一章节的核心流程图,我们在跟着作者写的时候也是这个思路:
在学习的过程,根据自己的学习精简了下(是对于编写代码的精简)
1.输入运行命令:如 run -ti /bin/sh
2.解析参数:得到输入的参数
3.创建并启动namespace隔离的容器进程:使用Linux的Namespace隔离进程环境
4.容器内调用自己,挂载proc文件系统,完成运行
注:本章的代码运行一次后,再次运行会出现下面的错误提示:
{"level":"error","msg":"fork/exec /proc/self/exe: no such file or directory","time":"2022-03-05T08:51:07+08:00"}
此时,我们运行下面的命令后,再次运行就可以了,可能是挂载proc文件系统的影响
mount -t proc proc /proc
1.命令解析
在书中,使用了组件库进行实现,我们照抄即可:
文件: main.go
package main

import (
  "dockerDemo/mydocker/command"
  log "github.com/sirupsen/logrus"
  "github.com/urfave/cli"
  "os"
)

const usage = `mydocker is a simple container runtime implementation.
               The purpose of this projects is to learn how docker works and how to write a docker by ourselves
               Enjoy it, just for fun.`

func main() {
  app := cli.NewApp()
  app.Name = "mydocker"
  app.Usage = usage

  app.Commands = []cli.Command{
    command.InitCommand,
    command.RunCommand,
  }

  app.Before = func(context *cli.Context) error {
    log.SetFormatter(&log.JSONFormatter{})
    log.SetOutput(os.Stdout)
    return nil
  }

  if err := app.Run(os.Args); err != nil {
    log.Fatal(err)
  }
}
下面是实现目前的两个指令:InitCommand和RunCommand
文件:main_command.go
package command

import (
  "dockerDemo/mydocker/container"
  "dockerDemo/mydocker/run"
  "fmt"
  log "github.com/sirupsen/logrus"
  "github.com/urfave/cli"
)

var InitCommand = cli.Command{
  Name:  "init",
  Usage: "Init container process run user's process in container. Do not call it outside",
  /*
    1.获取传递过来的command参数
    2.执行容器初始化操作
  */
  Action: func(context *cli.Context) error {
    log.Infof("init come on")
    cmd := context.Args().Get(0)
    log.Infof("command %s", cmd)
    return container.RunContainerInitProcess(cmd, nil)
  },
}

var RunCommand = cli.Command{
  Name:  "run",
  Usage: `Create a container with namespace and cgroups limit mydocker run -ti [command]`,
  Flags: []cli.Flag{
    cli.BoolFlag{
      Name:  "ti",
      Usage: "enable tty",
    },
  },
  /*
    这里是run命令执行的真正函数
    1.判断参数是否包含command
    2.获取用户指定的command
    3.调用Run function 去准备启动容器
  */
  Action: func(context *cli.Context) error {
    if len(context.Args()) < 1 {
      return fmt.Errorf("missing container command")
    }
    cmd := context.Args().Get(0)
    tty := context.Bool("ti")
    run.Run(tty, cmd)
    return nil
  },
}
更开始的时候我以为命令是按照定义执行的,但在调试过程中,发现并不行,上面的命令就只是单纯的定义,并没有顺序可言
2.启动隔离进程
下面是启动隔离进程的具体实现:
文件:container_process.go
package container

import (
  "os"
  "os/exec"
  "syscall"
)

// NewParentProcess
/*
这里是父进程,也就是当前进程执行的内容
1.这里的 /proc/self/exe 调用中, /proc/self/ 指定是当前运行进程自己的环境,exec是自己调用自己,使用这种方式对创造出来的进程进行初始化
2.后面的args是参数,其中init是传递给本进程的第一个参数,在本例中,其实就是会去调用initCommand去初始化进程的一些环境和资源
3.下面的clone参数就是去fork出来一个新进程,并且使用了namespace隔离新创建的进程和外部环境
4.如果用户指定了-ti参数,就需要把当前进程的输入输出导入到标准输入输出上
*/
func NewParentProcess(tty bool, command string) *exec.Cmd {
  args := []string{"init", command}
  cmd := exec.Command("/proc/self/exe", args...)
  cmd.SysProcAttr = &syscall.SysProcAttr{
    Cloneflags: syscall.CLONE_NEWUTS | syscall.CLONE_NEWPID | syscall.CLONE_NEWNS | syscall.CLONE_NEWNET | syscall.CLONE_NEWIPC,
  }
  if tty {
    cmd.Stdin = os.Stdin
    cmd.Stdout = os.Stdout
    cmd.Stderr = os.Stderr
  }
  return cmd
}
注意上面的args,这里传的就是我们前面定义的InitCommand,这里去调用了我们的InitCommand命令
也就是命令:run -ti /bin/bash
首先解析得到run,运行我们定义的RunCommand,在RunCommand中,调用了我们的InitCommand去初始化进程,并且使用Namespace进行了进程隔离
最后返回给RunCommand调用的Run函数进行执行
文件:run.go
package run

import (
  "dockerDemo/mydocker/container"
  log "github.com/sirupsen/logrus"
  "os"
)

// Run
/*
这里的Start方法是真正开始前面创建好的 command 的调用,
它首先会clone出来一个namespace隔离的进程,然后在子进程中,调用/proc/self/exe,也就是自己调用自己
发送 init 参数,调用我们写的 init 方法,去初始化容器的一些资源
*/
func Run(tty bool, command string) {
  parent := container.NewParentProcess(tty, command)
  if err := parent.Start(); err != nil {
    log.Error(err)
    return
  }
  log.Infof("parent process run")
  _ = parent.Wait()
  os.Exit(-1)
}
3.初始启动进程替换
在上面完成后,我们的进程已经启动起来了,但还有个问题没有解决,就是容器内的第一个进程的问题
按照书中所说和查询相关资料和实验,如果不继续进行操作,那容器内的第一个进程(通过ps -a查看),并不是我们想要的/bin/sh,而是init,如下:
sh-4.2# ps -aux
USER       PID %CPU %MEM    VSZ   RSS TTY      STAT START   TIME COMMAND
root         1  0.0  0.0 704764  2068 pts/0    SNl  10:01   0:00 /proc/self/exe init /bin/sh
root         5  0.0  0.0 115544  1776 pts/0    SN   10:01   0:00 /bin/sh
root         7  0.0  0.0 157536  1900 pts/0    RN+  10:01   0:00 ps -aux
所以我们不能使用前面Namespace试验中的run命令了,而是需要使用exec命令,编写的 init.go 文件如下:
package container

import (
  log "github.com/sirupsen/logrus"
  "os"
  "os/exec"
  "syscall"
)

// RunContainerInitProcess
/*
之类的init函数是在容器内部执行的,也就是说,代码执行到这里后,容器所在的进程其实就已经创建出来了,这是本容器执行的第一个进程。
使用mount先去挂载proc文件系统,以便于后面通过ps命等系统命令去查看当前进程资源的情况
*/
func RunContainerInitProcess(command string, args []string) error {
  log.Infof("command %s, args %s", command, args)
  defaultMountFlags := syscall.MS_NOEXEC | syscall.MS_NOSUID | syscall.MS_NODEV
  err := syscall.Mount("proc", "/proc", "proc", uintptr(defaultMountFlags), "")
  if err != nil {
    return err
  }

  // 试验容器内的第一个进程非我们传入的运行命令时,可放开下面的注释,关闭后面的Exec
  //cmd := exec.Command(command)
  //cmd.Stdin = os.Stdin
  //cmd.Stdout = os.Stdout
  //cmd.Stderr = os.Stderr
  //if err := cmd.Run(); err != nil {
  //  log.Fatal(err)
  //}
  //os.Exit(-1)

  argv := []string{command}
  if err := syscall.Exec(command, argv, os.Environ()); err != nil {
    log.Errorf(err.Error())
  }
  return nil
}
4.编译,启动,运行
通过上面的代码就已经可以,我们使用命令编译后开始运行尝试,激动人心的时刻到了
注:Goland里面可以直接运行但不能交互输入,可惜了,如果有老哥有方法解决,可以在评论区告知,非常感谢
➜  dockerDemo git:(main) ✗ go build mydocker/main.go
warning: GOPATH set to GOROOT (/usr/local/go) has no effect
➜  dockerDemo git:(main) ✗ ./main run -ti /bin/sh
{"level":"info","msg":"parent process run","time":"2022-03-05T10:08:15+08:00"}
{"level":"info","msg":"init come on","time":"2022-03-05T10:08:15+08:00"}
{"level":"info","msg":"command /bin/sh","time":"2022-03-05T10:08:15+08:00"}
{"level":"info","msg":"command /bin/sh, args []","time":"2022-03-05T10:08:15+08:00"}
sh-4.2# ps -aux
USER       PID %CPU %MEM    VSZ   RSS TTY      STAT START   TIME COMMAND
root         1  0.0  0.0 115544  1776 pts/0    SN   10:08   0:00 /bin/sh
root         5  0.0  0.0 157536  1896 pts/0    RN+  10:08   0:00 ps -aux
非常的Nice,和我们使用docker的时候感觉一样
总结
在本节中,结合自己的亲自试验,借助《自己动手写Docker》的代码,我们成功搞起了一个非常基础的容器,感觉非常的好
可以看到,实现这个功能,但并没有编写大量的代码,就简简单单的5个的文件,函数也很短小
如果各位也对自己编写一个Docker感兴趣,一定要动手起来,编程毕竟是一门手艺,实操的过程中,每个人都会遇到不一样的问题,有不同的疑惑,也希望本文能对大家有所帮助