Java并发编程-线程基础
1. 线程的创建
首先我们来复习我们学习 时接触的线程创建,这也是面试的时候喜欢问的,有人说两种也有人说三种四种等等,其实我们不能去死记硬背,而应该深入理解其中的原理,当我们理解后就会发现所谓的创建线程实质都是一样的,在我们面试的过程中如果我们能从本质出发回答这样的问题,那么相信一定是个加分项!好了我们不多说了,开始今天的 之路
1.1 **继承 Thread 类创建线程 **
**
这是我们最常见的创建线程的方式,通过继承 类来重写 方法,
代码如下:
/**
 * 线程类
 * url: www.i-code.online
 * @author: anonyStar
 * @time: 2020/9/24 18:55
 */
public class ThreadDemo extends Thread {
    @Override
    public void run() {
        //线程执行内容
        while (true){
            try {
                TimeUnit.SECONDS.sleep(1);
            } catch (InterruptedException e) {
                e.printStackTrace();
            }
            System.out.println("ThredDemo 线程正在执行,线程名:"+ Thread.currentThread().getName());
        }
    }
}
测试方法:
    @Test
    public void thread01(){
        Thread thread = new ThreadDemo();
        thread.setName("线程-1 ");
        thread.start();

        while (true){
            System.out.println("这是main主线程:" + Thread.currentThread().getName());
            try {
                TimeUnit.SECONDS.sleep(1);
            } catch (InterruptedException e) {
                e.printStackTrace();
            }
        }

    }
结果:
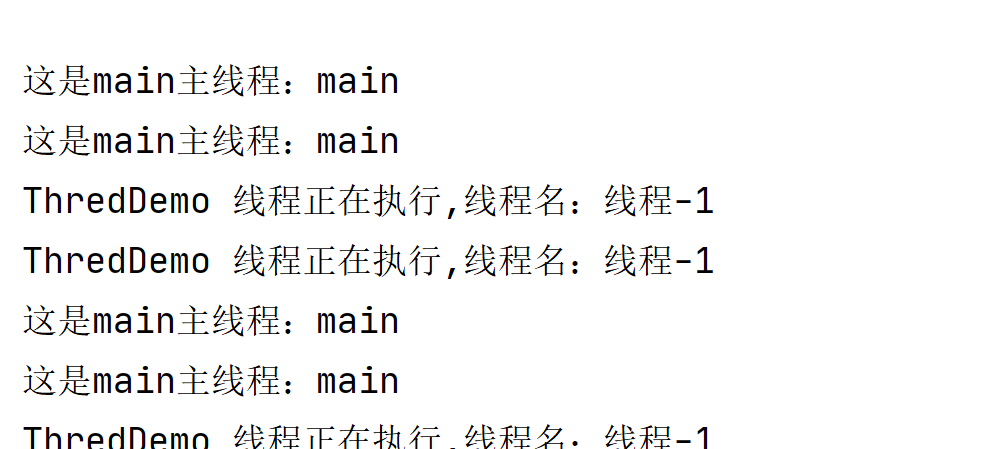
继承 的线程创建简单,启动时直接调用 方法,而不是直接调用 方法。直接调用 等于调用普通方法,并不是启动线程
1.2 **实现 Runnable 接口创建线程 **
**
上述方式我们是通过继承来实现的,那么在 中提供了 接口,我们可以直接实现该接口,实现其中的 方法,这种方式可扩展性更高
代码如下:
/**
 * url: www.i-code.online
 * @author: anonyStar
 * @time: 2020/9/24 18:55
 */
public class RunnableDemo implements Runnable {

    @Override
    public void run() {
        //线程执行内容
        while (true){
            try {
                TimeUnit.SECONDS.sleep(1);
            } catch (InterruptedException e) {
                e.printStackTrace();
            }
            System.out.println("RunnableDemo 线程正在执行,线程名:"+ Thread.currentThread().getName());
        }
    }
}
测试代码:
    @Test
    public void runnableTest(){
        // 本质还是 Thread ,这里直接 new Thread 类,传入 Runnable 实现类
        Thread thread = new Thread(new RunnableDemo(),"runnable子线程 - 1");
        //启动线程
        thread.start();

        while (true){
            System.out.println("这是main主线程:" + Thread.currentThread().getName());
            try {
                TimeUnit.SECONDS.sleep(1);
            } catch (InterruptedException e) {
                e.printStackTrace();
            }
        }
    }
运行结果:

1.3 实现 Callable 接口创建线程
这种方式是通过 实现 接口,实现其中的 方法来实现线程,但是这种线程创建的方式是依赖于 ** 包装器**来创建 , 具体来看代码
代码如下:
/**
 * url: www.i-code.online
 * @author: anonyStar
 * @time: 2020/9/24 18:55
 */
public class CallableDemo implements Callable {
    /**
     * Computes a result, or throws an exception if unable to do so.
     *
     * @return computed result
     * @throws Exception if unable to compute a result
     */
    @Override
    public String call() throws Exception {
        //线程执行内容
        try {
            TimeUnit.SECONDS.sleep(1);
        } catch (InterruptedException e) {
            e.printStackTrace();
        }
        System.out.println("CallableDemo 线程正在执行,线程名:"+ Thread.currentThread().getName());

        return "CallableDemo 执行结束。。。。";
    }
}
测试代码:
    @Test
    public void callable() throws ExecutionException, InterruptedException {
        //创建线程池
        ExecutorService service = Executors.newFixedThreadPool(1);
        //传入Callable实现同时启动线程
        Future submit = service.submit(new CallableDemo());
        //获取线程内容的返回值,便于后续逻辑
        System.out.println(submit.get());
        //关闭线程池
        service.shutdown();
        //主线程
        System.out.println("这是main主线程:" + Thread.currentThread().getName());
        try {
            TimeUnit.SECONDS.sleep(1);
        } catch (InterruptedException e) {
            e.printStackTrace();
        }
    }
结果:

有的时候,我们可能需要让一步执行的线程在执行完成以后,提供一个返回值给到当前的主线程,主线程需要依赖这个值进行后续的逻辑处理,那么这个时候,就需要用到带返回值的线程了
关于线程基础知识的如果有什么问题的可以在网上查找资料学习学习!这里不再阐述
2. 线程的生命周期
Java 线程既然能够创建,那么也势必会被销毁,所以线程是存在生命周期的,那么我们接下来从线程的生命周期开始去了解线程。
2.1 线程的状态
2.1.1 线程六状态认识
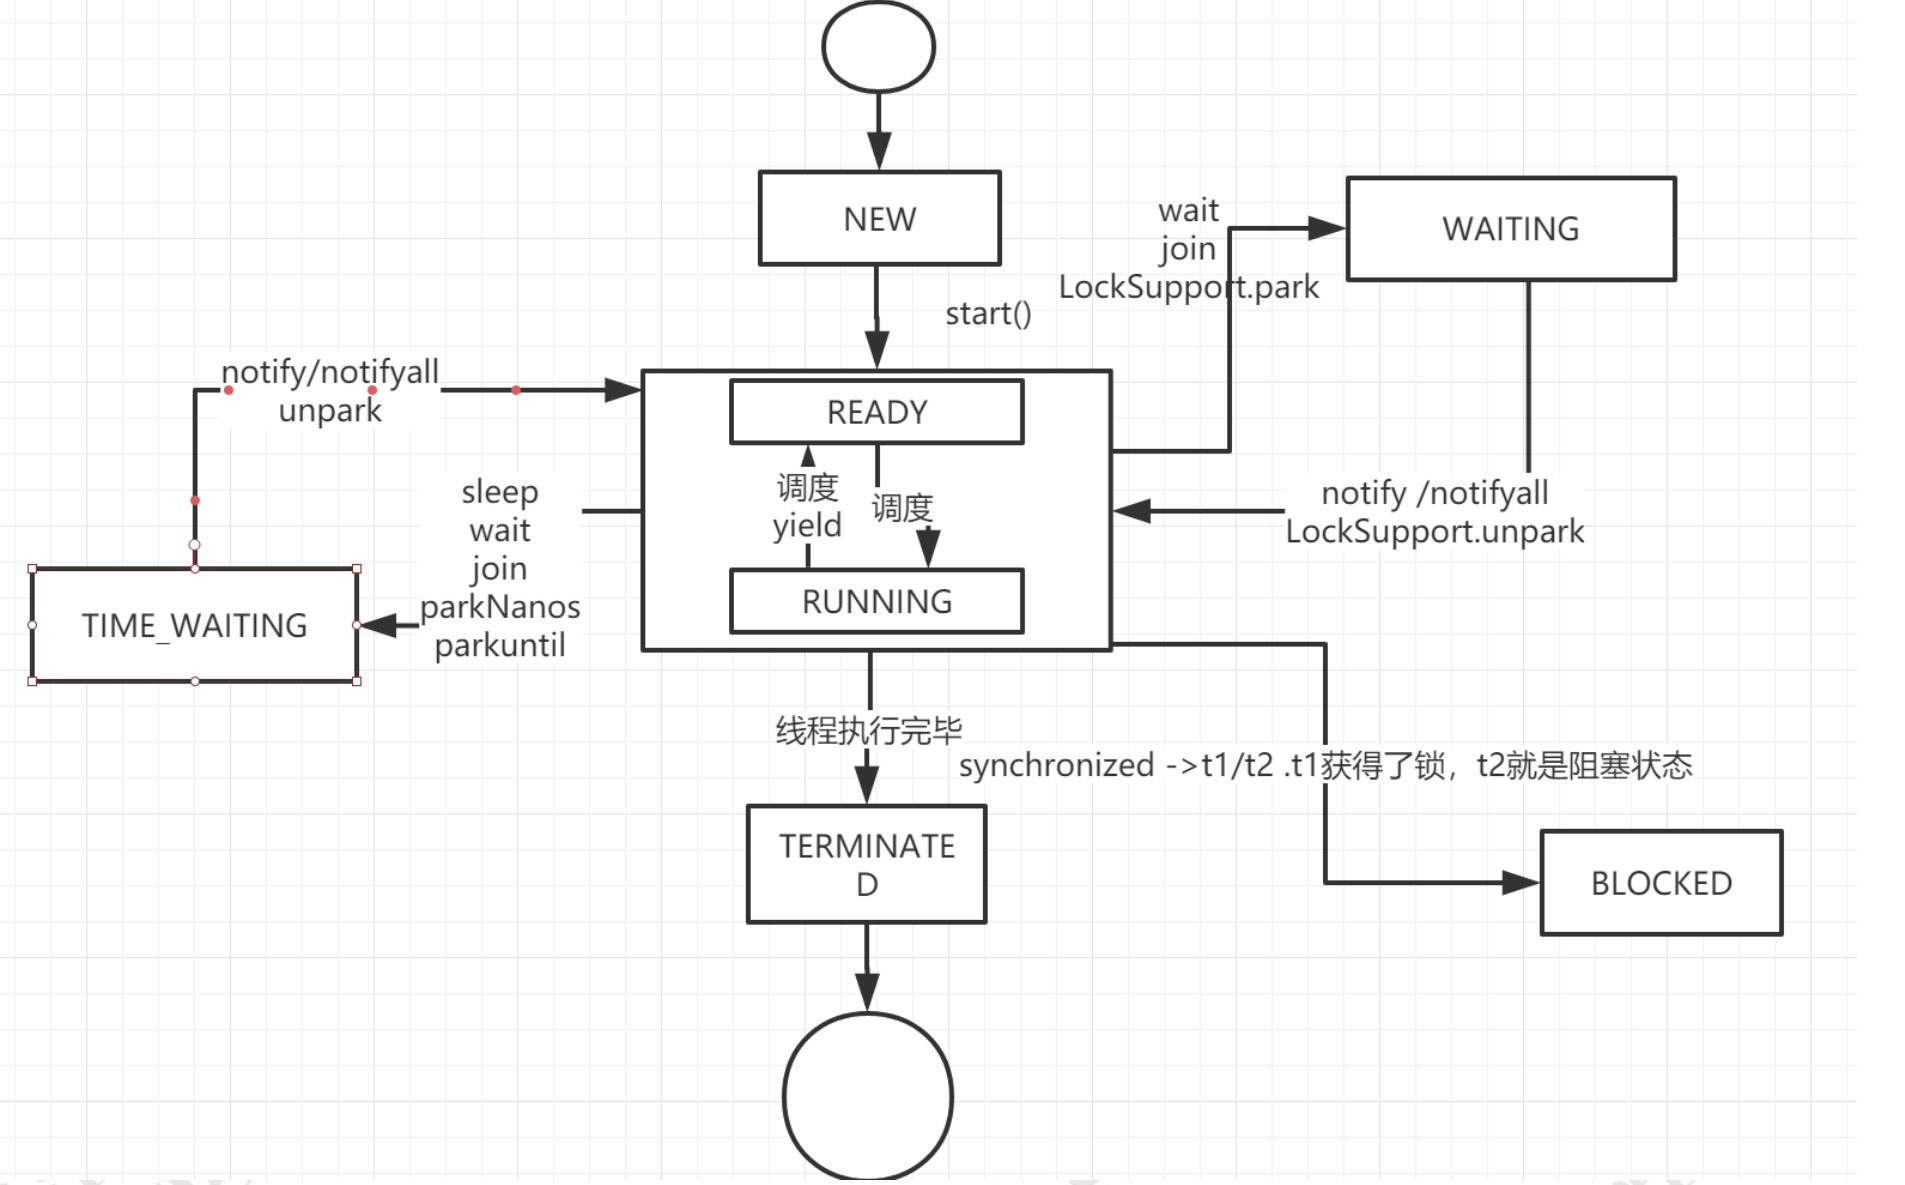
线程一共有 6 种状态(NEW、RUNNABLE、BLOCKED、WAITING、TIME_WAITING、TERMINATED)
NEW:初始状态,线程被构建,但是还没有调用 start 方法
RUNNABLED:运行状态,JAVA 线程把操作系统中的就绪和运行两种状态统一称为“运行中”
BLOCKED:阻塞状态,表示线程进入等待状态, 也就是线程因为某种原因放弃了 CPU 使用权,阻塞也分为几种情况
TIME_WAITING:超时等待状态,超时以后自动返回
TERMINATED:终止状态,表示当前线程执行完毕
2.1.2 代码实操演示
代码:
    public static void main(String[] args) {
        ////TIME_WAITING 通过 sleep wait(time) 来进入等待超时中
        new Thread(() -> {
           while (true){
               //线程执行内容
               try {
                   TimeUnit.SECONDS.sleep(100);
               } catch (InterruptedException e) {
                   e.printStackTrace();
               }
           }
        },"Time_Waiting").start();
        //WAITING, 线程在 ThreadStatus 类锁上通过 wait 进行等待
        new Thread(() -> {
            while (true){
                synchronized (ThreadStatus.class){
                    try {
                        ThreadStatus.class.wait();
                    } catch (InterruptedException e) {
                        e.printStackTrace();
                    }
                }
            }
        },"Thread_Waiting").start();

        //synchronized 获得锁,则另一个进入阻塞状态 blocked
        new Thread(() -> {
            while (true){
                synchronized(Object.class){
                    try {
                        TimeUnit.SECONDS.sleep(100);
                    } catch (InterruptedException e) {
                        e.printStackTrace();
                    }
                }
            }
        },"Object_blocked_1").start();
        new Thread(() -> {
            while (true){
                synchronized(Object.class){
                    try {
                        TimeUnit.SECONDS.sleep(100);
                    } catch (InterruptedException e) {
                        e.printStackTrace();
                    }
                }
            }
        },"Object_blocked_2").start();
    }
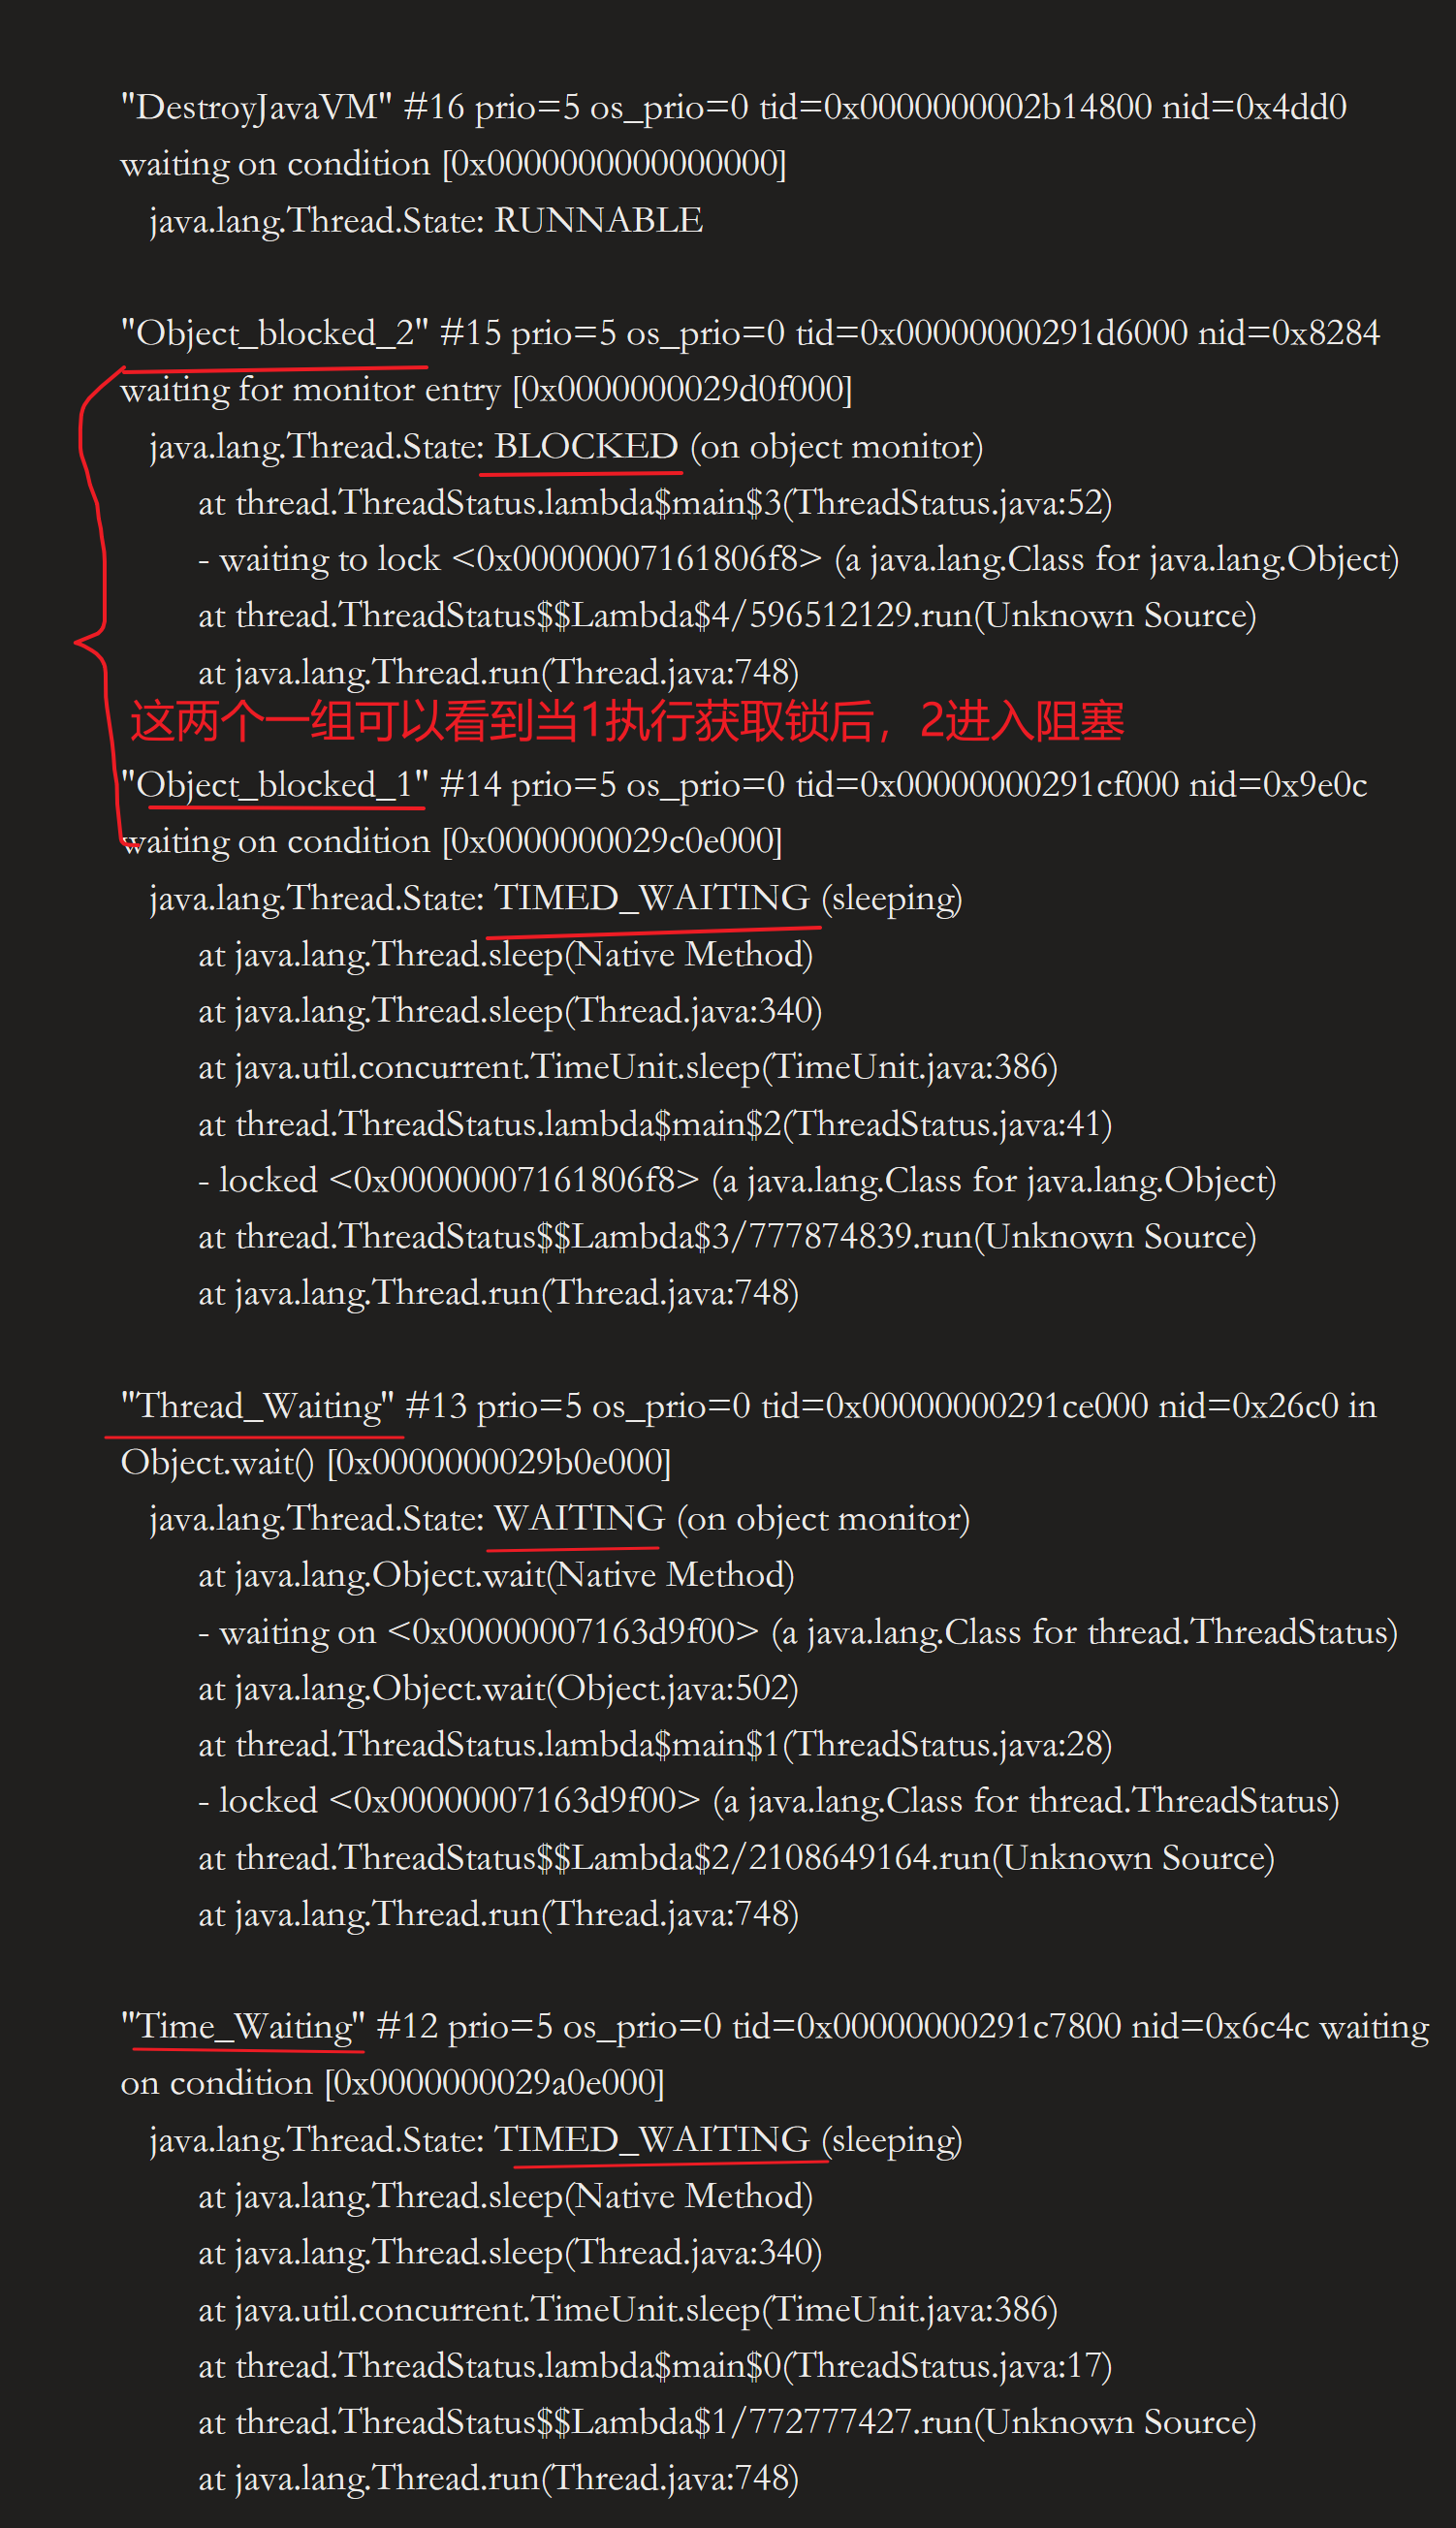
启动一个线程前,最好为这个线程设置线程名称,因为这样在使用 jstack 分析程序或者进行问题排查时,就会给开发人员提供一些提示
2.1.3 线程的状态堆栈
➢ 运行该示例,打开终端或者命令提示符,键入“ ”, ( 提供的一个显示当前所有 进程 的命令)
➢ 根据上一步骤获得的 ,继续输入 (jstack是 虚拟机自带的一种堆栈跟踪工具。jstack 用于打印出给定的 进程 或 或远程调试服务的 堆栈信息)
3. 线程的深入解析
3.1 线程的启动原理
前面我们通过一些案例演示了线程的启动,也就是调用 方法去启动一个线程,当 方法中的代码执行完毕以后,线程的生命周期也将终止。调用 方法的语义是当前线程告诉 ,启动调用 方法的线程。
我们开始学习线程时很大的疑惑就是 启动一个线程是使用 方法,而不是直接调用 方法,这里我们首先简单看一下 方法的定义,在 类中
    public synchronized void start() {
        /**
         * This method is not invoked for the main method thread or "system"
         * group threads created/set up by the VM. Any new functionality added
         * to this method in the future may have to also be added to the VM.
         *
         * A zero status value corresponds to state "NEW".
         */
        if (threadStatus != 0)
            throw new IllegalThreadStateException();

        /* Notify the group that this thread is about to be started
         * so that it can be added to the group's list of threads
         * and the group's unstarted count can be decremented. */
        group.add(this);

        boolean started = false;
        try {
            //线程调用的核心方法,这是一个本地方法,native
            start0();
            started = true;
        } finally {
            try {
                if (!started) {
                    group.threadStartFailed(this);
                }
            } catch (Throwable ignore) {
                /* do nothing. If start0 threw a Throwable then
                  it will be passed up the call stack */
            }
        }
    }

	//线程调用的 native 方法
    private native void start0();
这里我们能看到 方法中调用了 方法 来启动线程,这个方法是在 类中的静态代码块中注册的 , 这里直接调用了一个 方法
    /* Make sure registerNatives is the first thing  does. */
    private static native void registerNatives();
    static {
        registerNatives();
    }
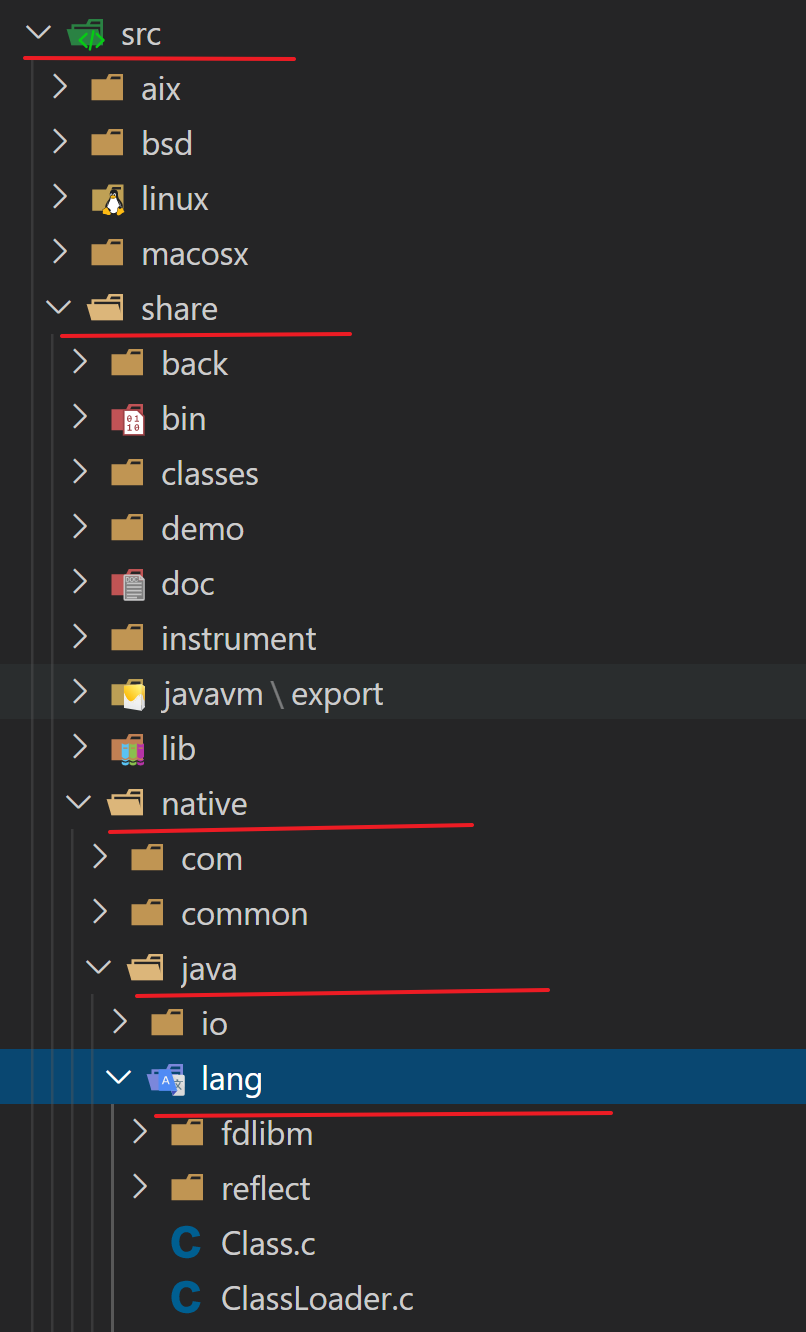
如上图,我们本地下载 工程,找到 文件

上面是 中所有代码,我们可以看到调用了 同时可以看到 集合中的映射,在调用本地方法 时,实际调用了 ,它自身是由 实现的,这里需要在 虚拟机源码中去查看,我们使用的都是 虚拟机,这个可以去 官网下载,上述介绍了不再多说
我们看到 的定义是在 源码中,而 的实现则在虚拟机 中,我们打开 源码,找到 文件,在 行,可以直接检索 , 方法代码如下:
JVM_ENTRY(void, JVM_StartThread(JNIEnv* env, jobject jthread))
  JVMWrapper("JVM_StartThread");
  JavaThread *native_thread = NULL;

  bool throw_illegal_thread_state = false;

  {
    MutexLocker mu(Threads_lock);

    if (java_lang_Thread::thread(JNIHandles::resolve_non_null(jthread)) != NULL) {
      throw_illegal_thread_state = true;
    } else {
      // We could also check the stillborn flag to see if this thread was already stopped, but
      // for historical reasons we let the thread detect that itself when it starts running
      // <1> :获取当前进程中线程的数量
      jlong size =
             java_lang_Thread::stackSize(JNIHandles::resolve_non_null(jthread));

      size_t sz = size > 0 ? (size_t) size : 0;

      // <2> :真正调用创建线程的方法
      native_thread = new JavaThread(&thread_entry, sz);
      if (native_thread->osthread() != NULL) {
        // Note: the current thread is not being used within "prepare".
        native_thread->prepare(jthread);
      }
    }
  }

  if (throw_illegal_thread_state) {
    THROW(vmSymbols::java_lang_IllegalThreadStateException());
  }

  assert(native_thread != NULL, "Starting null thread?");

  if (native_thread->osthread() == NULL) {
    // No one should hold a reference to the 'native_thread'.
    delete native_thread;
    if (JvmtiExport::should_post_resource_exhausted()) {
      JvmtiExport::post_resource_exhausted(
        JVMTI_RESOURCE_EXHAUSTED_OOM_ERROR | JVMTI_RESOURCE_EXHAUSTED_THREADS,
        "unable to create new native thread");
    }
    THROW_MSG(vmSymbols::java_lang_OutOfMemoryError(),
              "unable to create new native thread");
  }

  // <3> 启动线程
  Thread::start(native_thread);

JVM_END
是用来定义 函数的,在这个函数里面创建了一个真正和平台有关的本地线程, 上述标记 <2> 处
为了进一步线程创建,我们在进入 中查看一下具体实现过程,在 文件 行处定义了 的方法
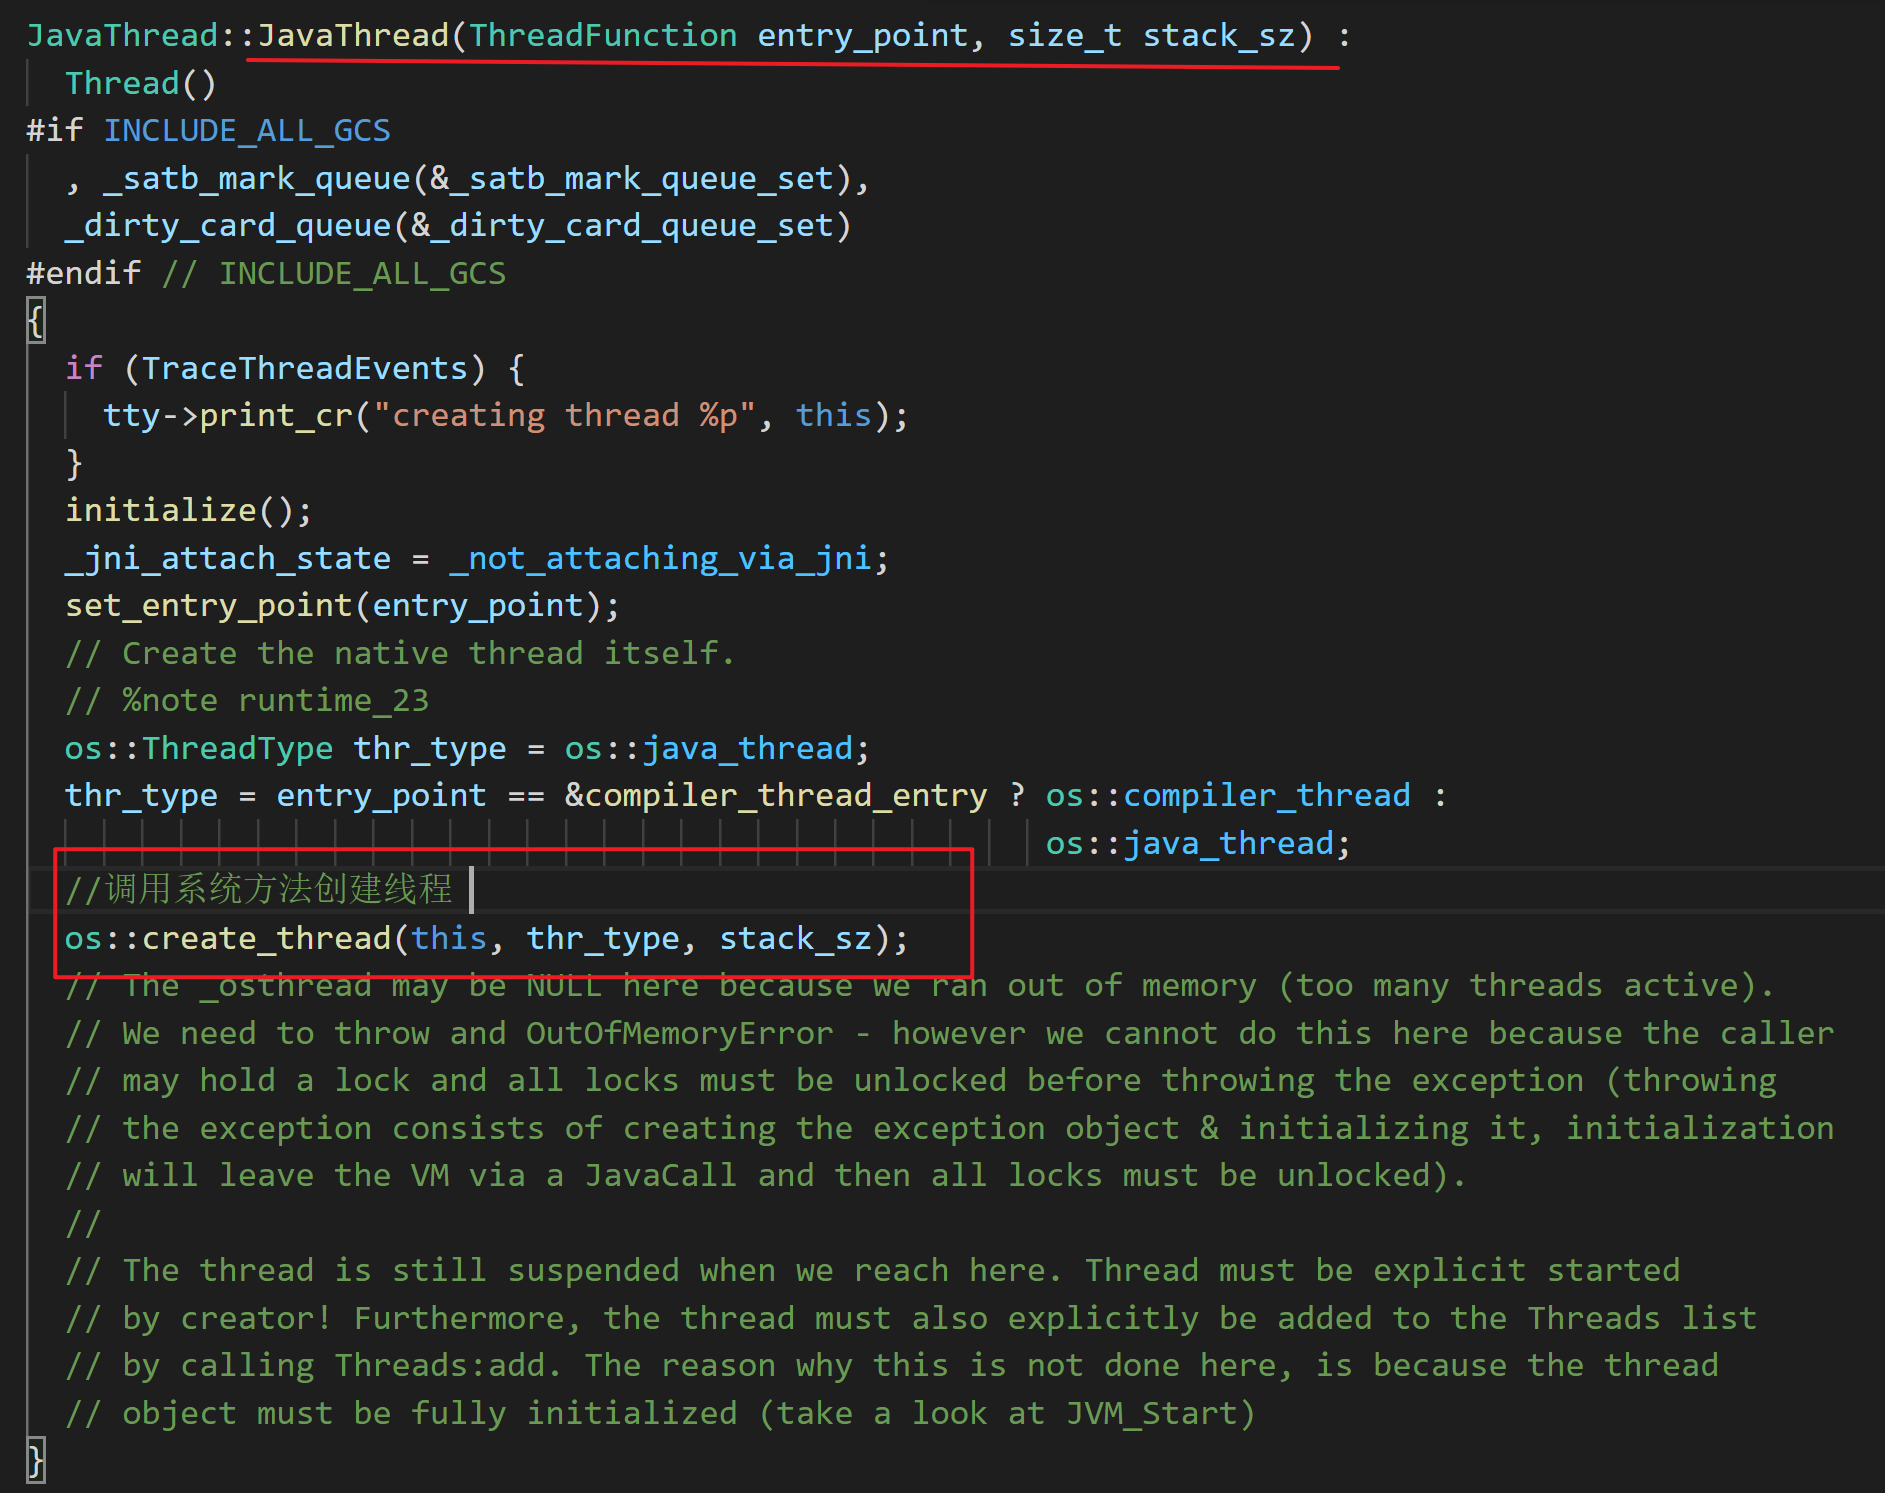
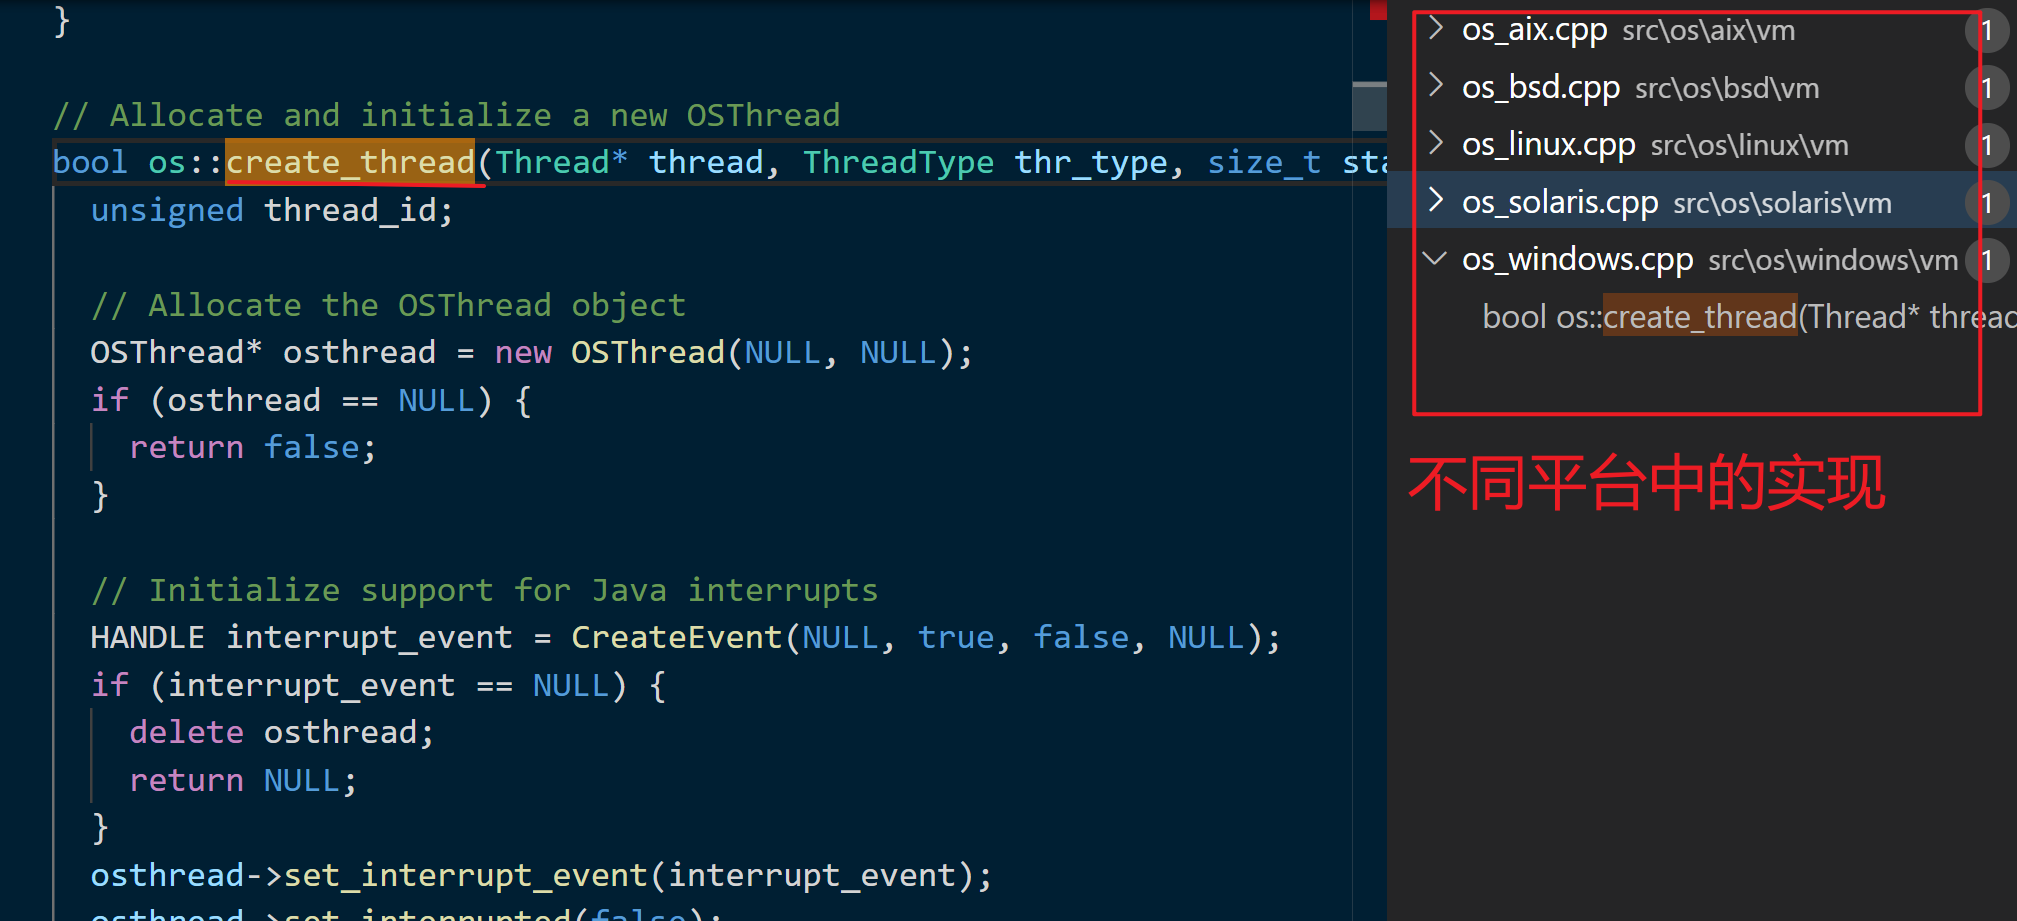
对于上述代码我们可以看到最终调用了 来实现线程的创建,对于这个方法不同平台有不同的实现,这里不再赘述,
上面都是创建过程,之后再调用 在 JVM_StartThread 中调用,该方法的实现在 中
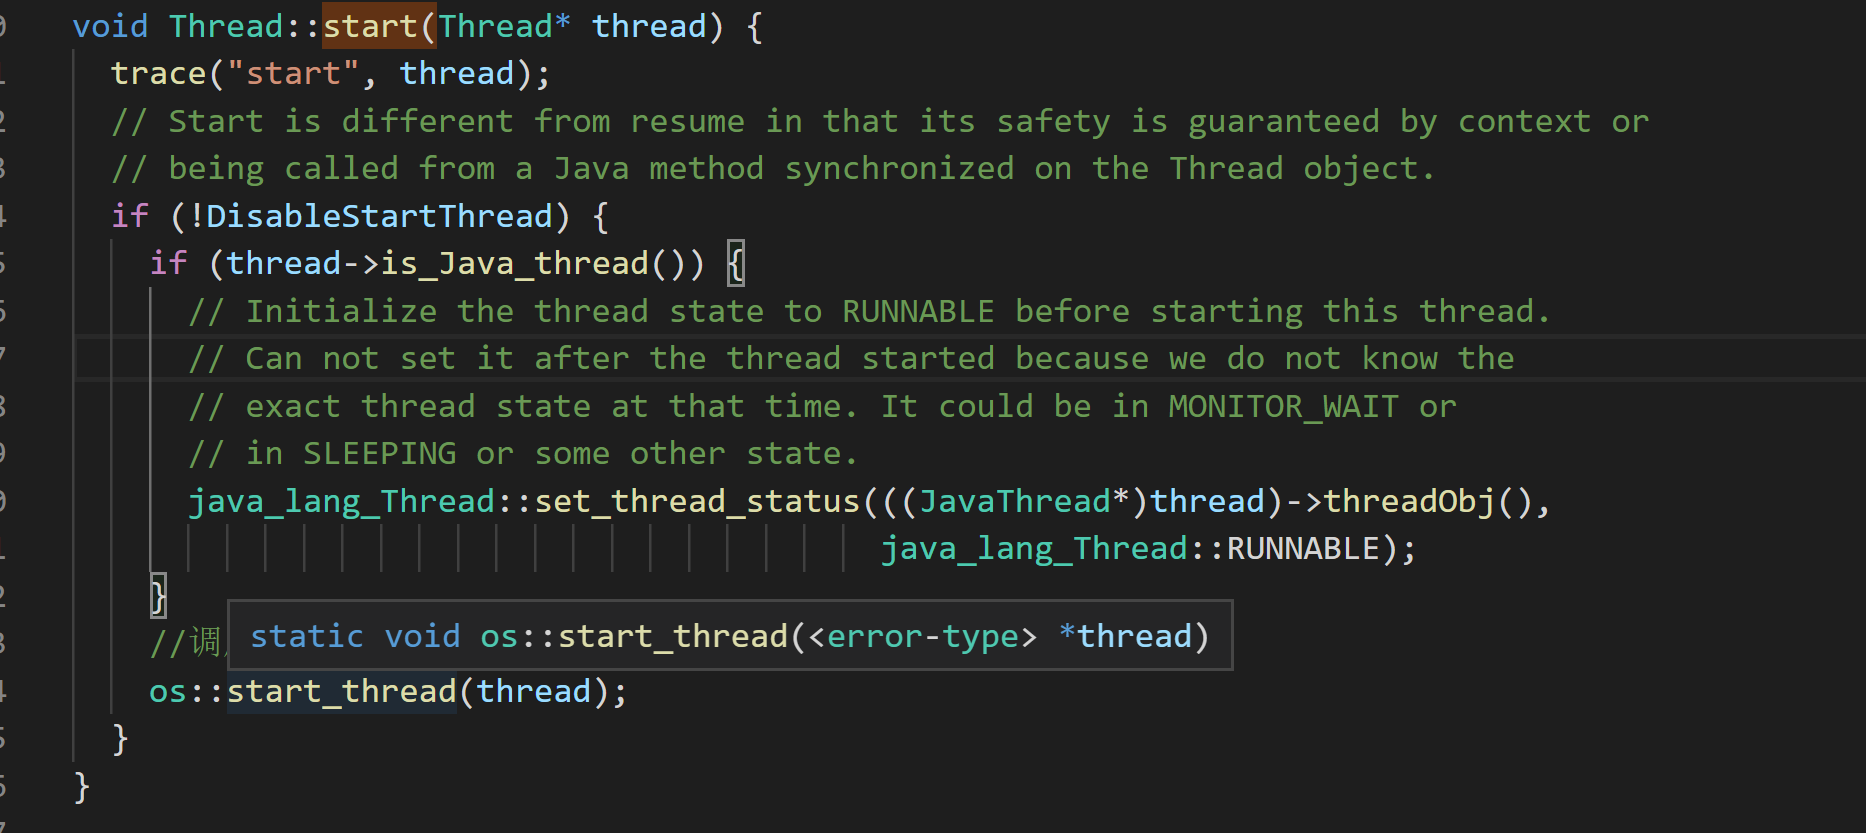
方法中有一个函数调用: ,调用平台启动线程的方法,最终会调用 文件中的 方法
3.2 线程的终止
3.2.1 通过标记位来终止线程
正常我们线程内的东西都是循环执行的,那么我们实际需求中肯定也存在想在其他线程来停止当前线程的需要,这是后我们可以通过标记位来实现,所谓的标记为其实就是 修饰的变量,着由它的可见性特性决定的,如下代码就是依据 来实现标记位停止线程
    //定义标记为 使用 volatile 修饰
    private static volatile  boolean mark = false;

    @Test
    public void markTest(){
        new Thread(() -> {
            //判断标记位来确定是否继续进行
            while (!mark){
                try {
                    TimeUnit.SECONDS.sleep(1);
                } catch (InterruptedException e) {
                    e.printStackTrace();
                }
                System.out.println("线程执行内容中...");
            }
        }).start();

        System.out.println("这是主线程走起...");
        try {
            TimeUnit.SECONDS.sleep(10);
        } catch (InterruptedException e) {
            e.printStackTrace();
        }
        //10秒后将标记为设置 true 对线程可见。用volatile 修饰
        mark = true;
        System.out.println("标记位修改为:"+mark);
    }
3.2.2 通过 stop 来终止线程
我们通过查看 类或者 可以看到关于线程的停止提供了 , , 等方法,但是我们可以看到这些方法都被标记了 也就是过时的,
虽然这几个方法都可以用来停止一个正在运行的线程,但是这些方法都是不安全的,都已经被抛弃使用,所以在我们开发中我们要避免使用这些方法,关于这些方法为什么被抛弃以及导致的问题 文档中较为详细的描述
在其中有这样的描述:
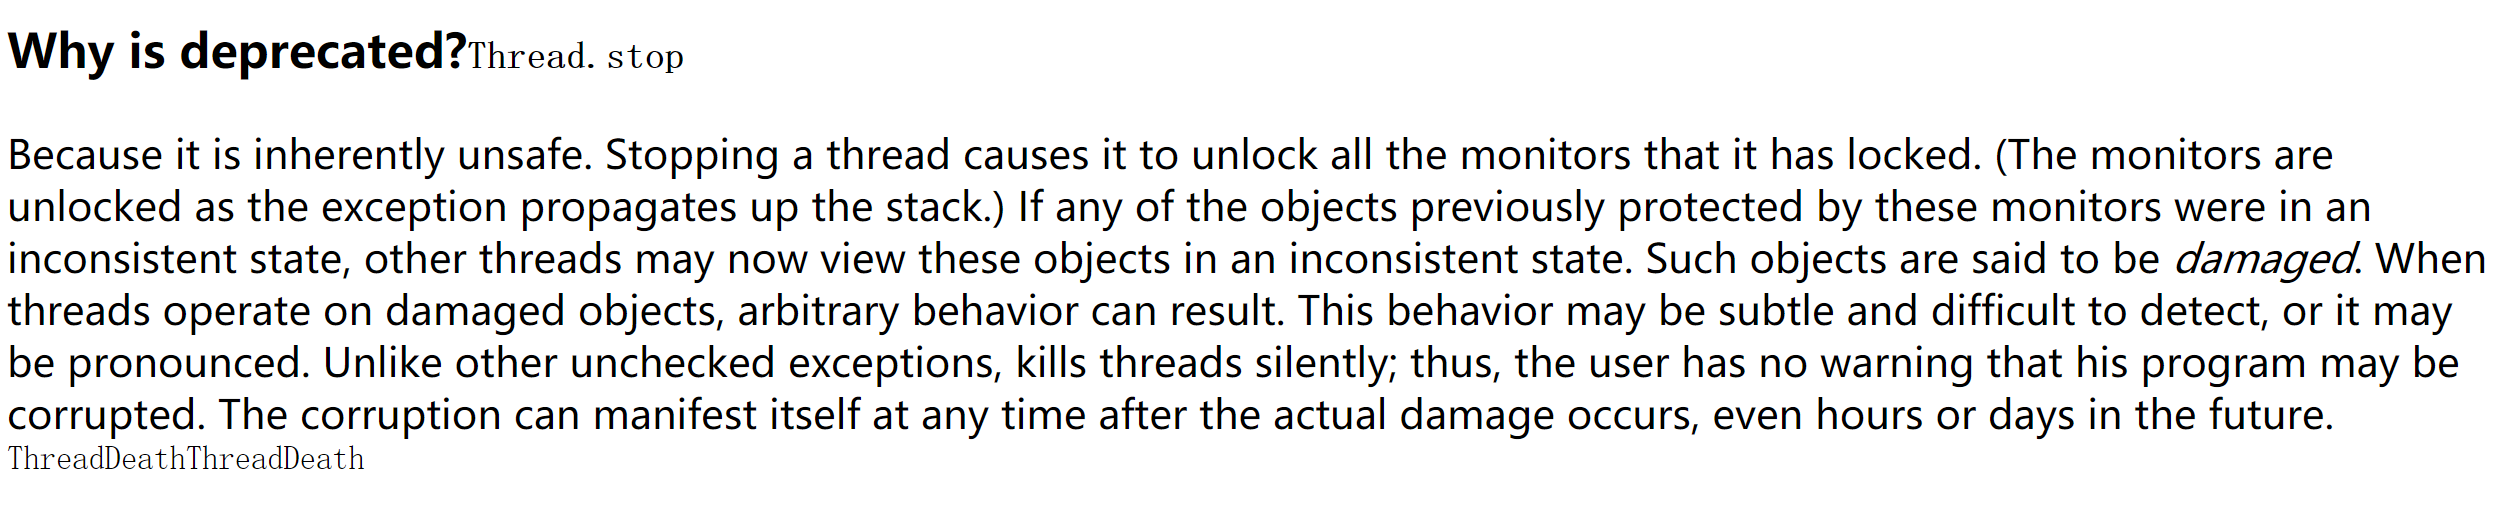
总的来说就是:
3.2.3 通过 interrupt 来终止线程
通过上面阐述,我们知道了使用 方法是不推荐的,那么我们用什么来更好的停止线程,这里就引出了 方法,我们通过调用 来中断线程
当其他线程通过调用当前线程的 方法,表示向当前线程打个招呼,告诉他可以中断线程的执行了,至于什么时候中断,取决于当前线程自己
线程通过检查自身是否被中断来进行相应,可以通过 来判断是否被中断。
我们来看下面代码:
    public static void main(String[] args) {
        //创建 interrupt-1 线程

        Thread thread = new Thread(() -> {
            while (true) {
                //判断当前线程是否中断,
                if (Thread.currentThread().isInterrupted()) {
                    System.out.println("线程1 接收到中断信息,中断线程...");
                    break;
                }
                System.out.println(Thread.currentThread().getName() + "线程正在执行...");

            }
        }, "interrupt-1");
        //启动线程 1
        thread.start();

        //创建 interrupt-2 线程
        new Thread(() -> {
            int i = 0;
            while (i <20){
                System.out.println(Thread.currentThread().getName()+"线程正在执行...");
                if (i == 8){
                    System.out.println("设置线程中断....");
                    //通知线程1 设置中断通知
                    thread.interrupt();
                }
                i ++;
                try {
                    TimeUnit.MILLISECONDS.sleep(1);
                } catch (InterruptedException e) {
                    e.printStackTrace();
                }
            }
        },"interrupt-2").start();
    }

上述代码中我们可以看到,我们创建了 线程,其中用 来判断当前线程是否处于中断状态,如果处于中断状态那么就自然结束线程,这里的结束的具体操作由我们开发者来决定。再创建 线程,代码相对简单不阐述,当执行到某时刻时将线程 设置为中断状态,也就是通知 线程。
线程中断标记复位 :
在上述 代码中如果加入 方法,那么我们会发现程序报出 错误,同时,线程 也不会停止,这里就是因为中断标记被复位了 ,下面我们来介绍一下关于中断标记复位相关的内容
在线程类中提供了** ** 的静态方法,用来对线程中断标识的复位,在上面的代码中,我们可以做一个小改动,对 线程创建的代码修改如下:
        //创建 interrupt-1 线程

        Thread thread = new Thread(() -> {
            while (true) {
                //判断当前线程是否中断,
                if (Thread.currentThread().isInterrupted()) {
                    System.out.println("线程1 接收到中断信息,中断线程...中断标记:" + Thread.currentThread().isInterrupted());
                    Thread.interrupted(); // //对线程进行复位,由 true 变成 false
                    System.out.println("经过 Thread.interrupted() 复位后,中断标记:" + Thread.currentThread().isInterrupted());
                    //再次判断是否中断,如果是则退出线程
                    if (Thread.currentThread().isInterrupted()) {
                        break;
                    }
                }
                System.out.println(Thread.currentThread().getName() + "线程正在执行...");

            }
        }, "interrupt-1");
上述代码中 我们可以看到,判断当前线程是否处于中断标记为 , 如果有其他程序通知则为 此时进入 语句中,对其进行复位操作,之后再次判断。执行代码后我们发现 线程不会终止,而会一直执行
进行线程中断标记复位是一种主动的操作行为,其实还有一种被动的复位场景,那就是上面说的当程序出现 异常时,则会将当前线程的中断标记状态复位,在抛出异常前, 会将中断标记 设置为
在程序中,线程中断复位的存在实际就是当前线程对外界中断通知信号的一种响应,但是具体响应的内容有当前线程决定,线程不会立马停止,具体是否停止等都是由当前线程自己来决定,也就是开发者。
3.3 线程终止 interrupt 的原理
首先我们先来看一下在 中关于 的定义:
    public void interrupt() {
        if (this != Thread.currentThread()) {
            checkAccess();  //校验是否有权限来修改当前线程

            // thread may be blocked in an I/O operation
            synchronized (blockerLock) {
                Interruptible b = blocker;
                if (b != null) {
                    // <1> 调用 native 方法
                    interrupt0();  // set interrupt status
                    b.interrupt(this);
                    return;
                }
            }
        }

        // set interrupt status
        interrupt0();
    }
上面代码中我们可以看到,在 方法中最终调用了 方法 ,这里相关在线程启动时说过,不再赘述,我们直接找到 中 文件中 方法
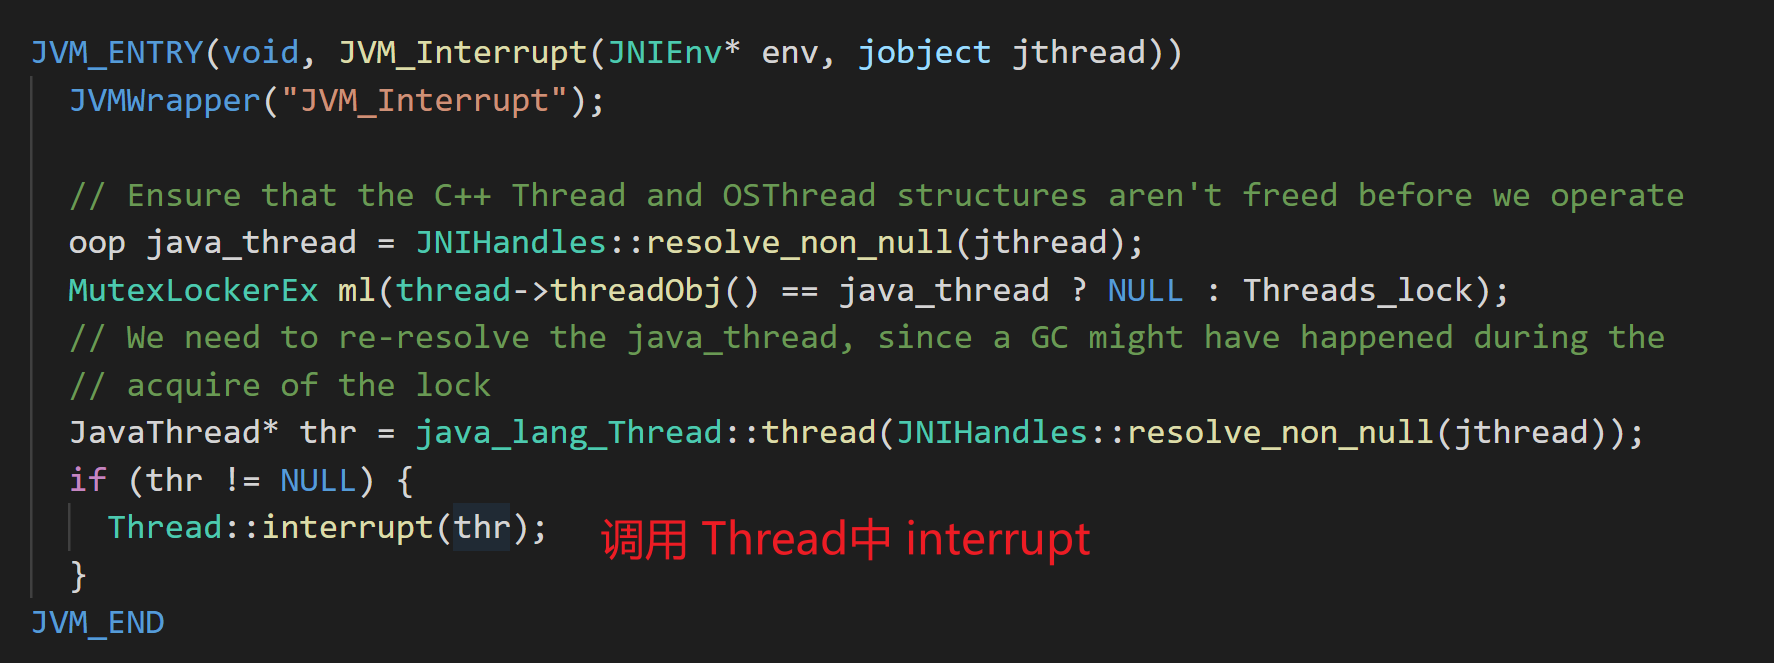
方法比较简单,其中我们可以看到直接调用了 的 方法,我们进入其中查看
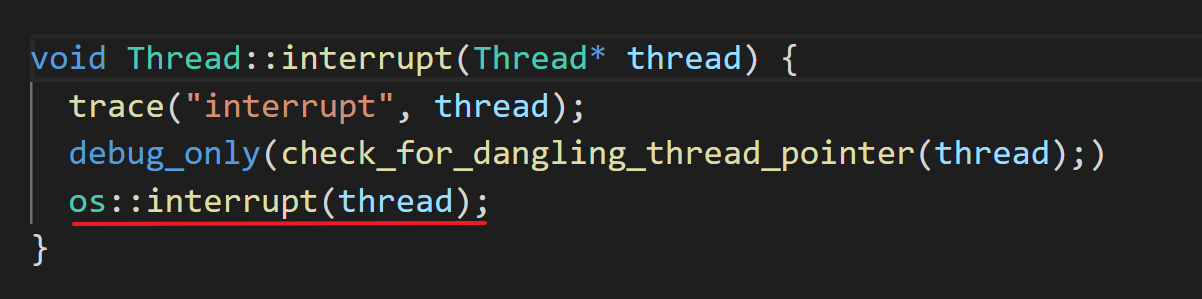
我们可以看到这里直接调用了 这里是调用了平台的方法,对于不同的平台实现是不同的,我们这里如下所示,选择 下的实现 中,
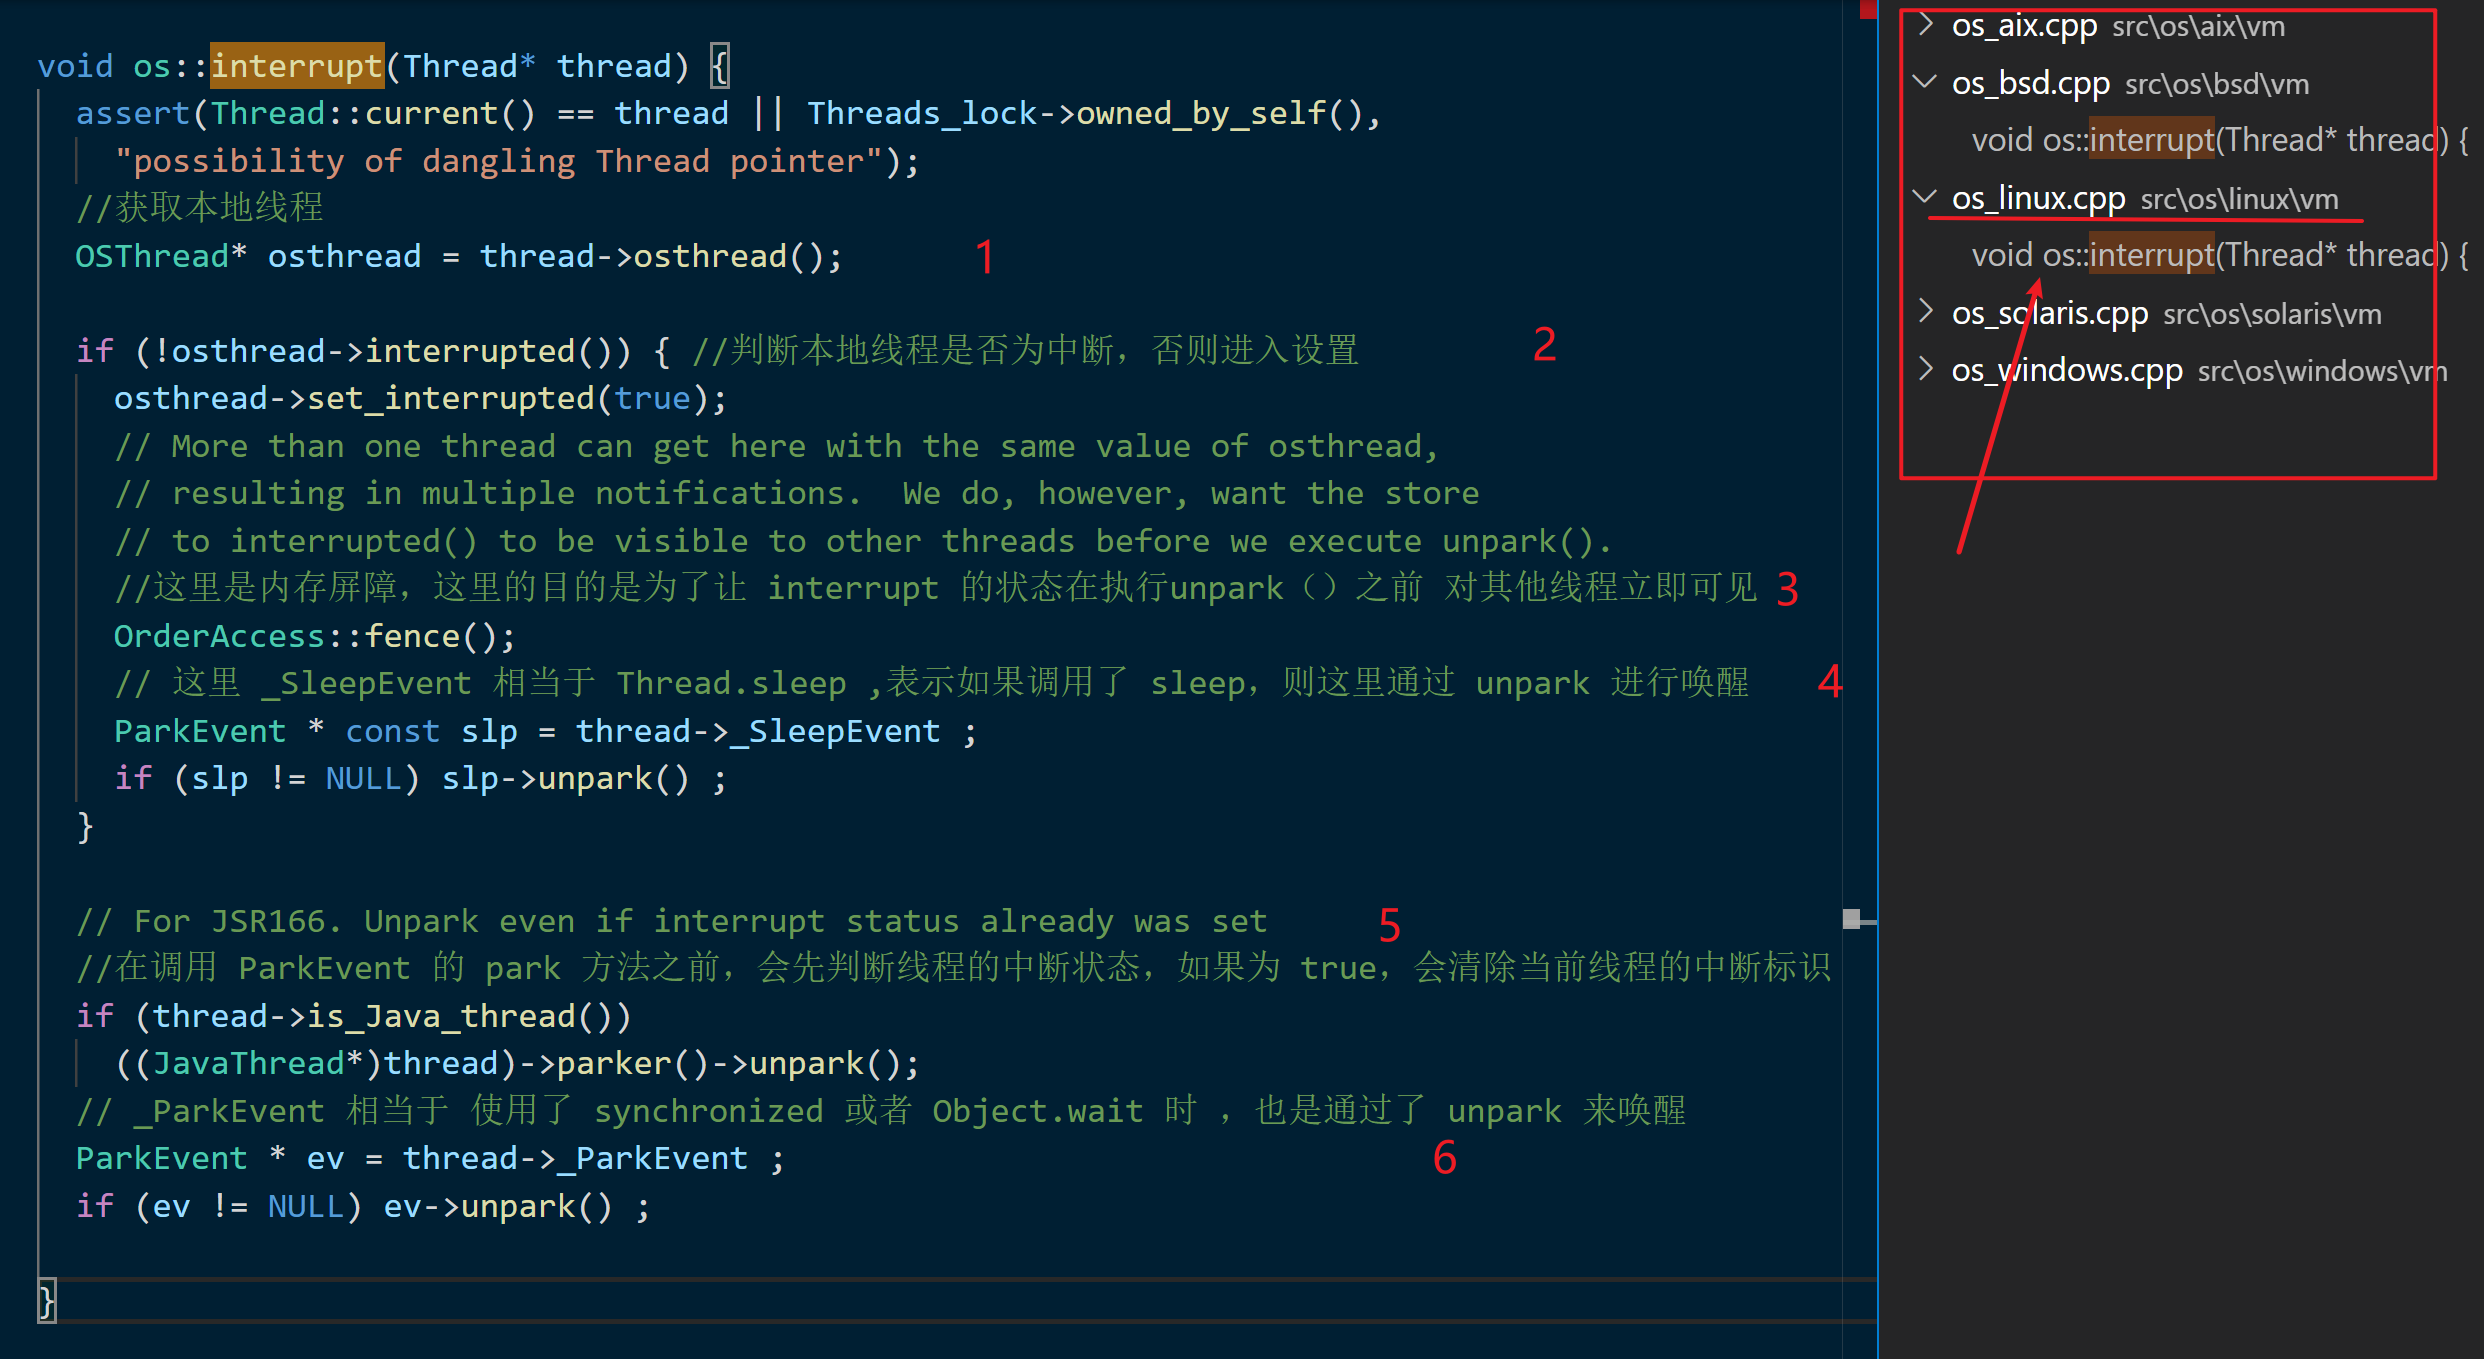
在上面代码中我们可以看到,在 处拿到 ,之后判断如果 为 则在 处调用 的 方法进行设置,我们可以进入看一下其实现,发现在 中定义了一个成员变量 而 方法其实就是将 设置为 ,之后再通过 的 方法来唤醒线程。具体的过程在上面进行的简单的注释介绍,